Umbraco Heartcore and Next.js
Heads Up!
This article is several years old now, and much has happened since then, so please keep that in mind while reading it.
TL;DR
Already know what Umbraco Heartcore and Next.js are and when it makes sense to use them? Awesome! Then feel free to skip down to the fun part where we get our hands dirty 💅
Umbraco Heartcore
What is a headless CMS?
I am assuming that Umbraco as a CMS is already familiar ground to you and that only the “headless” part is new to you. So a headless CMS is really the same as a classic CMS, only here we just have the backoffice to manage our content. There's no frontend, no views or templates to render the content. The content is completely decoupled from the presentation layer. Instead the CMS exposes the content via an API (actually two API's in the case of Umbraco Heartcore) and through that API one or more clients (website, mobile application, smart watch application etc) can fetch the content and render it to the end users.
I like the old Umbraco! Why do I need this here new thingy?

Well the classic Umbraco CMS is great for creating websites. That's how most of us came to know and love Umbraco in the first place. A company needed a website and voila Umbraco was the perfect fit!
These days (God that sounds like something grown ups say!) there are plenty of places where your content can live besides a website, though. Sure your company probably does need a new website, but it also has a mobile application on the drawing table. That mobile application needs content that is specifically tailored to the small device. It can't just reuse the content from the website.
Additionally since it's 2020 that new company website should definitely be built with one of those fancy JavaScript frameworks. It needs to have that SPA "feel" and everything should load crazy fast! And because we still want Google to be able to search through our website, we will prebuild our content as static HTML files that are indexable by the search engines.
So our company needs a CMS where we can manage the content for both clients (the website and the mobile application). I won't lie, we could totally handle that with the classic Umbraco CMS! However the clients also need a flexible way to fetch that data and they need to know when to fetch it. That part isn't as easy for the good ol' Umbraco CMS, but for Umbraco Heartcore it's childs play!
Next.js
What is Next.js
![]() Next.js is a JavaScript framework built on top of React. If you are thinking “wait a minute, isn’t React a framework?” then you wouldn’t be the first. React actually "only" handles the UI part, so it is really a UI library. With React we can create kickass single page applications (SPA), but we will almost always need to install a bunch of additional packages to get a fully fledged application.
Next.js is a JavaScript framework built on top of React. If you are thinking “wait a minute, isn’t React a framework?” then you wouldn’t be the first. React actually "only" handles the UI part, so it is really a UI library. With React we can create kickass single page applications (SPA), but we will almost always need to install a bunch of additional packages to get a fully fledged application.
Next.js though comes with a bunch of extra features compared to React. Some of the most important features are; static site generation (SSG), server side render (SSR) and routing. Next.js does a lot more and I encourage you to check out the Next.js website. In this blog post we will be using static site generation to generate HTML files with content from Umbraco and we will use routing to navigate between those HTML files. Pretty sweet right?
"But Bjørn, isn't Next.js just another JavaScript fad? Who's even using it?" I hear you! Next.js has been around since 2016 and there are some big players like Hulu, Marvel, Tickmaster and plenty of others using it. If you do have a use case where you need to generate a static frontend, then Next.js is definitely worth considering.
Did you say HTML files?
At first it might seem like we are taking a step back to the 90’s where a website often consisted of HTML files. Back then it wasn't unusual to have to manually enter content into a file and then manually upload the file via FTP to a server. If anything failed your only option was to email Sir Tim and ask for help! Luckily that’s not the case here! We will configure Next.js to fetch content from the Umbraco Heartcore API during the build process and then generate our static HTML files based on the content. Using the new webhooks feature in Umbraco Heartcore, we will trigger Next.js build process whenever content is published or unpublished in our Umbraco project. Nothing manual about that!
Alirght, enough talk! Let’s get our hands dirty!
Corporate website 👔 or record label website? 🤘
In my example, I was originally going to build a corporate website because I thought most readers would be able to identify with a project like that. You know, one of those websites where we have a “mission statement” page and smiling people in suits shaking hands. Then it occurred to me that nobody is dictating what I should build, so instead I decided on building a website for a fictitious record label. So much better!
Creating a Umbraco Heartcore project
We will start out with the easy part; setting up and configuring Heartcore. You will be pleased to hear that you can get a 14 day free trial of Heartcore either at the Umbraco website or you can start a new trial project from within the Umbraco Cloud portal. Once done you can login into the Umbraco backoffice as you would with a classic Umbraco Cloud project.
Since we’re building a website for a record label (oh yeah!), let’s head on over to the Settings section and add two document types: Artists and Artist
Artists will serve as our homepage where we list out the artist signed to our record label. From here you can click onto an Artist page which will present us with more information about the artist. That’s it for our website!
Artists document type
- properties: title (TextString), text (TextArea)
- permissions: allow at root, allow Artist as child
Artist document type
- properties: biography (RTE), image (Media Picker) and imageCredits (TextString)
- permissions: none
Remember there are no views, CSS or JavaScript in our Headless CMS. It’s purely about creating and managing content.
Next we head on over to the Content section and create the Artists page at root level and then we create a few artists under it. Remember we need an image to go along with each artist.
Note: You may have noticed that the preview button is not available while creating content. Preview definitely can be enabled, but we already have enough on our plate for one blog post.
Installing Next.js
To install Next.js you will need NPX or Yarn installed on your computer. You can download Node (which includes NPX) from nodejs.org.
Afterwards open your terminal/command and navigate to where you want to install the Next.js application. Proceed to running either npx create-next-app or yarn create next-app depending on which package manager you’re using and follow the instructions. create-next-app is a CLI that helps you get going with Next.js fast. It installs dependencies, adds scripts to our package.json file and creates a few example pages for us.
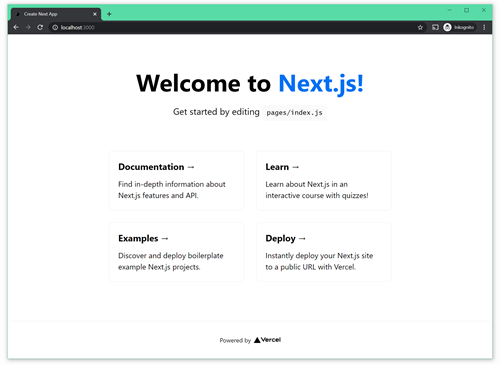
Once create-next-app is done doing it’s thing, use your terminal to step into the just created application directory and run npx next dev (or yarn dev if you used Yarn to install Next.js). If everything went the way it was supposed to, you should now have Next.js up and running on http://localhost:3000 🙌
Inspecting the Next.js files
So far, so good! Now open your Next.js application in your favorite editor and have a look at what files our Next.js application consists of:
.next/
The files in this directory are used by Next.js We shouldn’t need to modify them directly, since they will be overwritten later on. When running Next.js in development mode or when building out Next.js for production the static files are written to the .next folder.
pages/
The files in the pages/ folder are the public pages our Next.js application consists of. I explain pages in details in the next section file based routing.
public/
You can place fonts, images and other static files in here.
styles/
Contains stylesheets that are imported by the pages components.
...and
There are few other files that are not important to us right now.
File base routing
The files (or pages) in the pages folder are React components. On top of that each page has a route associated with it. File based routing! That means that you can add a Next.js page called pages/highfive.js and access it at http://localhost:3001/highfive Pretty neat right? You can also create subdirectories under pages/ and the routing will work with those directories as well. If you add an index.js file to a page directory, then that file will serve as the default route for the current directory.
Do note that since all the pages in the pages/ folder are accessible via routing, it is not where you want to keep your reusable React components. If you have a navigation or footer component you could instead place them in a components/ folder in the root directory.
You can think of the components in the pages/ folder as being similar to views in classic Umbraco and other reusable components in your Next.js applications are similar to partial views.
The pages folder also contains an api/ folder. I won’t be covering how to use it, since we will be relying on the Umbraco Heartcore API for our content needs.
Adding pages
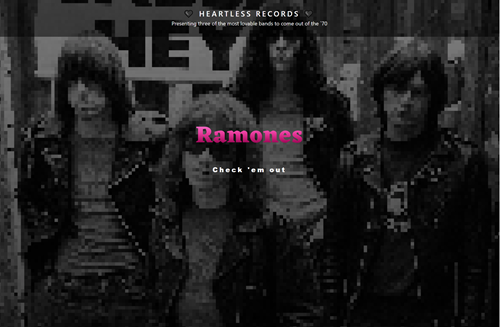
Ok so remember how earlier I was ranting about building a record label website? Let’s get started! Open pages/index.js delete everything within the file and copy and paste the code from here. Don’t worry too much about the code you just added. I will explain it shortly. Next replace styles/globals.css with this file and styles/Home.module.css with this file. Aftering saving the files, switch over to http://localhost:3000/
You will notice that if you click any of the artists you end up with a 404 error. Let’s fix that! In the pages/ folder create a file called artist.js and paste in the code from this file. Next create a file called Artist.module.css in the styles/ directory and drop in the code from this file. Now when we switch back over to http://localhost:3000/ we should be able to click the artists and have the content from pages/artist.js show up.
Step back into the pages/artist.js page and locate the getStaticProps function. The data or props returned by getStaticProps is what is available to the page component at build time and it is where the artist page get’s its content from. Right now all the artists share the same hard coded content. We will change that soon 😉
Generating HTML files from our pages
I think this is a good time to see what Next.js actually does with the page components when we build out the application for production. Switch over to the terminal and run the command npx next build or yarn build. After the build has finished, step into the .next/server/pages/ folder and open the artist.html file in your text editor. You will recognize the pages/artist.js component now rendered as HTML and you will see that the data returned by getStaticProps in pages/artist.js has been merged into the file. The getStaticProps function itself has been stripped out since it is only used during build time.
Data fetching
As we saw with the artist page, right now our content is hard coded directly into getStaticProps. Time to change that! In the root of our project create a new folder called lib/, inside that folder create a file called api.js and paste in this code. As you can see we have a couple of functions in here to help us fetch our data from Umbraco Heartcore. You’re a smart person so you can tell what they are doing from the function names.
If you want to learn more about Heartcore’s Content Delivery API you can find the documentation here. You can also play around with the API from inside the Umbraco Heartcore backoffice. In the backoffice go to Settings expand the Headless tree and click on API browser.
Before we can fetch data via the API we need to tell what Umbraco project it should fetch data from. You find that information by logging into Umbraco Cloud portal, choosing your Heartcore project and locating “Heartcore Project Alias”. Copy the alias and step back into lib/api.js and add the alias to the UMB_PROJECT_ALIAS const on the first line. In a real life project I would keep both the API root endpoint and the project alias in environmental variables, instead of hardcoding them into the api.js file. We are keeping it simple here 🙂
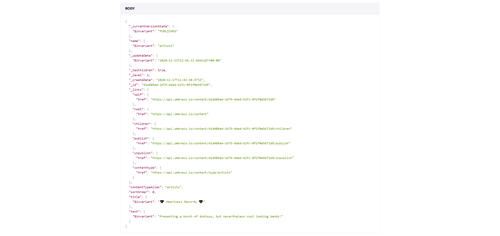
Next open pages/index.js and replace it with this file. Take a look at the getStaticProps function near the end of the file. As you can see, we are now fetching content from Umbraco Heartcore using the lib/api.js file we just added.
Switch to your browser and go to http://localhost:3000 you should now see the artists you added to Umbraco Heartcore earlier listed here. If you made it this far and you were able to have content from your Umbraco Heartcore project show up in your Next.js application, then high five you rock™ my friend! 🙋♂️
Dynamic routing
Now that our content is coming from Umbraco the artist links on the homepage are not working anymore. The artist URL’s are generated by Umbraco and we need to tell Next.js how to handle them. Step back into your editor, locate the pages/artist.js page and rename it to [...slug].js Yeah that might need a little explanation. We saw how we could create routes based on the files we add to pages/ folder. Those routes are pretty static. Next.js also lets us create dynamic routes which is perfect for our needs. Had we just named the file [slug].js it would match all routes at the root level of the website (eg. localhost:300/artist), but by adding in the three dots [...slug].js we are telling Next.js that this is a catch all route so now it will match anything at any level (eg.localhost:300/artists/kanye-west) as long as no other route matches first. The term “slug” is often used for part of or the entire page URL, but it’s not a special keyword in Next.js so we could have called it whatever we wanted.
Alright with that outta the way, open pages/[...slug].js and replace with this file. Good! Let's have a look at the code you just added. You can see that once again we are using getStaticProps to fetch data from the API. This time though we are fetching the content based on an argument called... slug. Yes you guessed it! Whenever a page URL matches our catch all route, the slug parameter is forwarded to the getStaticProps. The Content Delivery API has a convenient "get by url" endpoint which we can now use.
Below getStaticProps we find getStaticPaths which is new! Before we introduced dynamic routes to our application, Next.js could simply look at the pages/ folder and generate 1:1 what it contained eg. there’s a page called pages/artist.js so Next.js will generate a HTML file called artist.html However since we are now using dynamic routes Next.js and [...slug].js can match all URL’s, Therefore we need to dictate to Next.js what files it should generate at build time. That’s what getStaticPaths is for. Inside getStaticPaths we use the API to fetch a list of all of the artists and then we return an array of those artists URL/slug. During build Next.js will get a list of our artists URLs from getStaticPaths and generate a HTML file for each one. Each file will still get it’s content from getStaticProps. If this seems a little tricky try building your Next.js application for production (see Generating HTML files from our pages) and have a look at the files it’s generating. You should find a list of the artists that you have created in your Umbraco Hearcore project.
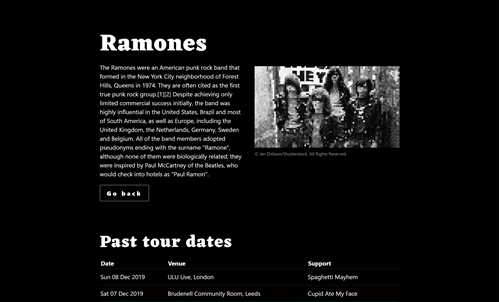
Switch to your browser and go to http://localhost:3000 The artist links on the homepage should work now and you should see the actual content from Umbraco Heartcore when you navigate to the artist’s page 🙌
Deploying Next.js
Your Node.js application can be deployed to any host that supports Node.js (which is needed during the build process). You can also make exports which just gives you the static HTML files, but that’s really not useful for our scenario.
Vercel hosting
Vercel are the creators of Next.js It's also a hosting provider for static websites. As you may have guessed they have excellent support for hosting Next.js applications! Same as Umbraco has with Umbraco Cloud. They also have a very generous free hosting option which is the one I recommend you opt in for. Jump over to vercel.com register and sign in.
At this point make sure you have pushed all your changes to your remote Git repository. Vercel deployment works by connection to a Git repository (GitHub, BitBucket, GitLab etc) and a branch of your choice. Each time you commit to the chosen branch Vercel will fetch your code from the branch and build it. Vercel will automatically recognize that it’s dealing with a Next.js application and process it accordingly.
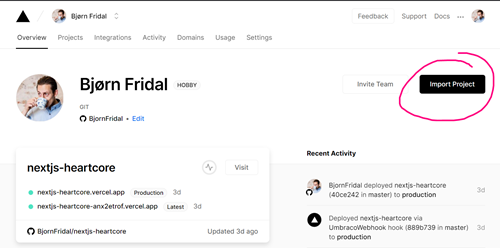
While signed into the Vercel dashboard click the “Import project” button. Now choose your Git host and follow the instructions for connecting your Git repository. Once done, Vercel will start the first deployment. If the deployment should fail you can step into the build logs for more information. Assuming that the build succeeds Vercel will provide you with a unique URL where you can access the deployed application. As you can see Vercel is frickin awesome!
Using webhooks to trigger deployments
We are now able to fetch content from Umbraco Heartcore, build and deploy our Next.js application. There is one crucial part missing though. Right now we only get fresh content into our Next.js application when we commit new changes to our remote Git host. That’s less than ideal. We want our application to be deployed (and built) whenever a content editor publishes or unpublishes content in our Umbraco Heartcore project. Luckily we have webhooks to solve that problem.
Heartcore Webhooks
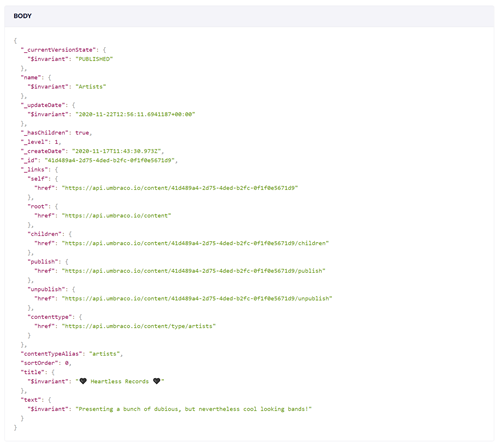
Step into your Umbraco Heartcore project, go to Settings section, expand the Heartcore tree and click on Webhooks. If you’re like me you’re curious to see what information Heartcore will send when a webhook is triggered. To find out, jump over to hookbin.com and click “Create new endpoint”. Copy the URL under “Your Hookbin Endpoint” and step back into Heartcore. Here click “Create Webhook” and paste your Hookbin endpoint into the URL field. Next choose “Publish content” under Event and click the “Create” button. Now this webhook will be triggered whenever we publish new content. Head over into the Content section open the Artists page and smash the Publish button. Once published you switch back over to Hookbin, reload your page and you should see that our newly created webhook has made http POST request that looks something like this.
Vercel Deploy Hooks
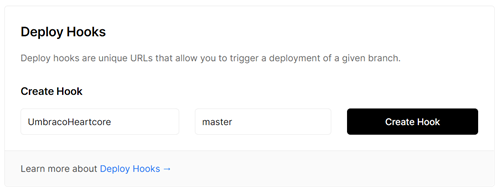
Switch over to the Vercel dashboard, choose your Next.js project, click the Settings tab and then click the Git menu item in the sidebar. Scroll down until you see “Deploy Hooks”. Vercel allows you to create a unique hook endpoint that will trigger a new deployment when called with a GET or POST http request. In the “Hook Name” field enter a name that will make it easy to identify the source that will trigger the hook endpoint eg. UmbracoHeartcore. In the “Git Branch Name” enter the name of the branch you want to deploy. In my case that is simply master.
Once you have created your Deploy hook, copy your unique URL, switch back into Heartcore and create two new webhooks. One webhook for when publishing and one for unpublishing. They will both use the same deploy hook URL you just created in Vercel. Also feel free to delete the Hookbin webhook we created earlier.
Time to sink or swim! 🏄♀️
Head over to the content section of Umbraco, select the Artists page, make a change to the title text and click “Publish”. Afterwards switch over to Vercel, go to your Next.js project and click the Deployments tab. You should see a new deployment triggered by your publish in Heartcore (you may need to reload the Vercal Deployments page to pick up the new deployment). Once the deployment finishes and the state changes to “Ready“ you should be a very happy camper! We now have everything in place for our small record label website. We can make changes to the application, push them to the Git repo and Vercel will deploy our changes. And when we add new or change the existing artists in Heartcore, Vercel will be notified of the changes and start a new deployment. Awesome!
Conclusion
I hope that you by now have a basic idea of how Umbraco Heartcore and Next.js works. We covered quite a lot of ground in this blog post and still there's a lot more you do with both Umbraco Heartcore and Next.js And just in case you need a little break from the Christmas carols and confectionery, remember that you can get a 14 days free trial of Heartcore either at umbraco.com or in the Umbraco Cloud portal.
