Configuration Files
Heads Up!
This article is several years old now, and much has happened since then, so please keep that in mind while reading it.
Introduction
Configuration files, despite the fact they contain settings which the whole site or application can rely on, are often overlooked; the contents of the files often become the coding equivalent of the junk cupboard, a case of “we want to store this setting, but we’re not quite sure where to put it”.
Because many of us are still developing and supporting applications in .NET Frameworks 4.7 and 4.8 I am going to take a look at configuration files:
- Options for creating structured configuration files
- How to test a configuration file at site start-up
- How to using configuration files as part of unit tests
- How to deploy files to an Azure App Services using Azure DevOps and deployment slots
Sample code for this article can be found at https://github.com/RachBreeze/2020-24-Days-In-Umbraco/ (Opens a new window)
What is a configuration file, and when will you use it?
A configuration file is used to store environment-specific settings, such as database connection strings. Developers may also use them to store information which is fairly constant but we know could change, for example, if the site is an eCommerce site retailing and shipping only in the UK the VAT rate may be stored in the config file as “0.2” as the VAT rate is constant, until the Chancellor changes it. By storing it in the config file, if the value does change we don’t have to recompile our application.
Working With Configuration Files
Let us imagine a scenario where the site is a UK site, supplying UK products and which sends marketing emails via a scheduled task.
We know that the marketing emails:
- Should only be going to the dev and test team in our dev and test environments
- To the dev, test and client in the clients testing environment (or UAT environment)
- To anyone in the production environment.
We will store the following in the configuration files to support this:
- A decimal value for the VAT rate, stored as “VAT”
- A boolean for if the email is in test mode, stored as “emailInTestMode”
- A semi colon-separated list of valid email domains for recipients of emails, stored in “testEmailDomains”
Web.Config
The default location for web site settings in the web.config within the <appSettings> element. Values are stored as key value pairs:
<appSettings>
<add key="VAT" value="0.2" />
<add key="emailInTestMode" value="true" />
<add key="testEmailDomains" value="@testdomain.com" />
</appSettings>
And then these can be accessed in code via calls like:
using System.Configuration;

namespace _24DaysInUmbraco.Examples
{
    public class ReadWebConfig
    {
        public void ReaderSettings()
        {
            var VAT = decimal.Parse(ConfigurationManager.AppSettings["VAT"]);
            var emailInTestMode = bool.Parse(ConfigurationManager.AppSettings["emailInTestMode"]);
            var testEmailDomains = ConfigurationManager.AppSettings["testEmailDomains"];

        }
    }
}
As we can see adding key-value pairs in the <appSettings> in the web.config is quick but:
- It is hard to structure them and group related settings
- If there’s a lot of key-value pairs the web.config becomes hard to read
- The values need to be cast and tested to ensure they are type-safe every time they are read
- It’s not until the routine that is accessed that uses that exact key-value pair that the developer/ tester/ user can confirm that the value is set correctly.
Some of these issues can be overcome by creating a settings class. This class ensures that the values are cast correctly and also helps keep the code DRY. Doing this also helps with creating Mocks for unit testing. An example settings class may be:
using System.Configuration;

namespace _24DaysInUmbraco.Examples
{
    public class Settings
    {
        public virtual decimal VAT => decimal.Parse(ConfigurationManager.AppSettings["VAT"]);

        public virtual bool EmailInTestMode => bool.Parse(ConfigurationManager.AppSettings["emailInTestMode"]);

        public virtual string TestEmailDomains => ConfigurationManager.AppSettings["testEmailDomains"];
    }
}
However, under pressure, rather than reusing existing code developers may make direct calls to ConfigurationManager.AppSettings to read the contents of the web.config.
Custom.Config
A custom config file allows us to structure the data more clearly, as it is pure XML. We can model the config file contents in code by writing a reader that inherits from the abstract ConfigurationSection class. The properties of the class should use the [ConfigurationProperty] attribute. Implementing properties with the ConfigurationProperty attribute means that developers can rely on C# to perform the type checking. In addition, developers can add one line of code per custom config, at startup to validate the file contents, ensuring an error is thrown at startup if the contents don’t validate, giving developers and testers automatic feedback on the site configuration.
Adding a custom config file
To use a custom config in code:
- Add a new config file to the solution the same way as any other file
- Give it the same name as the class that will be modelling it
In our example I’ve created “UmbracoAdvent.config” in the config subfolder and move the values from the web.config to this file:
<?xml version="1.0"?>
<umbracoAdventSettings vat="0.2">
<marketing emailInTestMode="true" testEmailDomains="@testdomain.com"/>
</umbracoAdventSettings>
Next up we need to create the class that will read this information.
To do this we need to tell the class it’s reading a configuration file section by inheriting from abstract ConfigurationSection class.
Then we need to tell the class about the properties in the file. The value for VAT is on the root element and can be read as follows, and here we are saying it’s always required:
[ConfigurationProperty("vat",IsRequired = true)]
public virtual decimal VAT => (decimal)this["vat"];
Here we’ve:
- Named the VAT property, and given it a type as we would normally
- Decorated the VAT property so that it reads from the config file by adding the ConfigurationProperty attribute
We can also tell our class to read from the config file into another class. To do this define the marketing element as a configuration element, and read the properties as before:
public class MarketingElement : ConfigurationElement
{
[ConfigurationProperty("emailInTestMode")]
public virtual bool EmailInTestMode => (bool)this["emailInTestMode"];
[ConfigurationProperty("testEmailDomains")]
public virtual string TestEmailDomains => (string)this["testEmailDomains"];
}
Then tell the class to read that element:
[ConfigurationProperty("marketing")]
public virtual MarketingElement MarketingSettings => (MarketingElement)this["marketing"];
A full list of constructors are available here https://docs.microsoft.com/en-us/dotnet/api/system.configuration.configurationproperty?view=netframework-4.7.2#constructors (opens a new window)
By decorating the read of the property with the validators required anyone consuming that property knows it is type safe and in the expected format.
Lastly because we don’t want to have to keep telling the class to read the property, and we need to tell the class where to read it from we add this:
public static UmbracoAdventSettings Settings { get; } = ConfigurationManager.GetSection("umbracoAdventSettings") as UmbracoAdventSettings;
The final code can be found in Examples\UmbracoAdventSettings.cs
And finally we need to tell the web.config where to read this section from, so add the following to the <configSections> element in the web.config
<section name="readerSectionName" type="classname,dll name"/>
Where:
- Name is the same name as the name used in the call to ConfigurationManager.GetSection in the reader class
- Type is the name of the class reading the file, followed by a comma and then the name of the dll containing the class reading the file, in our example it is:
<section name="umbracoAdventSettings" type="_24DaysInUmbraco.Examples.UmbracoAdventSettings,_24DaysInUmbraco"/>
And then tell the web.config where to read the details from:
<umbracoAdventSettings configSource="config\umbracoAdvent.config" />
Testing Custom Config
Testing with Nunit and Moq
The custom config is read via a static class, so there are a few tweaks to make it testable and work with dependency injection.
For dependency injection to work the class needs an interface, to do this we will create a wrapper interface:
namespace _24DaysInUmbraco.Examples
{
    public interface IUmbracoAdventSettingsWrapper
    {
        UmbracoAdventSettings Settings();
    }
}
And the interface needs a class which implements it:
namespace _24DaysInUmbraco.Examples
{
    public class UmbracoAdventSettingsWrapper : IUmbracoAdventSettingsWrapper
    {
        public UmbracoAdventSettings Settings()
        {
            return UmbracoAdventSettings.Settings;
        }
    }
}
The wrapper interface and implementation need registering at application startup, in Umbraco 8 this would be using a composer such as:
using _24DaysInUmbraco.Examples;
using Umbraco.Core.Composing;

namespace _24DaysInUmbraco.Composing
{
    // prepares the dependency injection for the email service
    public class ConfigurationComposer : IUserComposer
    {
        public void Compose(Composition composition)
        {
            composition.RegisterFor<IUmbracoAdventSettingsWrapper, UmbracoAdventSettingsWrapper>();
     }
    }
}
We can then create an email service into which IUmbracoAdventSettingsWrapper injected and which has a method “CanSendEmail”:
using System;
using _24DaysInUmbraco.Examples;

namespace _24DaysInUmbraco.Services
{
    public class EmailService
    {
        private readonly IUmbracoAdventSettingsWrapper _settingsWrapper;

        public EmailService(IUmbracoAdventSettingsWrapper settingsWrapper)
        {
            _settingsWrapper = settingsWrapper;
        }

        public bool CanSendEmail(string emailAddress)
        {
            if (!_settingsWrapper.Settings().MarketingSettings.EmailInTestMode)
            {
                return true;
            }

            var domain = emailAddress.Substring(emailAddress.IndexOf("@", StringComparison.Ordinal)).ToLower();
            return _settingsWrapper.Settings().MarketingSettings.TestEmailDomains.Contains(domain);
        }
    }
}
This can then be tested:
using _24DaysInUmbraco.Examples;
using _24DaysInUmbraco.Services;
using Moq;
using NUnit.Framework;

namespace _24DaysInUmbraco.Tests.Services
{
    public class WhenSendingEmail
    {
        [Test]
        public void IfTheSiteIsNotInTestModeEmailsCanBeSent()
        {
            var settings = new Mock<IUmbracoAdventSettingsWrapper>();
            settings.Setup(x => x.Settings().MarketingSettings.EmailInTestMode).Returns(false);
            var emailService = new EmailService(settings.Object);
            Assert.AreEqual(emailService.CanSendEmail("anyeamil@this.com"), true);
        }
    }
}
More sample tests can be found in the solution in the tests project.
Testing the custom configs on startup
Custom configs are validated the first time they are read, so if you want to validate them on startup add a line in your startup code that reads a value from the config file:
using _24DaysInUmbraco.Examples;
using Umbraco.Core.Composing;

namespace _24DaysInUmbraco.Composing
{
    // prepares the dependency injection for the email service
    public class ConfigurationComposer : IUserComposer
    {
        public void Compose(Composition composition)
        {
            composition.RegisterFor<IUmbracoAdventSettingsWrapper, UmbracoAdventSettingsWrapper>();
            var testFileContents = UmbracoAdventSettings.Settings.VAT;
        }
    }
}
If there is an error in the config file at startup a YSOD will be displayed.
Deploying Config Files In Azure DevOps
Configuration files contain settings that are unique to each environment. There are a number of ways of manipulating the configuration file contents as part of the build and deployment process, to ensure the values are changed as they are deployed to each environment.
File Transform
When a web application is configured for the first time two files are automatically created for the web.config as shown below:

These are named after the two default configurations found in configuration manager.

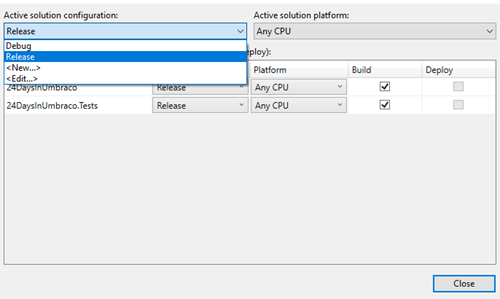
The debug configuration is usually the configuration we all develop in.
The release configuration is the configuration we normally deploy with.
The two files apply transforms the web.config that we have been working with. A transform just changes the config file’s contents.
Previewing Transforms
To preview a transform before it’s deployed right mouse on the transform to view and select “Preview Transform”.
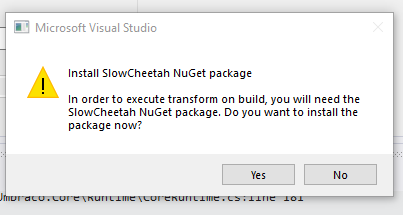
If prompted to install SlowCheetah and you know the solution will be deployed using a tool such as OctopusDeploy or Azure DevOps answer yes to the install SlowCheetah NuGet package question as it will help the deployment process.
The preview option for the transform allows a developer to see what the values are currently and what they will be when they are applied:
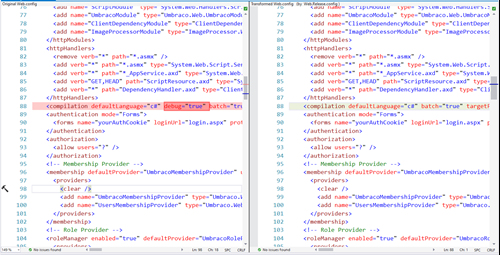
Out of the box we can see that all the web.Release.Config does is remove debug=”true” from the web.config file.
A full list of transforms can be found and details of how to add per environment van be found in this guide https://blog.elmah.io/web-config-transformations-the-definitive-syntax-guide/ (Opens a new window).
Deploying with Transforms
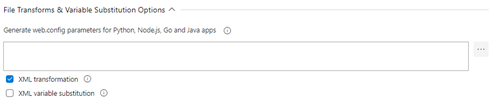
Once transforms have been added and tested locally they need to be added to the Azure DevOps build pipeline. To do this in the deploy task, select “xml transformation”.
The original file is transformed in the following order:
- *.release.config
- *.<environment>.config
So for example when deploying to the production environment the following transforms are applied:
- *.release.config
- *.production.config
Variable Substitution
Variables can be used to change configuration values on a per-environment basis.
Variable substitution is always performed after XML transformation. To enable variable substitution select “XML variable transformation” in the deploy task in the Azure DevOps pipeline:
Variables are defined in the variables section of the pipeline:
Azure Default Variable Substitution
Azure will only substitute variables in the following sections of any config files:
- appSettings
- applicationSettings
- connectionStrings
The variables should have the same name as the “key” or “name” entries in these sections. For example in Umbraco the database connection string is used:
<connectionStrings>
<remove name="umbracoDbDSN" />
<add name="umbracoDbDSN" connectionString="YourConnectionString" providerName="System.Data.SqlServerCe.4.0" />
</connectionStrings>
In Azure DevOps the variable name for this connection string would be “umbracoDbDSN”
Similarly, if you want to change the models mode in the appSettings the variable name to use would be “Umbraco.ModelsBuilder.ModelsMode”
Azure Variables Substitution
Performing variable substitution for elements outside of appSettings,applicationSettings and connectionStrings requires developers to use:
- The task "Tokenize in Archive"
- parameters.xml
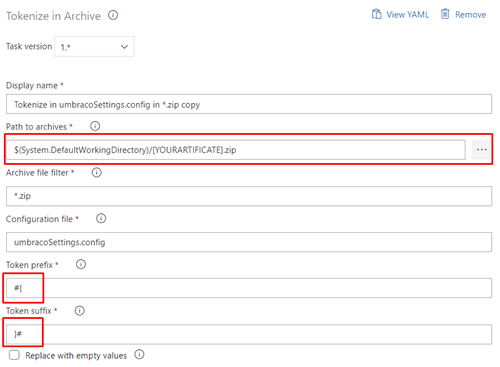
Tokenize in Archive
This is where the transform is added to the config file, which has been tokenized, and then variable substitution is applied after.
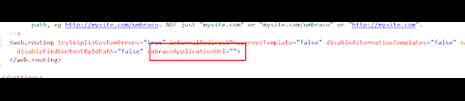
An example in Umbraco, in the umbracoSettings.Config file where the umbracoApplicationUrl may need to be transformed for the different environments.
In our development environment the url will be set as:
<web.routing
trySkipIisCustomErrors="true"
internalRedirectPreservesTemplate="false" disableAlternativeTemplates="false" validateAlternativeTemplates="false" disableFindContentByIdPath="false"
umbracoApplicationUrl="">
</web.routing>
However we want to change this on deployment to the url being deployed to so we add a release transform that says:
<settings xmlns:xdt="http://schemas.microsoft.com/XML-Document-Transform">
<web.routing umbracoApplicationUrl="#{baseURL}#" xdt:Transform="SetAttributes(umbracoApplicationUrl)"/>
</settings>
This says on creating a build release replace umbracoApplicationUrl within the umbracoSettings.config with #{baseURL}#
Making the element look like this:
<web.routing
trySkipIisCustomErrors="true"
internalRedirectPreservesTemplate="false" disableAlternativeTemplates="false" validateAlternativeTemplates="false" disableFindContentByIdPath="false"
umbracoApplicationUrl="#{baseURL}#">
</web.routing>
Now in Azure Devops we can add a variable in our pipeline:

And then use tokenize to replace the values in the config file. This will tokenize files in the build.zip too. The tokenize must target the transform file and run before the app deployment.
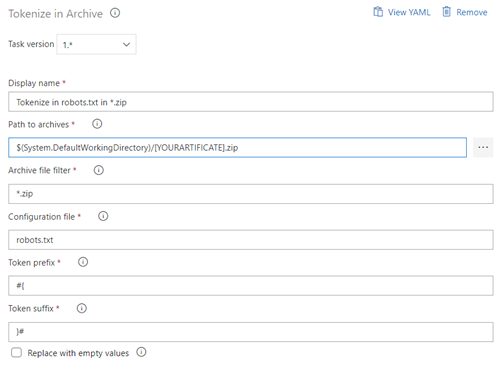
Tokenize can also be used to deploy the robots.txt, ensuring the disallow/ allow options are set correctly on each of the environments if the source robots.txt is defined as:
Sitemap: #{baseURL}#/xml-sitemap/
User-agent: *
#{robots}#
The baseURL and Robots values can be defined as variables in Azure DevOps

The tokenize can then be configured to tokenize robots.txt:
Parameters.xml
Replacing variables using the “Tokenize in Archive” task is slow. It is possible to configure variable replacement using “parameters.xml”. The parameters.xml file provides a set of values to the MSDeploy.exe command, detailing which configuration files to replace with what value. An example in Umbraco is where the ClientDependency.config is transformed to include the latest build number. Doing this ensures the latest css and js files are visible on the front end of Umbraco. Here the parameters.xml file would include:
<?xml version="1.0" encoding="utf-8" ?>
<parameters>
<parameter name="ClientDependency.Version"
description="Change the Client DependencyVersion"
defaultValue="#{clientDependency.Version}#"
tags="">
<parameterEntry
kind="XmlFile"
scope="ClientDependency\.config$"
match="/clientDependency/@version" />
</parameter>
</parameters>
The parameters.xml file is merged with any auto generated build parameters to create a file called “projectname.SetParameters.xml” in the buildoutput folder.
To ensure the correct clientDependency.Version is applied in the build task the “Replace Token” task needs adding to the build pipeline, with the root directory being set to the root of the folder that contains “*projectname.SetParameters.xml”
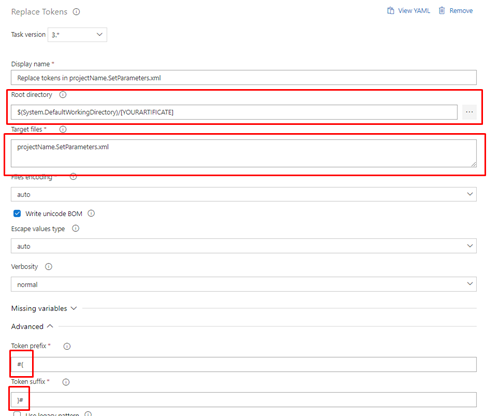
In addition to the value of #{clientDependency.Version}# to be the value of the build number, a variable needs adding to the pipeline:

https://marketplace.visualstudio.com/items?itemName=RichardFennellMVP.ParametersXmlGenerator (Opens a New Window) from Richard Fennel of BlackMarble can be used to auto generate a parameters.xml based on the contents of the app.config and web.config files.
Deployment Slots
Azure deployment slots allow a site to be deployed, warmed up and checked over before swapping the slot and placing it live.
Azure allows the values in appSettings, applicationSettings and connectionStrings elements to be substituted via the slot/ App Service (at the time of writing custom config files can not be substituted).
This means that whilst custom configuration files provide a great way of structuring the data Azure WebApps do not provide a way to substitute elements and values within them.
When creating a configuration file it is important therefore to determine which values really need to be stored at the deployment slot level and move them into the web.config.
Umbraco supports scheduled tasks, and these are definitely something that should only be enabled to run on the production slot and not the staging slot. To do this we may add a value to the configuration file and then override it on the staging slot.
To configure a setting to be specific to the slot in the Azure Portal open that slot and go to the configuration section:

Select application settings and click new application setting:
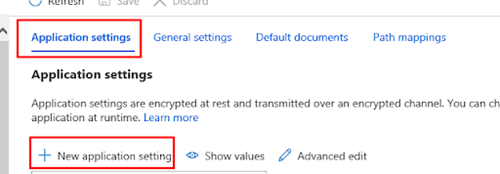
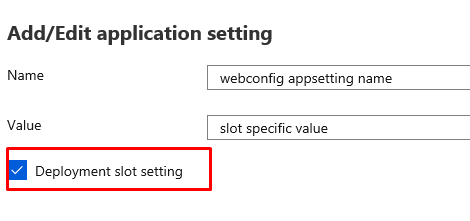
Then add the name of the key value pair in the web.config you want to override, in the name, enter the value for that slot and tick deployment slot setting. This value is then bound to the slot by ticking the "Deployment slot setting" option:
Summary
Implemented well in .NET 4.7 and 4.8 it is possible to ensure that the values contained in and read from configuration files are type-safe. Making life easier for the developers working with the file contents.
We can also test their contents at application startup and Mock their contents for Unit testing. This means that we can reduce and mitigate the risks of errors in our config files; giving us more confidence that the file contents are robust on deployment and also a quick check for if the values are not in the correct type at startup.
