YAML templates
Heads Up!
This article is several years old now, and much has happened since then, so please keep that in mind while reading it.
Making our build YAML pipeline smarter and reusable
NOTE: This article is starting where "Setting up YAML based build and deployment pipelines in Azure DevOps" left off; to begin with we have the following build YAML file:
pr: none # triggers on PRs by default, have to opt out
trigger:
  branches:
    include:
    - dev
    - main
  paths:
    include:
    - src
    - frontend
  batch: True
name: Build-$(date:yyyyMMdd)$(rev:.r)

stages:
  - stage: build
    jobs:
    - job: build
      displayName: Build and save as artifact

      pool:
        vmImage: windows-2019

      steps:
      - checkout: self

      # Install NuGet to restore packages
      - task: NuGetToolInstaller@1
        displayName: 'Use NuGet '

      # Restore packages based on the solution file
      - task: NuGetCommand@2
        displayName: NuGet restore
        inputs:
          solution: v8-testsite.sln

      # Build the solution using MSBuild
      - task: VSBuild@1
        displayName: Build solution v8-testsite.sln
        inputs:
          solution: v8-testsite.sln
          vsVersion: "16.0"
          msbuildArgs: /p:DeployOnBuild=true
            /p:WebPublishMethod=Package
            /p:PackageAsSingleFile=true
            /p:SkipInvalidConfigurations=true
            /p:PackageLocation="$(build.artifactstagingdirectory)\\"
            /p:IncludeSetAclProviderOnDestination=False
          platform: any cpu
          configuration: release

      # Save the build output as an artifact to use in the deploy pipeline
      - task: PublishBuildArtifacts@1
        inputs:
          PathtoPublish: '$(Build.ArtifactStagingDirectory)'
          ArtifactName: 'BE'
          publishLocation: 'Container'

      # Install node
      - task: NodeTool@0
        inputs:
          versionSpec: '12.x'
          displayName: 'Install Node.js'

      # Restore node packages
      - powershell: cd frontend; npm ci
        displayName: 'Install npm dependencies'

      # Run frontend build
      - powershell: cd frontend; npm run build
        displayName: 'Build Frontend'

      # Zip FE files
      - task: ArchiveFiles@2
        displayName: Archive frontend/dist
        inputs:
          rootFolderOrFile: frontend/dist
          archiveFile: $(Build.ArtifactStagingDirectory)/FE.zip

      # Save the FE files as artifact
      - task: PublishBuildArtifacts@1
        displayName: 'Publish Artifact: FE'
        inputs:
          PathtoPublish: $(Build.ArtifactStagingDirectory)/FE.zip
          ArtifactName: FE
Assuming other projects are based on a similar pipeline, here are the values that are specific to this one:
- The solution path in the NuGet restore task
- The solution path in the VSBuild task
I will assume the frontend path and dist folder would be the same in other projects - but if not the following steps could be added for them too.
We can introduce a variable to handle the Solution path, and reference it in the tasks.
Note: referencing variables is done like this - $(varname):
Note: referencing variables is done like this - $(varname):
variables:
- name: SolutionPath
  value: v8-testsite.sln

stages:
  - stage: build
    jobs:
    - job: build
      displayName: Build and save as artifact

      pool:
        vmImage: windows-2019

      steps:
      - checkout: self

      # Install NuGet to restore packages
      - task: NuGetToolInstaller@1
        displayName: 'Use NuGet '

      # Restore packages based on the solution file
      - task: NuGetCommand@2
        displayName: NuGet restore
        inputs:
          solution: $(SolutionPath)

      # Build the solution using MSBuild
      - task: VSBuild@1
        displayName: Build solution
        inputs:
          solution: $(SolutionPath)
          vsVersion: "16.0"
          msbuildArgs: /p:DeployOnBuild=true
            /p:WebPublishMethod=Package
            /p:PackageAsSingleFile=true
            /p:SkipInvalidConfigurations=true
            /p:PackageLocation="$(build.artifactstagingdirectory)\\"
            /p:IncludeSetAclProviderOnDestination=False
          platform: any cpu
          configuration: release
Another thing that may change between sites could be the Node version. Right now we run Node version 12.x, but older setups may be different - they could also be set up differently and require different npm commands. For now we can handle the node version problem by assuming there is a .nvmrc file that specifies the version in each solution.
We can do that by using a task that reads a file and saves its content as a pipeline variable:
- task: FileContenttoVariable@2
  displayName: File content to variable node-version
  inputs:
    FilePath: $(System.DefaultWorkingDirectory)\.nvmrc
    VariableName: node-version
    AddNewlines: false

# sets node version based on nvmrc
- task: NodeTool@0
  displayName: Use Node $(node-version)
  inputs:
    versionSpec: $(node-version)
At this point we could include this build.yml file in a boilerplate solution and could get it all set up quite quickly for new sites just by changing the variable values.
Making our deploy YAML pipeline smarter and reusable
Let's run through the deploy.yml file as well - this is the starting point:
trigger: none # have to set it to NOT be triggered "globally" and then the real trigger is under the pipeline resources
pr: none # triggers on PRs by default, have to opt out

resources:
  pipelines:
    - pipeline: build-pipeline # this is sort of an alias that can be used later
      source: 'build' # the name of the build pipeline in DevOps
      trigger: true # will trigger once the build on this pipeline is done

stages:
  - stage: deploy
    jobs:
    - deployment: DeployWeb
      displayName: deploy to vm
      pool:
        vmImage: windows-2019
      environment:
        name: Dev server
        resourceType: VirtualMachine
      strategy:
        runOnce:
          deploy:
            steps:
            # Set up the IIS profile we want to deploy to, including hostname bindings
            - task: IISWebAppManagementOnMachineGroup@0
              inputs:
                IISDeploymentType: 'IISWebsite'
                ActionIISWebsite: 'CreateOrUpdateWebsite'
                WebsiteName: 'testsite'
                WebsitePhysicalPath: F:\Websites\testsite
                WebsitePhysicalPathAuth: 'WebsiteUserPassThrough'
                AddBinding: true
                Bindings: '{"bindings":[{"protocol":"http","ipAddress":"All Unassigned","port":"80","hostname":"testsite.domain","sslThumbprint":"","sniFlag":false}]}'
                CreateOrUpdateAppPoolForWebsite: true
                AppPoolNameForWebsite: 'testsite'
                DotNetVersionForWebsite: 'v4.0'
                PipeLineModeForWebsite: 'Integrated'
                AppPoolIdentityForWebsite: 'ApplicationPoolIdentity'
                ParentWebsiteNameForVD: 'testsite'
                VirtualPathForVD: #leave this empty or it breaks
                ParentWebsiteNameForApplication: 'testsite'
                VirtualPathForApplication: #leave this empty or it breaks
                AppPoolNameForApplication: #leave this empty or it breaks
                AppPoolName: 'testsite'

            # Deploy the BE to the site
            - task: IISWebAppDeploymentOnMachineGroup@0
              inputs:
                WebSiteName: 'testsite'
                Package: '$(Pipeline.Workspace)\build-pipeline\BE\web.zip'
                RemoveAdditionalFilesFlag: false
                ExcludeFilesFromAppDataFlag: true
                TakeAppOfflineFlag: true

            # Deploy the FE to the site
            - task: IISWebAppDeploymentOnMachineGroup@0
              inputs:
                WebSiteName: 'testsite'
                Package: '$(Pipeline.Workspace)\build-pipeline\FE.zip'
                RemoveAdditionalFilesFlag: false
                ExcludeFilesFromAppDataFlag: true
                TakeAppOfflineFlag: true
In the deploy file there are quite a lot more variables we need to introduce:
- Deployment environment name
- IIS website name
- IIS website domain
- IIS website path
Let's add them as variables:
variables:
- name: DeployEnv
  value: 'Dev server'
- name: IISWebsiteName
  value: testsite
- name: Hostname
  value: testsite.domain

stages:
  - stage: deploy
    jobs:
    - deployment: DeployWeb
      displayName: deploy to vm
      pool:
        vmImage: windows-2019
      environment:
        name: $(DeployEnv)
        resourceType: VirtualMachine
      strategy:
        runOnce:
          deploy:
            steps:
            # Set up the IIS profile we want to deploy to, including hostname bindings
            - task: IISWebAppManagementOnMachineGroup@0
              inputs:
                IISDeploymentType: 'IISWebsite'
                ActionIISWebsite: 'CreateOrUpdateWebsite'
                WebsiteName: '$(IISWebsiteName)'
                WebsitePhysicalPath: F:\Websites\$(IISWebsiteName)
                WebsitePhysicalPathAuth: 'WebsiteUserPassThrough'
                AddBinding: true
                Bindings: '{"bindings":[{"protocol":"http","ipAddress":"All Unassigned","port":"80","hostname":"$(Hostname)","sslThumbprint":"","sniFlag":false}]}'
                CreateOrUpdateAppPoolForWebsite: true
                AppPoolNameForWebsite: '$(IISWebsiteName)'
                DotNetVersionForWebsite: 'v4.0'
                PipeLineModeForWebsite: 'Integrated'
                AppPoolIdentityForWebsite: 'ApplicationPoolIdentity'
                ParentWebsiteNameForVD: '$(IISWebsiteName)'
                VirtualPathForVD: #leave this empty or it breaks
                ParentWebsiteNameForApplication: '$(IISWebsiteName)'
                VirtualPathForApplication: #leave this empty or it breaks
                AppPoolNameForApplication: #leave this empty or it breaks
                AppPoolName: '$(IISWebsiteName)'

            # Deploy the BE to the site
            - task: IISWebAppDeploymentOnMachineGroup@0
              inputs:
                WebSiteName: '$(IISWebsiteName)'
                Package: '$(Pipeline.Workspace)\build-pipeline\BE\web.zip'
                RemoveAdditionalFilesFlag: false
                ExcludeFilesFromAppDataFlag: true
                TakeAppOfflineFlag: true

            # Deploy the FE to the site
            - task: IISWebAppDeploymentOnMachineGroup@0
              inputs:
                WebSiteName: '$(IISWebsiteName)'
                Package: '$(Pipeline.Workspace)\build-pipeline\FE.zip'
                RemoveAdditionalFilesFlag: false
                ExcludeFilesFromAppDataFlag: true
                TakeAppOfflineFlag: true
At this point we could include this deploy.yml file in a boilerplate solution and could get it all set up quite quickly for new versions.
However, let's say you had 20 projects, and suddenly you decide to add a caching command for node-modules because it takes a long time to run npm install each time. This way you would have to run through all 20 repos to add that task - not the smartest way of working..
Using YAML Templates
You may at this point think - what if I need to deploy my site to several environments? Well with the setup as we have it now, you could add the other environment(s) in Azure DevOps and then add a new deploy stage to the deploy file:
variables:
- name: DeployLiveEnv
  value: 'Live server'

stages:
  - stage: deploy dev
    .....

  - stage: deploy live
    jobs:
    - deployment: DeployWeb
      displayName: deploy to vm
      pool:
        vmImage: windows-2019
      environment:
        name: $(DeployLiveEnv)
        resourceType: VirtualMachine
      strategy:
        runOnce:
          deploy:
            steps:
            # Set up the IIS profile we want to deploy to, including hostname bindings
            - task: IISWebAppManagementOnMachineGroup@0
              inputs:
                IISDeploymentType: 'IISWebsite'
                ActionIISWebsite: 'CreateOrUpdateWebsite'
                WebsiteName: '$(IISWebsiteName)'
                WebsitePhysicalPath: F:\Websites\$(IISWebsiteName)
                WebsitePhysicalPathAuth: 'WebsiteUserPassThrough'
                AddBinding: true
                Bindings: '{"bindings":[{"protocol":"http","ipAddress":"All Unassigned","port":"80","hostname":"$(Hostname)","sslThumbprint":"","sniFlag":false}]}'
                CreateOrUpdateAppPoolForWebsite: true
                AppPoolNameForWebsite: '$(IISWebsiteName)'
                DotNetVersionForWebsite: 'v4.0'
                PipeLineModeForWebsite: 'Integrated'
                AppPoolIdentityForWebsite: 'ApplicationPoolIdentity'
                ParentWebsiteNameForVD: '$(IISWebsiteName)'
                VirtualPathForVD: #leave this empty or it breaks
                ParentWebsiteNameForApplication: '$(IISWebsiteName)'
                VirtualPathForApplication: #leave this empty or it breaks
                AppPoolNameForApplication: #leave this empty or it breaks
                AppPoolName: '$(IISWebsiteName)'

            # Deploy the BE to the site
            - task: IISWebAppDeploymentOnMachineGroup@0
              inputs:
                WebSiteName: '$(IISWebsiteName)'
                Package: '$(Pipeline.Workspace)\build-pipeline\BE\web.zip'
                RemoveAdditionalFilesFlag: false
                ExcludeFilesFromAppDataFlag: true
                TakeAppOfflineFlag: true

            # Deploy the FE to the site
            - task: IISWebAppDeploymentOnMachineGroup@0
              inputs:
                WebSiteName: '$(IISWebsiteName)'
                Package: '$(Pipeline.Workspace)\build-pipeline\FE.zip'
                RemoveAdditionalFilesFlag: false
                ExcludeFilesFromAppDataFlag: true
                TakeAppOfflineFlag: true
So that means we need a new stage per environment, along with new variables for the environment and potentially things like the domain and IISWebsiteName as well.
Instead of doing that, we can use YAML templates to split parts of our build or deploy files into their own "template" YAML file - we can even store these YAML files in a separate repository and then just pull them in to use them.
So on a separate repo you can add your files. I will fx add a build template file:
umbraco8/build-tmpl.yml
parameters:
- name: SolutionPath
  type: string
  default: ''

steps:
# Install NuGet to restore packages
- task: NuGetToolInstaller@1
  displayName: 'Use NuGet '

# Restore packages based on the solution file
- task: NuGetCommand@2
  displayName: NuGet restore
  inputs:
    solution: ${{ parameters.SolutionPath }}

# Build the solution using MSBuild
- task: VSBuild@1
  displayName: Build solution
  inputs:
    solution: ${{ parameters.SolutionPath }}
    vsVersion: "16.0"
    msbuildArgs: /p:DeployOnBuild=true
      /p:WebPublishMethod=Package
      /p:PackageAsSingleFile=true
      /p:SkipInvalidConfigurations=true
      /p:PackageLocation="$(build.artifactstagingdirectory)\\"
      /p:IncludeSetAclProviderOnDestination=False
    platform: any cpu
    configuration: release

# Save the build output as an artifact to use in the deploy pipeline
- task: PublishBuildArtifacts@1
  inputs:
    PathtoPublish: '$(Build.ArtifactStagingDirectory)'
    ArtifactName: 'BE'
    publishLocation: 'Container'

# Install node
- task: NodeTool@0
  inputs:
    versionSpec: '12.x'
    displayName: 'Install Node.js'

# Restore node packages
- powershell: cd frontend; npm ci
  displayName: 'Install npm dependencies'

# Run frontend build
- powershell: cd frontend; npm run build
  displayName: 'Build Frontend'

# Zip FE files
- task: ArchiveFiles@2
  displayName: Archive frontend/dist
  inputs:
    rootFolderOrFile: frontend/dist
    archiveFile: $(Build.ArtifactStagingDirectory)/FE.zip

# Save the FE files as artifact
- task: PublishBuildArtifacts@1
  displayName: 'Publish Artifact: FE'
  inputs:
    PathtoPublish: $(Build.ArtifactStagingDirectory)/FE.zip
    ArtifactName: FE
So you may notice here that it is all the build steps from our build.yml file, except the variable has been replaced with a Parameter, and it is called slightly differently: $(SolutionPath) becomes ${{ parameters.SolutionPath }}.
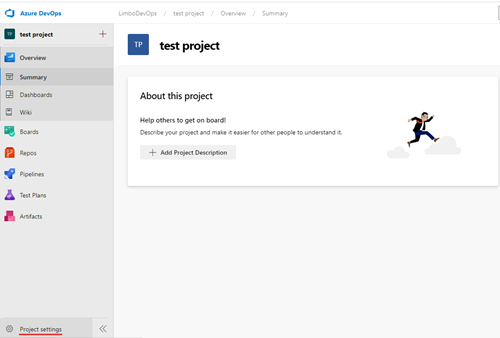
With this change, we can now call the template in our build.yml file instead - to do that we need to first set up a Github Service connection in Azure DevOps though - so go to your project and click "Project Settings" in the bottom left corner:
Navigate to the "Service Connections" menu, click to add a new service connection. Here you need to choose Github and fill out the fields:
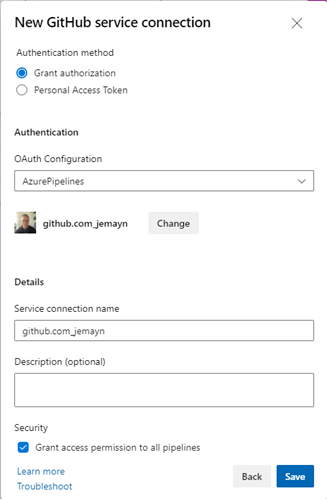
Make sure to copy the Service Connection name, we will need that in a moment!
Now let's edit our build.yml file to use our new template instead:
pr: none # triggers on PRs by default, have to opt out
trigger:
  branches:
    include:
    - dev
    - main
  paths:
    include:
    - src
    - frontend
  batch: True
name: Build-$(date:yyyyMMdd)$(rev:.r)

variables:
- name: SolutionPath
  value: v8-testsite.sln

resources:
  repositories:
  - repository: PipelineTemplates # Your given name of the resource, can be used to access items from it further down
    name: jemayn/Yaml-Pipelines # org/repo name
    endpoint: github.com_jemayn # Service connection name
    type: github
    ref: main # Branch / tag / commit to pull

stages:
  - stage: build
    jobs:
    - job: build
      displayName: Build and save as artifact

      pool:
        vmImage: windows-2019

      steps:
      - checkout: self

      # Get template with pathtofile@repositoryname
      - template: umbraco8/build-tmpl.yml@PipelineTemplates
        parameters:
          SolutionPath: $(SolutionPath)
So as you can see we added a new "resource" section where we get the YAML template repository, then in the stage we can replace all the tasks with just a template where we can pass the needed parameters in.
You may note that for the repo it has a ref parameter - so we could even version our templates with release tags, or something similar. We could also have different build/deploy files for many different types of sites or for v7, 8, 9. Just split them in folders and call the correct path when you call your template.
Let's do the same for the deploy file:
umbraco8/deploy-tmpl.yml
parameters:
- name: IISWebsiteName
  type: string
  default: ''
- name: Hostname
  type: string
  default: ''

steps:
# Set up the IIS profile we want to deploy to, including hostname bindings
- task: IISWebAppManagementOnMachineGroup@0
  inputs:
    IISDeploymentType: 'IISWebsite'
    ActionIISWebsite: 'CreateOrUpdateWebsite'
    WebsiteName: '${{ parameters.IISWebsiteName }}'
    WebsitePhysicalPath: F:\Websites\${{ parameters.IISWebsiteName }}
    WebsitePhysicalPathAuth: 'WebsiteUserPassThrough'
    AddBinding: true
    Bindings: '{"bindings":[{"protocol":"http","ipAddress":"All Unassigned","port":"80","hostname":"${{ parameters.Hostname }}","sslThumbprint":"","sniFlag":false}]}'
    CreateOrUpdateAppPoolForWebsite: true
    AppPoolNameForWebsite: '${{ parameters.IISWebsiteName }}'
    DotNetVersionForWebsite: 'v4.0'
    PipeLineModeForWebsite: 'Integrated'
    AppPoolIdentityForWebsite: 'ApplicationPoolIdentity'
    ParentWebsiteNameForVD: '${{ parameters.IISWebsiteName }}'
    VirtualPathForVD: #leave this empty or it breaks
    ParentWebsiteNameForApplication: '${{ parameters.IISWebsiteName }}'
    VirtualPathForApplication: #leave this empty or it breaks
    AppPoolNameForApplication: #leave this empty or it breaks
    AppPoolName: '${{ parameters.IISWebsiteName }}'

# Deploy the BE to the site
- task: IISWebAppDeploymentOnMachineGroup@0
  inputs:
    WebSiteName: '${{ parameters.IISWebsiteName }}'
    Package: '$(Pipeline.Workspace)\build-pipeline\BE\web.zip'
    RemoveAdditionalFilesFlag: false
    ExcludeFilesFromAppDataFlag: true
    TakeAppOfflineFlag: true

# Deploy the FE to the site
- task: IISWebAppDeploymentOnMachineGroup@0
  inputs:
    WebSiteName: '${{ parameters.IISWebsiteName }}'
    Package: '$(Pipeline.Workspace)\build-pipeline\FE.zip'
    RemoveAdditionalFilesFlag: false
    ExcludeFilesFromAppDataFlag: true
    TakeAppOfflineFlag: true
And we will call it from our deploy.yml file:
trigger: none # have to set it to NOT be triggered "globally" and then the real trigger is under the pipeline resources
pr: none # triggers on PRs by default, have to opt out

resources:
  pipelines:
    - pipeline: build-pipeline # this is sort of an alias that can be used later
      source: 'build' # the name of the build pipeline in DevOps
      trigger: true # will trigger once the build on this pipeline is done

stages:
  - stage: deploy dev
    jobs:
    - deployment: DeployWeb
      displayName: deploy to vm
      pool:
        vmImage: windows-2019
      environment:
        name: Dev server
        resourceType: VirtualMachine
      strategy:
        runOnce:
          deploy:
            steps:
            - template: umbraco8/deploy-tmpl.yml@PipelineTemplates
              parameters:
                IISWebsiteName: testsite
                Hostname: testsite.domain

  - stage: deploy live
    jobs:
    - deployment: DeployWeb
      displayName: deploy to vm
      pool:
        vmImage: windows-2019
      environment:
        name: Live server
        resourceType: VirtualMachine
      strategy:
        runOnce:
          deploy:
            steps:
            # Set up the IIS profile we want to deploy to, including hostname bindings
            - template: umbraco8/deploy-tmpl.yml@PipelineTemplates
              parameters:
                IISWebsiteName: testsite
                Hostname: testsite.com
As you can see we have removed the variables as now they are no longer reused - instead for each deployment environment we can simply pass in the env name and the template params specific to that environment.
Controlling conditions and environment access
One final thing to note is that you can set conditions on stages and tasks - so fx if you set the build up to track on a dev and main branch you may not want it to deploy to the live env but only to the dev one if the triggered branch is dev. You can do that by adding a single condition line on the live stage:
 - stage: deploy live
    condition: and(succeeded(), eq(variables['resources.pipeline.build-pipeline.sourceBranch'], 'refs/heads/main'))
    jobs:
This will make sure the stage only runs if the previous stage succeeds, and if the build-pipeline was triggered from the main branch.
I hope this article has been helpful. Feel free to write me on twitter @JesperMayn with any comments, questions or feedback 😊
