Advanced Tips For Content Apps
Heads Up!
This article is several years old now, and much has happened since then, so please keep that in mind while reading it.
What Are Content Apps?
Content apps were added in V8 and add an excellent way of showing extra information about your pages in the back office. I'm not going to go into too much information about the basics of content apps, as you can read about that in the documentation, which can be found on the documentation site. I've seen them used for all sorts of things, from displaying analytics data, to displaying SEO information about the page you're currently editing.
But what if you want to do something a bit more complicated? In this article We're going to walk through creating a content app that does something a bit MORE than just display some information and in the process, look at some of the issues that we might run into and try and solve them using some advanced tips and tricks I've learned for using Content Apps. We'll be using the basic Umbraco starter kit as our starting point, and building on that. There is a public GitHub repo with all of the code from this article available, and I'll link to that at the bottom of the article so you can pull it down and have a play with the finished site.
Lets Talk Versions
All of the examples in this article are using V9 as that's the latest version of Umbraco. However, everything that I'm doing here can also be done in V8, so people on older versions of Umbraco don't need to miss out! All of the front end HTML views and controllers should work as is, it'll just be any server side code that might be different. I'll try and note what changes you need to make to use this in V8 as I go along.
In writing this article, I'm using Visual Studio, but there's no reason you can't use VS Code, Rider or any other .Net IDE if you prefer.
Our Content App
We're going to create a Content App that allows a CMS editor to import some news/blog type articles onto the site as a CSV file from the main news/blog page. The user will be able to click on the App, upload a CSV file, and we'll have an API controller that will process the file and add the new pages to the CMS underneath the main news/blog section. We're going to try and use built in Umbraco components and styling so that it shouldn't look out of place in the back office.
We'll look at how to add the App, and some of the issues that we encounter and how we can get round them.
Adding the App
We'll assume that you have an install of Umbraco V9 set up, and that you've installed the basic starter kit. First, let's add our plugin to the App_Plugin folder. We're going to add an empty controller JS file, and the HTML for the view, with just some dummy content for now, to check it works. Here's a picture of the added code in VS.
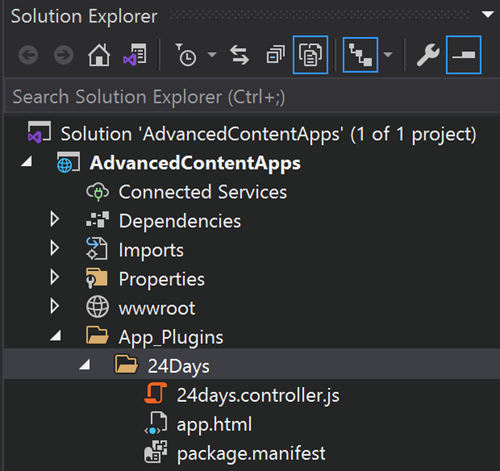
I've created a folder called "24Days" in the App_Plugins folder to house our files. I've called the content app view file "app.html" and the controller "24days.controller.js". The app view file just contains an H1 with some dummy text for now. Next up, we'll add the package.manifest file into our plugin folder, which can be seen below.
{
  //content apps
  "contentApps": [
    {
      "name": "Article Import",
      "alias": "articleImport",
      "weight": 1,
      "icon": "icon-cloud-upload",
      "view": "~/App_Plugins/24Days/app.html",
      "show": [
        "+content/blog"
      ]
    }
  ],

  // array of files we want to inject into the application
  "javascript": [
    "~/App_Plugins/24Days/24days.controller.js"
  ]
}
The initial package.manifest file for our Content App
All we're doing here is setting the Icon and title of the Content App, and then telling Umbraco which document types to show it on (the blog page in our case). Let's rebuild the site and have a look in the back office and see if we can see our content app on the blog page!

Woohoo! Success! But wait, this is where we run into our first issue.
First Issue! We Need More Advanced Permissions.
But we have our App showing, so what's the big issue? Well. Content Apps can only be assigned to document types, you can't specify in the default configuration if the apps show when an item is being added or edited. Why is that a problem? In this case, it's because our App is going to allow you to upload content underneath the blog page. If you're adding a new blog page and haven't saved it yet, you can't upload child pages, because there's nothing to upload it to, and attempting to do so will throw an error. So we need to find a way to only show our app if the page being viewed is already published. But how do we do that?
Fortunately, in Umbraco rather than use the more basic package manifest, we can register the content app in our code instead, which gives us more control over the display logic for the App. First, you can remove the contentApp definition from the package.manifest, leaving just the JS registration in there.
Next, we'll add a folder called ContentApps and add a class for our Content App there.
using System;
using System.Collections.Generic;
using System.Linq;
using System.Threading.Tasks;
using Umbraco.Cms.Core.Composing;
using Umbraco.Cms.Core.DependencyInjection;
using Umbraco.Cms.Core.Models;
using Umbraco.Cms.Core.Models.ContentEditing;
using Umbraco.Cms.Core.Models.Membership;

namespace AdvancedContentApps.ContentApps
{
    public class ArticleImportAppComponent : IComposer
    {
        public void Compose(IUmbracoBuilder builder)
        {
            // Add our app to the site
            builder.ContentApps().Append<ArticleImportContentApp>();
        }
    }

    public class ArticleImportContentApp : IContentAppFactory
    {
        public ContentApp GetContentAppFor(object source, IEnumerable<IReadOnlyUserGroup> userGroups)
        {
            // Only show app on content items
            if (!(source is IContent))
                return null;

            var content = ((IContent)source);

            // Only show app on blog list pages
            if (!content.ContentType.Alias.Equals("blog"))
                return null;

            // Only show when editing
            if (content.Id == 0)
                return null;

            return new ContentApp
            {
                Alias = "articleImport",
                Name = "Article Import",
                Icon = "icon-cloud-upload",
                View = "/App_Plugins/24Days/app.html",
                Weight = 1
            };
        }
    }
}
The classes we can use to register and load the Content App via code
You can see that we define the content app and then add the logic for whether we display the app there. Inside the class we can check pretty much anything we like (in this case we're just checking if it's content, the document type and whether the page's Id is 0 or not). We've also got the code to register the Content App in the same file at the top (you could split this out separately if you wanted to).
If you're using V8 of Umbraco, the code for this is slightly different. You can still create the App in your code, but you wire it in using a component and see of the namespaces will be slightly different. The details can be found here: https://our.umbraco.com/Documentation/Extending/Content-Apps/index-v8_7
Adding the Upload and Import Functionality
OK, now we're going to flesh out the Content App. Nothing too fancy here, we're going to add an upload field to the Content App, and hook it into a controller that we're going to create to accept the upload and add the Title and Excerpt of new blog posts underneath the blog list page and save them (but not publish them). We're going to use the built in Umbraco back office UI elements so that everything looks like it's part of the back office UI. I'm not going to go into too much detail here, but here is the code that we've now added:
The App view:
<div ng-controller="24Days.ArticleImportController as vm">
    <umb-box>
        <umb-box-header title="Article import">
        </umb-box-header>
        <umb-box-content>
            <p>
                You can use this section to import a CSV file of articlke titles and excerpts. The CSV file <strong>must</strong> contain the following fields:
            </p>
            <ul>
                <li>Title</li>
                <li>Excerpt</li>
            </ul>
        </umb-box-content>
    </umb-box>

    <umb-box>
        <umb-box-header title="Upload CSV file">
        </umb-box-header>
        <umb-box-content>
            <div ng-show="vm.invalidFileFormat" class="alert alert-error property-error" style="display: none;">The uploaded file must be in <b>.csv</b> format.</div>
            <div ng-show="vm.noFile" class="alert alert-error property-error" style="display: none;">A .csv file must be selected.</div>
            <div class="umb-panel-group__details-status-actions ng-scope" ng-hide="vm.processing">
                <div class="input-group">
                    <label class="input-group-btn">
                        <span class="btn btn-info" style="margin-bottom: 10px; text-align: center;">
                            Select .csv <input type="file" accept=".csv" umb-file-upload ngf-multiple="false" class="ng-scope" style="display: none;">
                        </span>
                    </label>
                    <input type="text" id="fileName" class="form-control" readonly style="text-align: center; width: 300px;" value="{{vm.fileName}}">
                </div>
                <umb-button action="vm.upload()"
                            type="button"
                            button-style="success"
                            state="init"
                            label="Upload file"
                            ng-if="vm.fileName"
                            icon="icon-inbox">
                </umb-button>
            </div>
            <div class="umb-panel-group__details-status-actions ng-scope" ng-show="vm.processing">
                <div class="clearfix ng-scope">
                    <div class="alert alert-info">Processing file<strong> {{vm.fileName}} </strong></div>
                </div>
                <umb-load-indicator></umb-load-indicator>
            </div>
        </umb-box-content>
    </umb-box>
</div>
The HTML view file for our App
The JS controller for the App view:
'use strict';
(function () {
    'use strict';
    function ArticleImportController($scope, editorState, contentResource, notificationsService, $timeout, Upload, $rootScope) {
        var vm = this;

        vm.blogKey = editorState.current.key;
        vm.fileName = '';
        vm.processing = false;
        vm.invalidFileFormat = false;
        vm.noFile = false;
        vm.file = null;

        vm.upload = function () {
            if (vm.file === null) {
                vm.noFile = true;
                $timeout(function () {
                    vm.noFile = false;
                }, 500);
                return;
            }
            vm.processing = true;

            Upload.upload({
                url: "/umbraco/backoffice/24days/import/importarticles?blogKey=" + vm.blogKey,
                file: vm.file
            }).success(function (response) {
                vm.processing = false;

                notificationsService.success(response);

                activate();
            }).error(function (data) {
                vm.processing = false;

                notificationsService.error("Unable to process CSV upload");
            });
        }

        $scope.$on("filesSelected", function (event, args) {
            if (args.files.length > 0) {
                vm.file = args.files[0];
                vm.fileName = vm.file.name;
            } else if (args.files.length <= 0 || vm.processing) {
                vm.file = null;
                return;
            }

            vm.noFile = false;

            var extension = vm.fileName.substring(vm.fileName.lastIndexOf(".") + 1, vm.fileName.length).toLowerCase();
            if (extension !== 'csv') {
                vm.invalidFileFormat = true;
                $timeout(function () {
                    vm.file = null;
                    vm.invalidFileFormat = false;
                }, 500);
                return;
            }
        });

        function activate() {
            vm.file = null;
            vm.fileName = '';
        }

        activate();
    }
    angular.module('umbraco').controller('24Days.ArticleImportController', ArticleImportController);
}());
The JS controller for our App
The controller that we post the file to:
using CsvHelper;
using Microsoft.AspNetCore.Mvc;
using System;
using System.Collections.Generic;
using System.Globalization;
using System.IO;
using System.Linq;
using System.Threading.Tasks;
using Umbraco.Cms.Core.Services;
using Umbraco.Cms.Web.BackOffice.Controllers;
using Umbraco.Cms.Web.Common.Attributes;
using Umbraco.Cms.Web.Common.Controllers;

namespace AdvancedContentApps.Controllers
{
    [PluginController("24Days")]
    [IsBackOffice]
    public class ImportController : UmbracoAuthorizedJsonController
    {
        private readonly IContentService _contentService;

        public ImportController(IContentService contentService)
        {
            _contentService = contentService;
        }

        [HttpPost]
        public IActionResult ImportArticles([FromQuery] Guid blogKey)
        {
            if (!Request.HasFormContentType && !Request.Form.Files.Any())
            {
                return BadRequest("Error: bad file uploaded.");
            }

            var uploadedFile = Request.Form.Files[0];

            using (var reader = new StreamReader(uploadedFile.OpenReadStream()))
            using (var csv = new CsvReader(reader, CultureInfo.InvariantCulture))
            {
                //get the header rows
                csv.Read();
                csv.ReadHeader();

                //read the CSV data
                while (csv.Read())
                {
                    var title = csv.GetField<string>(0);
                    var excerpt = csv.GetField<string>(1);

                    var newPage = _contentService.Create(title, blogKey, "blogPost");

                    newPage.SetValue("pageTitle", title);
                    newPage.SetValue("excerpt", excerpt);

                    _contentService.Save(newPage);
                }
            }

            return Ok("Success: the file you uploaded has been uploaded to the system and processed.");
        }
    }
}
Our import controller to process the CSV and create the articles
We're using a Nuget package called CSV Helper to read the CSV file that we upload. We're not doing any validation or anything fancy, as this is just an example. We assume that the title is in the first column and that the second column has the excerpt. We also assume the first row of the CSV file has the headers in it. You can call them whatever you like, as we're not referring to them in our code (but in a more robust solution, you might want to validate field header names etc). CSV Helper has support for this, as well as for mapping to POCOs and objects.
With the code here, all of the front end code should work as is in V8, but you may need to update some namespaces etc in the Controller that we post to to make it work correctly.
And here we can see our App, which looks like part of the back office thanks to our use of the back office UI elements and directives:

All done! So now if we upload a CSV file with some content in, we should see a success message! Yay right? Right?
Second Issue! The Listview Doesn't Update With the Imported Pages
Not so fast! this is where we hit our second issue. After import, click on the list view for the child pages, and there's not sign of the new pages we brought in!!! Does this mean it didn't work? Not quite. If you refresh the page in the browser, you'll see the new pages have been added, but the list view wasn't updated when we added them.
This isn't a massive issue, but it is bad UI for the users, who may assume that the content they imported has not actually run and run the import lots of times, resulting in lots of duplicate content.
It took a lot of looking through source code to figure out a way of doing this, but I discovered that the list view does have a way of refreshing the list view content. There's code in the JS controller that will refresh the list views if the language is changed in the back office. I couldn't find a way to call that directly from our App, but what I settled on was this:
- emit an event on upload in our Content App to the $rootScope which all Angular components have access to
- create a custom list view that's based on the built in one, and add a listener there for our emitted event, and refresh the list view when it happens
First, let's modify the App JS controller to emit our custom event! All we're going to do is add the following line of code $rootScope.$emit("RefreshCustomListView", {}); underneath the call to notificationService.success(response);
All this line does is emit an event on the rootScope that other things can listen out for. In order to do this, you need to pass in $rootScope to your JS controller's constructor so it can be accessed by your code.
Now we'll create our custom list view template and controller and add them to our project. In our controller we're going to listen for the custom event we're emitting and when it fires, we'll call the refresh function on the main list view that refreshes all the list views. To do this, I've just copied the built in code for the list type list view and added some extra code to listen for our special event:
'use strict';
(function () {
    'use strict';
    function FilteredListViewListLayoutController($scope, listViewHelper, mediaHelper, mediaTypeHelper, urlHelper, $rootScope) {
        var vm = this;
        var umbracoSettings = Umbraco.Sys.ServerVariables.umbracoSettings;
        vm.nodeId = $scope.contentId;
        // Use whitelist of allowed file types if provided
        vm.acceptedFileTypes = mediaHelper.formatFileTypes(umbracoSettings.allowedUploadFiles);
        if (vm.acceptedFileTypes === '') {
            // If not provided, we pass in a blacklist by adding ! to the file extensions, allowing everything EXCEPT for disallowedUploadFiles
            vm.acceptedFileTypes = !mediaHelper.formatFileTypes(umbracoSettings.disallowedUploadFiles);
        }
        vm.maxFileSize = umbracoSettings.maxFileSize + 'KB';
        vm.activeDrag = false;
        vm.isRecycleBin = $scope.contentId === '-21' || $scope.contentId === '-20';
        vm.acceptedMediatypes = [];
        vm.selectItem = selectItem;
        vm.clickItem = clickItem;
        vm.selectAll = selectAll;
        vm.isSelectedAll = isSelectedAll;
        vm.isSortDirection = isSortDirection;
        vm.sort = sort;
        vm.dragEnter = dragEnter;
        vm.dragLeave = dragLeave;
        vm.onFilesQueue = onFilesQueue;
        vm.onUploadComplete = onUploadComplete;
        markAsSensitive();
        function activate() {
            if ($scope.entityType === 'media') {
                mediaTypeHelper.getAllowedImagetypes(vm.nodeId).then(function (types) {
                    vm.acceptedMediatypes = types;
                });
            }
        }
        function selectAll() {
            listViewHelper.selectAllItemsToggle($scope.items, $scope.selection);
        }
        function isSelectedAll() {
            return listViewHelper.isSelectedAll($scope.items, $scope.selection);
        }
        function selectItem(selectedItem, $index, $event) {
            listViewHelper.selectHandler(selectedItem, $index, $scope.items, $scope.selection, $event);
        }
        function clickItem(item) {
            listViewHelper.editItem(item);
        }
        function isSortDirection(col, direction) {
            return listViewHelper.setSortingDirection(col, direction, $scope.options);
        }
        function sort(field, allow, isSystem) {
            if (allow) {
                $scope.options.orderBySystemField = isSystem;
                listViewHelper.setSorting(field, allow, $scope.options);
                $scope.getContent($scope.contentId);
            }
        }
        // Dropzone upload functions
        function dragEnter(el, event) {
            vm.activeDrag = true;
        }
        function dragLeave(el, event) {
            vm.activeDrag = false;
        }
        function onFilesQueue() {
            vm.activeDrag = false;
        }
        function onUploadComplete() {
            $scope.getContent($scope.contentId);
        }
        function markAsSensitive() {
            $scope.options.includeProperties.forEach(function (option) {
                option.isSensitive = false;
                if ($scope.items && $scope.items.length) {
                    $scope.items.forEach(function (item) {
                        item.properties.forEach(function (property) {
                            if (option.alias === property.alias) {
                                option.isSensitive = property.isSensitive;
                            }
                        });
                    });
                }
            });
        }
        activate();

        $rootScope.$on("RefreshCustomListView", function () {
            $scope.refreshListView();
        });

        $scope.refreshListView = function () {
            $scope.$parent.$parent.$parent.$parent.$parent.reloadView($scope.contentId);
        }
    }
    angular.module('umbraco').controller('24Days.FilteredListLayoutController', FilteredListViewListLayoutController);
}());
The code for the controller for the custom list view that will support refreshing
The key part here is at the bottom where we listen for our custom event on the root scope, and when we handle it, we call a function that calls the built in refresh list view function that lives higher up the Angular scope tree. We can handily get at it using the $parent property of the scopes!
<div ng-class="{'-content':(entityType === 'content')}"
     ng-controller="24Days.FilteredListLayoutController as vm">

    <div ng-if="entityType === 'media'"
         on-drag-leave="vm.dragLeave()"
         on-drag-end="vm.dragLeave()"
         on-drag-enter="vm.dragEnter()">

        <umb-file-dropzone ng-if="!vm.isRecycleBin && vm.acceptedMediatypes.length > 0"
                           accepted-mediatypes="vm.acceptedMediatypes"
                           parent-id="{{vm.nodeId}}"
                           files-uploaded="vm.onUploadComplete"
                           accept="{{vm.acceptedFileTypes}}"
                           max-file-size="{{vm.maxFileSize}}"
                           hide-dropzone="{{options.filter.length > 0}}"
                           compact="{{ items.length > 0 }}"
                           files-queued="vm.onFilesQueue">
        </umb-file-dropzone>

        <umb-table ng-if="items"
                   items="items"
                   allow-select-all="options.bulkActionsAllowed"
                   item-properties="options.includeProperties"
                   on-select="vm.selectItem(item, $index, $event)"
                   on-click="vm.clickItem(item)"
                   on-select-all="vm.selectAll($event)"
                   on-selected-all="vm.isSelectedAll()"
                   on-sorting-direction="vm.isSortDirection(col, direction)"
                   on-sort="vm.sort(field, allow, isSystem)">
        </umb-table>

    </div>

    <div ng-if="entityType !== 'media'">

        <umb-table ng-if="items"
                   items="items"
                   allow-select-all="options.bulkActionsAllowed"
                   item-properties="options.includeProperties"
                   on-select="vm.selectItem(item, $index, $event)"
                   on-click="vm.clickItem(item)"
                   on-select-all="vm.selectAll($event)"
                   on-selected-all="vm.isSelectedAll()"
                   on-sorting-direction="vm.isSortDirection(col, direction)"
                   on-sort="vm.sort(field, allow, isSystem)">
        </umb-table>

        <umb-empty-state ng-if="!items && options.filter.length === 0 && !vm.isRecycleBin"
                         position="center">
            <div ng-show="entityType === 'content'"><localize key="content_listViewNoContent">No content has been added</localize></div>
            <div ng-show="entityType === 'member'"><localize key="content_listViewNoMembers">No members have been added</localize></div>
        </umb-empty-state>

    </div>

    <umb-empty-state ng-if="!items && options.filter.length > 0"
                     position="center">
        <localize key="general_searchNoResult"></localize>
    </umb-empty-state>

    <umb-empty-state ng-if="!items && options.filter.length == 0 && vm.isRecycleBin"
                     position="center">
        <localize key="general_recycleBinEmpty"></localize>
    </umb-empty-state>

</div>
The custom view we'll be using for our list view
Next, update the package.manifest to include our new controller and finally, we'll edit the default list view for content to use our new list view instead of the built in one:
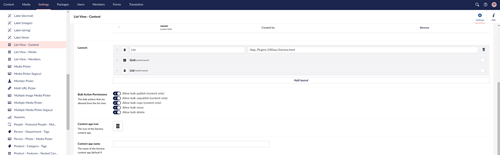
If we rebuild/reload the site and go to the import and run it, and then click the list view for child items, we should now see our imported items showing on the list without needing to reload the page!
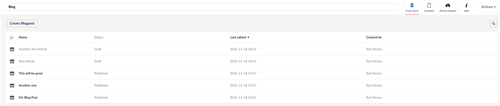
Because we've replaced the default list views, this now means we can use this feature on all of the content list views. For this example, I've just re-done the standard list style view template, but you could do the grid style one as well if you wanted to.
All of the code for this part should work in both V8 and V9, as it's all front end!
Hopefully this has been interesting and has given you some ideas about more complicated things you can do with Content Apps!
Future Improvements
This example is very basic, We don't do any duplicate checking on the import, and we're only setting a couple of properties. You could make the import much more robust if you wanted to. If you wanted an audit trail, you could even add an audit trail and display a history of imports in the content app underneath the import. We're also not validating the uploaded CSV file, so you may want to do some checking for things like required columns, whether any required fields are missing etc.
The angular code for some of this is a little bit hacky, there's probably a better way of doing some of the things that I've done here around communicating between scopes and components. There's probably plenty of room for improving on my javascript! I'm also doing things like calling the back office APIs from within the JS controller for the Content App, but you might want to split that out into its own angular resource, especially if you want to re-use the code.
GitHub Repo
There is a Github repo available with a working version of the code that we've built in this article. You can download the repo and build it and have a play with the code. Full instructions on running the site and logins for the CMS etc are in the readme for the repo. You can access the repo here: https://github.com/Attackmonkey/Advanced-Tips-For-Content-Apps.
