Azure Load Balancing
Heads Up!
This article is several years old now, and much has happened since then, so please keep that in mind while reading it.
This article collects a lot of different technical setups and will refer to several concepts that we can’t go into detail with here. To get the most out of it, it’s best to have some Azure tools and Web Apps experience. We will link to more information where it is relevant.
Setting up Azure
The first thing to do is to make sure you have created all the Azure resources and configured them. Follow the steps below to ensure you have created all the necessary items for the auto scaling environment:
- Create a Web App for the front-end website. Please ensure auto scaling is enabled. You can see step by step instructions for creating an Azure Web App in this Microsoft Learning tutorial.
- Create another Web App for the Umbraco backend website. Auto scaling should not be enabled for this Web App as the backend will not work properly if you enable auto scale here.
- Create an Azure SQL database. This database will be shared with the frontend and backend websites.
- Create an Azure Storage Account for the Umbraco media files.
Now you are ready to set up the Umbraco media files with Azure storage.
Setting up Umbraco media files with Azure Storage
You can set up Umbraco media files to be stored and served from Azure Blob storage with the following steps:
- Open Visual Studio
- Install the UmbracoFileSystemProviders.Azure using the nuget package.
- Install UmbracoFileSystemProviders.Azure.Media using the nuget package. This will be installed on top of UmbracoFileSystemProviders.Azure but all the settings will be maintained.
- Copy the storage account name and access key from the Azure portal and follow the config update instructions given here in this guide by Jeavon.
If the settings are done correctly, you will be able to see the files in Azure Blob, when you create a media file in the Umbraco media section.
Install SSL certificate for the App Service
Now you need to install the SSL certificate so the applications will be secure:
- Select App Services in the left menu in the Azure portal and click on the relevant app.
- From the left navigation of your app, select TLS/SSL settings.
- Click on Private Key Certificates (.pfx)
- Click on Create App Service Managed Certificate.
- Select the custom domain to create a certificate for it and click on Create. (Note that you can only create one certificate for each supported custom domain.)
The certificate can now be found in the Private Key Certificates list.

Setting up Application Insights for Monitoring
We recommend installing Application Insights so you can monitor the availability, performance and usage of your web applications. You can also then track live metrics streams, requests and response times and events.
Read more about this here.
Configure CDN endpoints
You then need to set up the CDN endpoints for the media files path to work properly as media files are now served from the Azure Blob storage.
We recommend following the detailed steps in this guide written by Jeavon on GitHub & the Umbraco documentation.
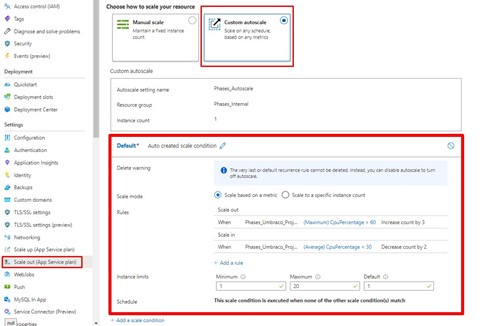
Configure the scale out rules in the Azure Web App
- Select App Services in the left menu in the Azure portal and click on the relevant app.
- From the left navigation of your app, select Scale out (App Service plan)
- Set up the the two rules as shown in the screenshot below
Staging Environment
Setting up your staging environment to be the same as your live environment is ideal for testing, so we recommend you make both load balanced.
Repeat all the above steps to set up an identical Staging environment.
Setting up Azure DevOps
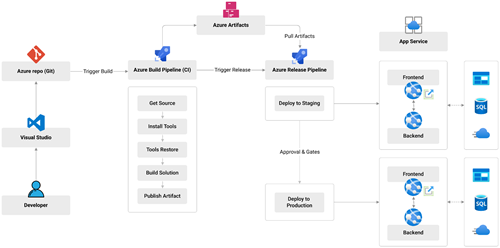
At this point, we highly recommend setting up Azure DevOps so the deployment can be done seamlessly to each environment.
You can see the DevOps pipeline workflow we follow below:
Azure Specific Configuration
It’s time to head into the web.config to make special configurations to prevent several issues. We’ve compiled the important steps below, but you can read more about this here.
Examine Directory Factory Options
To avoid issues with Examine indexes becoming locked and corrupt add the following appSettings within Web.config
Frontend website web.config:
<add key="Umbraco.Examine.LuceneDirectoryFactory"
	value="Examine.LuceneEngine.Directories.TempEnvDirectoryFactory, Examine" />
Backend website web.config:
<add key="Umbraco.Examine.LuceneDirectoryFactory"
	value="Examine.LuceneEngine.Directories.SyncTempEnvDirectoryFactory, Examine" />
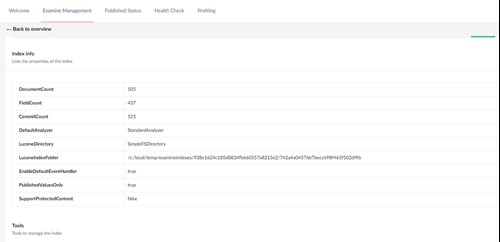
Once the above configurations are added, then we need to verify that Examine is working. You can check this by using the backend search. If the backend search works, then Examine is working.
You can also check the path of the Examine indexes via the Examine dashboard.
Configure Umbraco to use the Environment Temporary folder
To avoid several servers sharing the same temporary files, move any Umbraco temp files to the non-synced environment temp storage.
- Add the following to appSettings within Web.config of the backend webapp:
<add key="Umbraco.Core.LocalTempStorage" value="EnvironmentTemp" /> - Delete the /App_Data/TEMP folder
Umbraco MainDom locking
You want to avoid the Published Cache locking when the Azure Web Apps auto transitions between hosts. This can be done by configuring the app to use SQL for MainDom locking
Add the following to appSettings within the Web.config of the backend:
<add key="Umbraco.Core.MainDom.Lock" value="SqlMainDomLock" />
Configure an explicit master scheduling server
Umbraco recommends configuring an explicit master scheduling server as it will reduce the amount of complexity performed by the master election process. You can read more about that here.
There’s two ways to achieve this: IServerRegistrar or editing the UmbracoSettings.config file.
Option 1 - Using IServerRegistrar
You need to create a couple of classes for the front-end servers and master server:
public class MasterServerRegistrar : IServerRegistrar
{
    public IEnumerable<IServerAddress> Registrations
    {
        get { return Enumerable.Empty<IServerAddress>(); }
    }
    public ServerRole GetCurrentServerRole()
    {
        return ServerRole.Master;
    }
    public string GetCurrentServerUmbracoApplicationUrl()
    {
        // NOTE: If you want to explicitly define the URL that your application is running on,
        // this will be used for the server to communicate with itself, you can return the
        // custom path here and it needs to be in this format:
        // https://www.website.com/umbraco

        return null;
    }
}

public class FrontEndReadOnlyServerRegistrar : IServerRegistrar
{
    public IEnumerable<IServerAddress> Registrations
    {
        get { return Enumerable.Empty<IServerAddress>(); }
    }
    public ServerRole GetCurrentServerRole()
    {
        return ServerRole.Replica;
    }
    public string GetCurrentServerUmbracoApplicationUrl()
    {
        return null;
    }
}
Once the above classes are created then you need to register them in the backend and the frontend.
Backend registration
[RuntimeLevel(MinLevel = RuntimeLevel.Run)]
public class OurComposer : IUserComposer
{
	public void Compose(Composition composition)
	{
		composition.SetServerRegistrar(new MasterServerRegistrar());
	}
}
Frontend registration
[RuntimeLevel(MinLevel = RuntimeLevel.Run)]
public class OurComposer : IUserComposer
{
	public void Compose(Composition composition)
	{
		composition.SetServerRegistrar(new FrontEndReadOnlyServerRegistrar());
	}
}
Option 2 - Using UmbracoSettings.config
Another option is to set the UmbracoApplicationUrl via configuration rather than using a ServerRegistrar.
To do this you need to edit the umbracoSettings.config and add the URL of the web app with the trailing “/umbraco” to the umbracoApplicationUrl attribute of the web.routing element (change the URL https://backend.azurewebsites.net/ to the URL of your backend website):
<web.routing
	trySkipIisCustomErrors="false"
	internalRedirectPreservesTemplate="false"
	disableAlternativeTemplates="false"
	disableFindContentByIdPath="false"
	umbracoApplicationUrl="https://backend.azurewebsites.net/umbraco">
</web.routing>
Restrict accessing umbraco backend from the frontend website
Once the two Web Apps are set up, the backend should only be accessed via a single instance.
Add the following rule in the web config file to ensure this (change the URL https://backend.azurewebsites.net/ to the URL of your backend website):
<rewrite>
	<rules> <!-- Restrict access to Umbraco -->
		<rule name="Restrict access" stopProcessing="true">
			<match url="umbraco$|umbraco/(?!surface\/)(?!api\/)(?!webservices\/)" />
			<conditions logicalGrouping="MatchAll" trackAllCaptures="false">
				<add input="{HTTP_HOST}" pattern="(([^.]+)\.)?frontend\.azurewebsites\.net" negate="true" />
				<add input="{HTTP_HOST}" pattern="(([^.]+)\.)?localhost" negate="true" />
			</conditions>
			<action type="Redirect" url="https://backend.azurewebsites.net/umbraco/" appendQueryString="false" />
		</rule>
	</rules>
</rewrite>
Custom Index in scaling environment
If your application uses custom indexes then you should use a CacheRefresher to tell the other servers to also index the data.
Add the following event handler to a composer In order to use CacheRefresher event
ContentCacheRefresher.CacheUpdated += ContentCacheRefresher_CacheUpdated;
Refer to this ExamineComponent source code to understand how CacheRefresher refresh events can be used.
In the handler populate/remove the custom index items as required (as opposed to using ContentService_Published for example).
Thank you for reading!
In this article we compiled several tutorials and documentations to help you configure load balancer for your Umbraco website with two Azure Web Apps.
You can read more about load balancing with Umbraco in the Umbraco documentation.
We hope you found this article helpful. Should you have any questions, you are always welcome to reach out to us through our website contact form.
Happy holidays from Phases :)


