Upgrading Umbraco
Heads Up!
This article is several years old now, and much has happened since then, so please keep that in mind while reading it.

Before we begin, some context. Don't worry you can skip my introduction and skip straight to the meat and bones of the guide by going here.
I'm both a recent convert to Umbraco and relatively new to developing with .net and the various tools such as Visual Studio and task runners such as Gulp that come part and parcel with being a web developer nowadays.
I had been building hobby websites as early as the 1990's, I had no idea that there was a world beyond that of HTML+CSS+JS/SQL/PHP so when I moved into my current role managing websites that were built using Asp.Net and Umbraco - I found myself having to completely re-frame my understanding of what building and developing websites meant and further - a whole host of tools, techniques and concepts that seemed overly complex or counter-intuitive.
Added to that - I inherited a good 15 or so websites that were built on the Umbraco platform - all of which were on different versions of Umbraco going as far back as version 6.1.6 and with an increasing need to upgrade these sites to make use of some of the advances in Umbraco required learning how to utilise the tools available such as Visual Studio in order to maintain and develop these sites further. However as a newcomer to the technology, Visual Studio in particular, was a daunting prospect having never used the application previously.
Similarly, even though I had previous experience with GitHub and version control - I had only scratched the surface with how useful it could be in assisting this kind of development - both ensuring that there was always a way of reverting my Umbraco projects so that if anything went wrong I had a fall back position and could reverse everything in simple steps - but more usefully in the case of upgrading Umbraco - something that explicitly gives me really useful information about the changes to files that I need to make in order to Upgrade successfully.
As a result I've been constantly on the lookout for guides and tutorials that break things into simple easy steps that even those with the most basic understanding of web development can follow and understand. However with the internet still in its relative infancy, there continues to be a large gap between user friendly accessible guidelines and information orientated towards already experienced web developers.
This is why I've decided to write this article targeted at beginners to visual studio and GitHub so that it could be of use to anyone who may find themselves in the same position that I was in. This isn't necessarily the recommended way of either utilising GitHub or Visual Studio in these tasks and the more experience one gets in managing projects such as these - the more the process can be streamlined and improved. But I'm hoping that by following the way I've managed to upgrade my sites through using version control process such as GitHub - this guide will give beginners a starting point through which they can quickly understand how it all works before they can then develop their own methods of achieving the same goals.
Without further ado - let's begin the guide which after all is the reason you're probably reading this article.
Beginner's guide to Upgrading Umbraco
Prerequisites:
- Your site and database and any integrations etc fully backed up
- Microsoft Visual Studio
- Git
- An account on GitHub
- Microsoft SQL Studio (or whichever equivalent tool used to view and manage your SQL databases)
- A working visual studio solution file (.sln) for your website project*
* note: If you don't have a working Visual Studio file then don't panic all is not lost - I have included a brief guide to setting up Visual Studio for sites without solution files at the end of this article.
** another note: Many of the steps required to upgrade may not need Visual Studio and can be done without it depending on the complexity of your site - it is perfectly feasible to upgrade without using it particularly if your site is based on a vanilla install of Umbraco without any custom code and therefore does not need to be recompiled - however without it will mean that if you do run into any issues that break the site, you will lack some really useful tools to help identify and solve the bugs causing the failure. So if not using VS then proceed at your own risk (meaning that using version control will be even more useful).
Step 1: Plan your upgrade path
Planning out your upgrade path is critical. Just search in google or on the Umbraco forums and you will find countless threads of developers who have attempted upgrades which have resulted in broken sites maybe because they have tried to upgrade in too few steps which has resulted in a cascade of errors which have all to be resolved before the site has a hope of working again.
How many steps needed in your upgrade is dependent on your starting point - read through the version specific upgrade guides on Umbraco to find out the major changes that were implemented under each version. It will also depend on the complexity of your site and how far away your site is from where you need it to be.
A tool I've found really useful but is not immediately obvious is the 'Compare' tool on our.umbraco.com. This will enable the user to define their starting and end point for upgrades and to plan file changes accordingly.
As the site I am upgrading for this example is currently running on Umbraco 7.2.0 - I have planned to upgrade my site accordingly (thanks to codeshare for creating this guide which I generally use as the basis for defining my upgrade path).
Therefore to reduce the risk of getting the trusty YSOD the plan I intend to use whilst upgrading is:
7.2.0 => 7.2.8 => 7.3.8 => 7.4.3 => 7.5.14 => 7.6.13 => 7.7.13 => 7.9.6 => 7.10.4 => 7.11.1 => 7.12.3
It seems a lot of steps so feel free to miss some out particularly if you are confident your site doesn't need so many steps. However - as we're going to learn - ensuring good version control allows you to make mistakes as you will always have a roll-back position. So feel free to experiment and see what happens. Sometimes it can be fun to completely break a site and see if you can figure out why.
The guide won't cover every single step - but will cover those with the most important changes that need to be considered.
** just an important aside here - When planning your upgrades you will need to identify and check any packages or plugins that you have in your site. There may well be dependencies that packages rely upon that get amended in the upgrade - so just always double check your packages and ensure that if you upgrade - the package will remain compatible. If not - then check to see if the package author has released a version that will be compatible with the version you are upgrading to. Failing that, then you will have to either abandon using the package / plug-in, use an alternative package that works with the version of Umbraco to which you are upgrading or lastly see if you can create your own custom code to perform the same function.
Step 2: Create a development version of your site
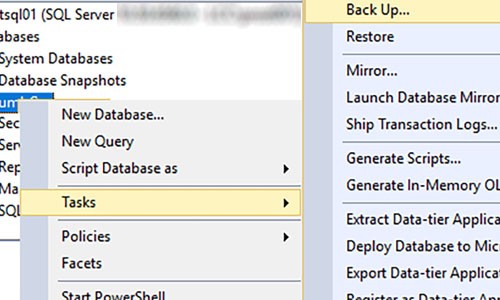
First backup your database
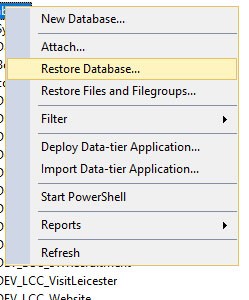
and restore your database to a new version.
Make sure you tick the 'copy only' box and that you have changed the name of the database you are restoring to so that it becomes a copy of the old data but in a freshly sparkling new database
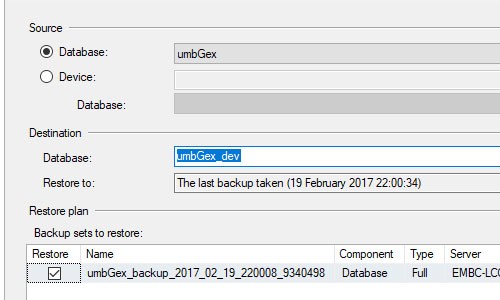
Once the database is restored with a new name make a note of the new name of the database and if necessary ensure you have checked your security options and if necessary create a new profile for accessing your Dev site with a new password.
Step 3: Create a new Git repo
First - setup your folders for working with Git.
- Open the directory containing your website project code
- Copy your site files into the directory
- Right-click and choose 'Git bash here..'
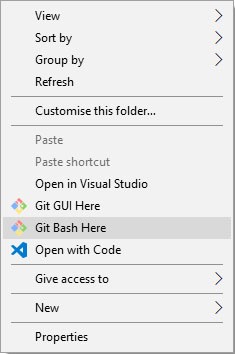
This will open up a command line interface from within your directory folder as well as setting up your master branch indicated but the <master> at the end of the directory path.
- Type git init to setup a new local git repository from within the folder
- Type git add . to add all the files of your site
- Type git commit -m "your message here"
It's important to always include a message with your commit so that you can track your commits. As we're setting up the project for the first time use a message such as:
- git commit -m "Site Setup"
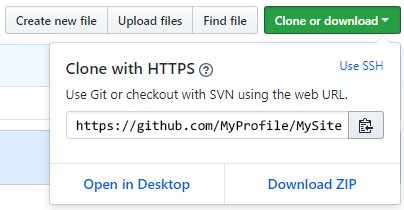
Now open up your web browser and go to your git account and choose the 'new repo'.

Give it a sensible name and click 'Create repository'. On the right hand side of the window click on Clone or Download and copy the web url given as the path to your git repo on GitHub.
Now you need to set your local git to point to your new git repo on github.
- Open up your command line in your sites location
- Enter Git remote add origin https://github.com/yourSite to tell your local repository where the remote repository is located
- Now you can upload or 'Push' your site to your new repo
- Enter Git push -u origin master
Check in your web browser (you may need to refresh a few times) that the repository you created on GitHub has received the files that you 'pushed' to it.
Now you have your site and its code on GitHub within your master branch. This means you now have your site set as the 'master' version within its repo and as long as you don't commit or push to your master version of your site - you will always have this to fall back to if you ever need to completely restore your site before you began upgrading.
Step 4: Create a new branch for managing your upgrade
In order to manage your upgrade process you need to create a new branch for the updated site.
The usual git workflow would be to create a branch for coding in some changes - once confirmed then merging into the master branch.
However because we're running concurrent upgrades - rather than merging any changes into the master branch - we're going to continue to create branches per upgrade and only when we're satisfied that the site is running on the version of Umbraco that we want - then we can think about merging back into the master repository.
In order to create a branch on your new repo - open up your Gitbash window in your project folder and type:
Git checkout -b upgrade7.5.3
This will create a new branch on your project specifically to manage your upgrade of your site to 7.5.3
Because it's empty and you haven't yet made any changes there is nothing to add. However, because you created a new branch some of the git files have been amended. So if you want to see your changes on the GitHub repository - then run git add . to pick up those changes, commit them with git commit -m "create branch for upgrade7.5.3" and then push your changes to your repository: git push -u origin upgrade7.5.3.
Step 5: Check Documentation
It's at this point you need to take a look at the version specific upgrade guides and the compare tool previously mentioned.
Step 6: Upgrade
Now is the point you can commence your upgrade.
If doing manually - you can skip most of this section as it covers using Visual Studio to run the upgrade - just make sure then when commencing the upgrade, follow the advice on the version specific upgrade guide. The disadvantages of doing manually of course is that if the upgrade breaks your site - it will be much more problematic to identify the cause of the issue.
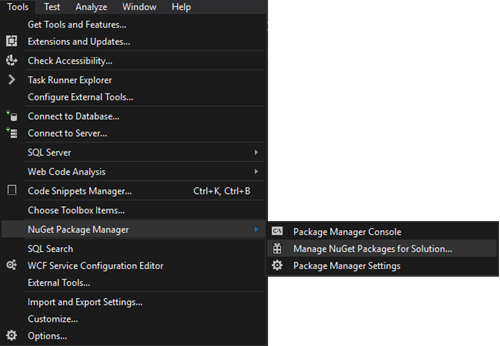
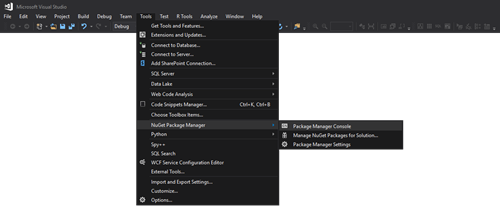
If you're using MS Visual Studio for building your site - open your project and browse to Tools > NuGet Package Manager > Manage NuGet Packages for solution
Go to the updates tab and scroll down to UmbracoCMS and highlight it.
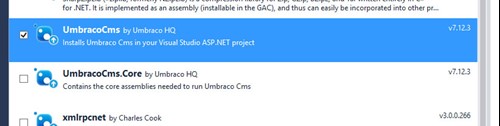
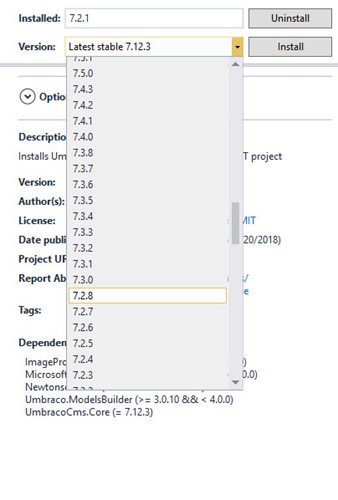
To the right you will find a window with the current version of Umbraco installed on your site and the latest version of Umbraco available for install.
Change the version that you want to install by opening the drop-down and finding the version you want to install to.
Now before we hit that install button - lets use Umbraco Compare to look at what updates the new version will bring and if we have to do anything in particular to make it work.
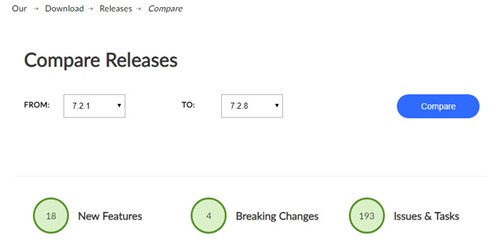
Running through the list of things we can see that the updates are generally bug fixes and amendments to some of the features.
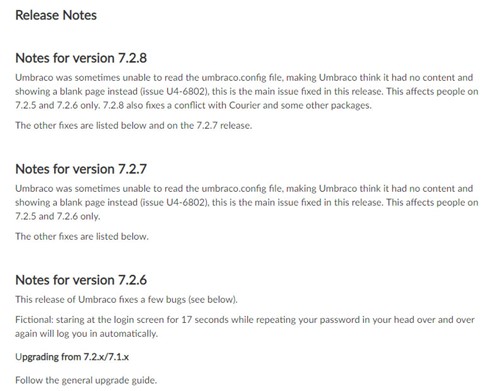
The notes also tell me that in order to upgrade from version 7.2.1 - to just follow the general upgrade guide as per usual.
So at this point - as I have everything backed up including my web.config - I feel confident that I can hit the install button and install the new version of Umbraco onto my site.
Once done - you should get your nice new install of Umbraco - if using Visual Studio you will get that all too familiar screen indicating 'Don't Forget To Build'!
Step 7: Compare and merge
Before we hit build though - let's compare our web config with our backed up version so we can make any amendments necessary.
To compare we can do what is sometimes referred to as a 'diff' - a useful tool that comes as part of Git to enable us to see what is being changed in a file.
In the following example I've added a line "Here is some extra content" in my web.config
So in your git bash window - enter the command git diff head
This will look at any changed files on your local dev system. The version install guides on Our Umbraco will indicate which files need to be merged. However as a minimum you should always do a Diff on your web.config file so you can familiarise with any changes that are made and merge any custom code or references in your web.config that needs to be retained - in particular the connection string which will always need to be copied into any new version of your web.config.
If you aren't quite comfortable doing your diff using the console - then there are many varied diff viewer software easily available not least of which is GitHub own Diff Viewer.
Step 8: Build
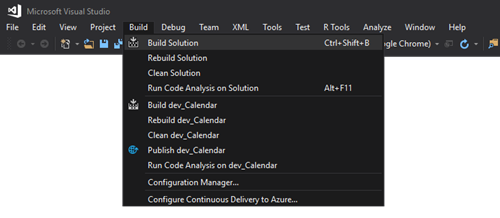
So once any merges have been made - it is time to try compiling your site with the new version of Umbraco. In Visual Studio - hit build.
With luck - your site should build first time without issue. However invariably there will always be some versions of Visual Studio that you upgrade to that will cause issue when trying to build. In many cases this is down to certain packages or plugins that have incorrect references or did not install or update correctly when installing Umbraco through Nuget.
For example - the reference to HTML5AgilityPack in the web.config when installing Umbraco 7.6 through Nuget indicates that version 4.9 is needed yet the version that is installed when upgrading Umbraco is 4.9.5 - and Nuget has not updated the references in the project correctly. I have found the best way to resolve this is to get Nuget to reinstall all the packages refrerenced in the project.
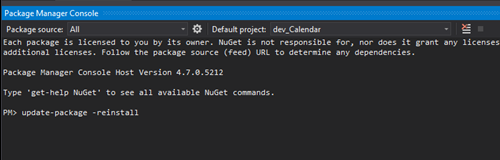
In order to do this - open up the package-manager console in Visual Studio:
Type the following and press enter:
>update-package -reinstall
This should update any references in your project
Step 9: Git add and push
In order to update your upgrade to the GitHub repo - firstly open git bash and type:
git add .
This will search the repo for any files that have changed and stage them ready to be committed. The period denotes that 'all' files in the current directory should be added.
So the next step is to commit them to the project
So staying in the same branch - use:
git commit -m "upgrade 7.4.3"
Remember that when you commit it is important to include a descriptive message so you can easily identify the changes.
Now that you've committed your files - it is time to update your GitHub repo so this time:
git push origin <branch name>
Once done - you will see a list of all the files that are being added onto GitHub
Now open up GitHub in your browser and browse to the repository.
If your git push went according to plan - you will see all the files and folders that had the message "upgrade 7.4.3" now added to your repository.
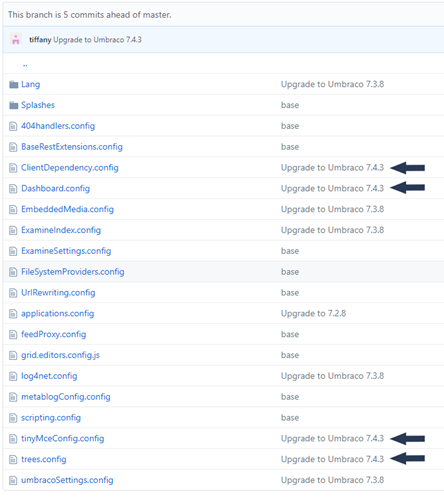
The magic here is that because you included a message with your commit - you can now easily identify the files that need updating into your live version by the addition of the message. This means it's a simple matter of updating your live version with only those files that were updated.
Step 10: Update your live version
Now that we have the amended files on the GitHub repo - we can easily identify them with the message "upgrade 7.4.3" that we added when we committed.
This is a very useful piece of information - it enables us to then easily identify the files that we need to replace or add in the live version of the site.
If we were upgrading manually - depending on the number of changes to files - it can be more difficult to keep track of the files that need to be changes in the live version.
Step 11 Next steps
So if you recall - all this work was done within the branch on GitHub specific to this upgrade.
If this were a new feature or a bug fix on a website - developers would normally end the process by merging the upgrade into the master repository
However - because it is likely that there are more steps in the upgrade process - you now have a branch dedicated to a particular upgrade.
Therefore in order to continue upgrading - you can create a new branch in your GitHub repo in order to manage the next upgrade.
Only upon reaching the end of your upgrade path - you can then decide if you need to merge your upgrade code into the master repo.
Creating a Visual Studio solution for existing websites
- Open fresh copy of Visual Studio
- File->New Project, select Web Application
- Use the following settings:
- Name: Website (this is the name of the existing folder with the website files in it)
- Location: C:\Temp\ (anywhere will do for now)
- Solution Name: TheProject (name of the existing project's root folder)
- Check "Create directory for solution"
- Delete the auto-created Default, Global and Web.config files
- Save All and close Visual Studio
- In Windows Explorer, copy the new folder on top of the existing folder so that the files are merged.
- Double click on the sln file to open Visual Studio again.
- Select "Show all files" (at the top of Solution Explorer)
- Right click on any files or folders you want to add and select Include in Project.
- Open up the web.config in visual studio and got to appsettings > umbracoconfigurationstatus to find the version of Umbraco you need
- Go to Nuget package manager > and install a fresh version of Umbraco of the same version from your web.config
- Make sure not to overwrite the web.config otherwise the new install will overwrite the connection strings and any manual configuration
- Once Umbraco is installed – build it
- Run the site in debug mode through Visual Studio. It will provide you with all the usual Umbraco install options but don't panic - your content will be safe.
- If everything has gone to plan you will find your build works but you cannot login – likely because the membership provider was overwritten by the new install
- Stop the site running in debug mode - save any changes and close the solution.
- Open up sql management studio and run the following query against your database:
UPDATE umbracoUser SET userdisabled = 0, userLogin = 'admin', userPassword = 'default' WHERE id = 0
- This will clear the password for the admin account of the site
- Go to web.config and find the UsersMembershipProvider. Password Format will be set to “hashed” – you will need to change this to “clear”
- Save the web.config, open up your solution file in Visual Studio and run the site.
- You'll be taken to the Umbraco login page - insert username as admin and password as default - all being well this will log you in as admin
- Now this bit is critically important - whilst logged in you need to manually open your web.config using notepad (you won't be able to use Visual Studio if you are running the site - you'll be locked out of editing it). Change the UsersMembershipProvider back to hashed. If you amend any password details and leave the UsersMembershipProvider as "clear" and logout of the site - you will have to go through these steps again as it won't have saved your password.
- Create a new user - reset your password or whatever you need to do in order to be able to access the site again and save your changes
- Logout of the backoffice and stop the site in Visual Studio. Just to be safe rebuild the site and run it again in debug mode. Go to the login screen and check you can now login using the new details you added.
- Congratulations - you've now been able to create a whole new visual studio solution file for your site that you can continue to work on as you upgrade.
Many many thanks and a #hfny to Paul Seal from CodeShare for providing me with the inspiration for writing these guides. I highly recommend visiting his pages here once you are done with 24Days.
For further reading here is his guide on upgrading:
..and here is his guide to resetting the admin password:
