Deploy with Gitlab
Heads Up!
This article is several years old now, and much has happened since then, so please keep that in mind while reading it.
The repository will contain the same as an Umbraco Cloud repository - this means that dll's and other nasty stuff that typically are not in your repositories will be included. We call these repositories "projectname.web". Whatever code you build - do it in a separate project. Just like Umbraco Cloud.
The goal
- support multiple developers
- local dev environments
- easy deploy to multiple environment targets (dev, staging, live)
- supporting different clients with the same cd using different transports (runner, ftp, custom docker)
Secondary goals
- tracking deploys
- total control of environment files
- redeploy
What is Gitlab CI/CD
First I want to explain how the GitLab CI/CD looks schematically. GitLab comes with a built-in Continuous Integration, Continuous Delivery, and Continuous Deployment.
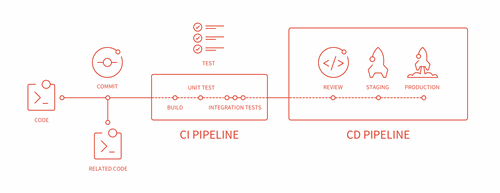
In a nutshell:
Continuous Delivery is having all of the infrastructure and verification in place that is needed in order to push updates to a production environment at any time.
Continuous Deployment is doing exactly this, pushing updates into production as soon as they become available. Both Continuous Delivery and Continuous Deployment rely on a third concept:
Continuous Integration is a software development practice in which all developers commit to the master branch every day, every commit is built automatically by an integration server and subjected to an automated battery of tests, and broken builds are fixed immediately.
We only use the Continuous Deployment, because for simplicity we put custom logic to App_Code and skip the building part.
Before we go into more details, in brief, the steps needed to have a working Continuous Deployment can be summed up to:
1. Add .gitlab-ci.yml to the root directory of your repository
2. Configure a Runner
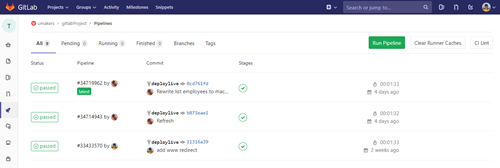
With this setup, all your work will be deployed and pushed to the needed branch in your Git repository. Then the Runner will automatically start the pipeline which will appear under the project’s Pipelines page. You can see a list of all deploys and statuses at https://gitlab.com/{group}/{project}/pipelines, and will look like this:
The benefits from using Gitlab for deployment are:
- Easy to setup and deploy
- Possibility to rollback (to some extent)
- Possibility to have unlimited environments like dev and staging
- And traceability
Prerequisites
In order to automate deployment with Gitlab, first of all, you need a repo with branching strategy and some rules. In our workflow we use the following rules:
- The repo contains the website files including all binaries
- You will need to have a web-live.config file which is basically a copy of the web.config file and used for running the deploy to live
- The web.config file should never be added to the repo (it’s your local config file)
- /Media and /App_Data folders are excluded from the repo (if needed files will have to be manually transferred via FTP)
- Use uSync for storing database changes to the disk
Step by step
Repo with branching strategy
The branching strategy is quite simple and will allow you to keep a transparent overview and flow:
1. You can have a development branch (called deploydev)
2. You could even have a staging branch (called deploystage)
3. You will need to have a specific branch for deploy to live (called deploylive)
4. Working branches are created from master and called feature-something or bugfix-something
5. If you have a development branch you can merge branches with features or bugfixes into the deploydev branch. When pushed to deploydev you can test in a non-local environment
6. When everything is ready for live, you merge the feature and/or bugfix branch(es) into deploylive and push to live
7. Last but not least you merge the feature and/or bugfix branch(es) to the master branch and pushYou have to have a web.config file for each environment.
Locally when you just clone a project you need to copy some environment web-environment-name.config to web.config and update connection string to local if needed.
Add .gitignore to the repo
Example of a .gitignore file:
.git
*.obj
*.pdb
*.user
*.vspscc
[Db]ebug*/
obj/
[Rr]elease*/
_BuildOutput/*
.vs/
packages/*
!packages/repositories.config
App_Data/*
!App_Data/packages
App_Plugins/UmbracoForms/[Ii]nstalled
/media/*
/[wW]eb.config
With this .gitignore file we exclude /Media, /App_Data (except /App_Data/packages), web.config and visual studio files from the repo
Add .gitlab-ci.yml to the root of the repo
.gitlab-ci.yml is a YAML file for the project configuration. It is placed in the root of your repository and contains definitions of how your project should be built.
If you want a quick introduction to GitLab CI, follow a quick start guide.
Runner is a tool that runs the jobs described in .gitlab-ci.yml file and send the results back to Gitlab. On GitLab.com, Shared Runners are enabled by default, so you don’t need to set up anything to start using them with GitLab CI/CD.
Job is just a script defined in .gitlab-ci.yml.
Pipeline is a set of jobs :)
Let’s create a simple .gitlab-ci.yml file that deploys to live each time you commit to the “deploylive” branch (you can just copy below script and save as .gitlab-ci.yml):
stages:
- copy
deploy_job_ftp:
stage: copy
tags:
- docker, gce
only:
- deploylive
script:
- apt-get update -qq && apt-get install -y -qq lftp
- cp ./web-live.config ./web.config
- lftp -c "set ftp:ssl-allow no; open -u $USERNAME,$PASSWORD $HOST; mirror -Rev ./ ./ --ignore-time --parallel=10 --exclude-glob .git* --exclude .git/ --exclude App_Data/ --exclude ^\media/$"
environment:
name: live
url: https://umakers.dk/
What do all these lines do?
First - we use only one stage, let's call it "copy":
stages:
- copy
Our job called “deploy_job_ftp” belongs to the “copy” stage
deploy_job_ftp:
stage: copy
In this example, we use a shared docker image for checkout and ftp deploying:
tags:
- docker, gce
“only” defines what branch Runner should use for getting the source
only:
- deploylive
script is the only required keyword a job needs. It’s a shell script which is executed by the Runner
script:
- apt-get update -qq && apt-get install -y -qq lftp
Because we are not doing a build using Gitlab CI, we also don’t do any config file transforms. This is also the reason we don’t store our web.config in the repository. But we have environment specific web.config files in our repository eg. web-live.config. During the deploy, we rename this environment specific config file to web.config
- cp ./web-live.config ./web.config
After getting sources and renaming configs we need to push all files to the server that hosts our project. We do it via ftp with the lftp tool:
- lftp -c "set ftp:ssl-allow no; open -u $USERNAME,$PASSWORD $HOST; mirror -Rev ./ ./public_html --ignore-time --parallel=10 --exclude-glob .git* --exclude .git/ --exclude App_Data/ --exclude ^\media/$"
This command does the following: open ftp connection with $USERNAME,$PASSWORD $HOST credentials and mirror files to remote server. These credentials you have to define in Gitlab repo -> CI/CD Settings -> Variables section. As you can see in the screenshot below:
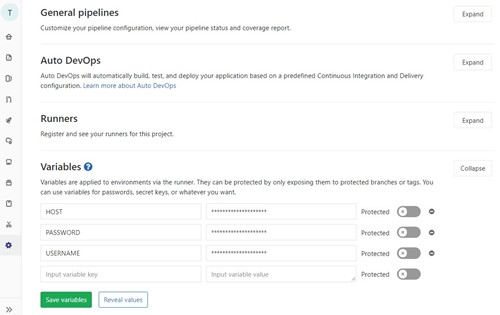
Variables are applied to environments via the runner. They can be protected by only exposing them to protected branches or tags. You can use variables for passwords, secret keys, and/or whatever you want. This is a secure and recommended way of storing credentials and other sensitive data that shouldn’t be in the repo.
In the lftp script, we exclude /app_data and /media folders from mirroring. It’s a very important part of the script because if we do not exclude these folders, it will remove the files and folders that are not in the repo. Be careful with lftp script, read lftp official documentation.
This is pretty much all DevOps work for creating a Continuous Deployment for our Umbraco project that is hosted on a remote server. Next time, when you need to deploy into production, just push changes to “deploylive” branch and that’s it.
Bonus
If you need a dev environment basically you have to do 3 things:
1. Setup dev server with ftp access
2. Add new section to yml file:
stages:
- copy
deploy_job_ftp:
stage: copy
tags:
- docker, gce
only:
- deploydev
script:
- apt-get update -qq && apt-get install -y -qq lftp
- cp ./web-dev.config ./web.config
- lftp -c "set ftp:ssl-allow no; open -u $DEVFTP_USERNAME,$DEVFTP_PASSWORD $DEVFTP_HOST; mirror -Rev ./ ./ --ignore-time --parallel=10 --exclude-glob .git* --exclude .git/ --exclude App_Data/ --exclude ^\media/$"
environment:
name: dev
url: https://dev.umakers.dk/
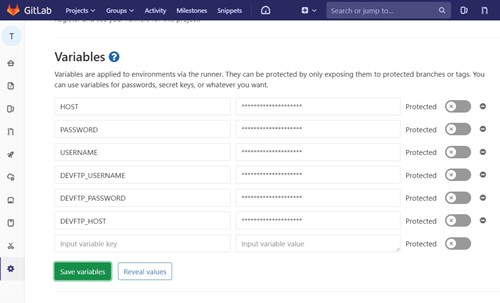
3. Set variables as we already know in Gitlab repo -> CI/CD Settings -> Variables section. You can see in the screenshot below:
4. Add web-dev.config to the repo
5. Push changes to “deploydev” branch and that’s it. All changes will be pushed to dev environment.
We use Gitlab CI in the easiest way. In this example, we use a shared docker image for checkout and ftp'ing. But you can install Gitlab runner (Windows service) on your own server and do builds, tests, and other stuff.
Please note that all deploys in this setup are a one-way direction move, so if you choose to use the GitLab CI/CD on a project, all changes to project code via Umbraco backend on the live server WILL be overwritten when deploying. In other words, do not work on the live environment when using this setup.
Conclusion
The way to deploy is relatively simple and can be extended in many ways. Basically, you can maintain code locally and deploy changes to a live environment in one click. If changes are made to the database it will require additional handling of these changes through the popular uSync package (thanks to Kevin Jump). Please share your thoughts in the comments.
Official GitLab CI/CD documentation - https://docs.gitlab.com/ee/ci/README.html
Happy Christmas everyone!

