Push Notifications and Umbraco
Heads Up!
This article is several years old now, and much has happened since then, so please keep that in mind while reading it.
This happened with a website that I built for a local swimming club. The problem that arose involved communication to parents about unforeseen cancellations to swimming sessions. One part of the solution was to move the club’s mailing list to an online provider and promote sign up to the list so that parents were notified of any alterations to sessions. However, there was another opportunity that would notify parents on their devices via the website and push notifications. Push notifications have the advantage of being instantly delivered to the user’s device and could make the difference between a parent seeing an announcement or not.
Push Notifications
What is a push notification? You have probably encountered push notifications if you have a mobile device. Push notifications are designed to immediately grab your attention and provide you with essential, or sometimes completely useless information from the apps and sites you use regularly. Android and iOS notifications via apps are provided as part of the native OS, but push notifications are also supported in modern browsers via the HTML5 APIs.
Push notifications use a number of the Web APIs to deliver notifications to desktop and mobile devices via the user’s chosen browser. The support for push notifications is steadily growing and at the time of writing Chrome, Firefox, Edge (the user needs to explicitly enable the feature), Opera, as well as, a number of Android browsers all offer support. For now, iOS and Safari continue to avoid support for this feature but Safari has its own custom implementation.
The notifications depend on messaging services provided by browsers, for example, Chrome provides Firebase Cloud Messaging. When a user subscribes to notifications in the browser, the browser returns an endpoint URL for its specific messaging platform. Once you send a message to the endpoint, the messaging service handles the delivery of the message to the user’s browser or device. The service worker listens to this message and can then use the Notification API to display the content of the message to the user. Each messaging platform handles failed deliveries differently, but most will continue to retry until the message is delivered (within a reasonable time frame, determined by the platform). This means that if your device is offline when the notification is sent, you will receive it the next time it is online.
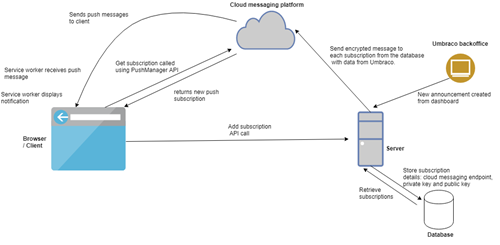
See the full sized version of the Umbraco push notifications flow diagram here. It may not mean much right now, but come back and look at it after you finish reading and it should help to visually reiterate the main flow.
There are three key concepts to understand when adding push notifications to a website:
- Service Workers
- Push and Notification APIs
- VAPID keys
Unfortunately, I don’t have the word space to cover all of these concepts in great detail, but will provide an overview of each one and links for further reading if you are interested. If you're interested in the details of service workers, the APIs and VAPID keys, Google has a great introduction that goes into more detail, particularly about VAPID keys.
Service Workers
A service worker is a script that runs in your browser and is separate from the main website. They are completely separate from the DOM and cannot interact with elements on the page directly, but there are ways to respond to certain events triggered by scripts running in the DOM. One of the features of Service Workers, the key feature when being used in Progressive Web Apps, is that it can act as a proxy to control network requests. This feature allows it to intercept network requests and, as an example, return cached responses if the browser’s state is currently offline. It's important to note that in order to use service workers on your site, your site must be running on HTTPS otherwise the browser will ignore it.
To register a service worker, you must call the register() method at page load. This method checks if there is a service worker file on the server, based on the parameter name that you provide, then registers the worker once the page has loaded.
After registration, use the navigator.serviceworker.ready promise callback to configure other features to run after your service worker has finished installing.
Push and Notification APIs
The Push and Notification APIs depend on the Service Worker being installed and ready to use. These are two separate APIs that handle different parts of the push notification process. The Push API enables a client to receive messages from the server, even when the website is not open in a browser. Each browser has its own service for sending push messages. I’ll touch on this in more detail in the next section about VAPID keys, but there are libraries that handle the subscriptions to different messaging platforms for you, making it easy to provide push services across multiple browser vendors.
The Notification API is utilised in the service worker code after a push message is received from the service and can be used to display notifications to the user. On desktop, this will appear as an overlay in the OS and on mobile devices (read as Android for now), this will be in the form of a native notification. The data sent in the push message can include text which can then be used as part of the notification displayed to the user. There are other options too, such as setting logos for the notification, a URL and a click handler for when, or if, the user clicks or interacts with the notification.

I would stress the importance of how you initiate the prompt that asks the user for permission to send push notifications. All too often, websites are asking for this before the site has even finished loading. As a user of the internet, and putting my developer hat to one side for a moment, I find this to be a really bad experience and absurdly annoying. I'd be interested to see some stats about how many people actually accept the push permissions when they are prompted on page load, but I imagine it would be quite low. Right, rant over and developer hat back on; my point was to stress the importance of being empathetic to what a user wants to see when they first visit a site. Popups (of any kind, but push notifications for the sake of this article) are unlikely to be top of their agenda. Furthermore, if a user blocks notifications in a browser, they generally don't get a chance to enable them again - it's a lose, lose situation. An alternative approach, and one that is shown later on in this article, is to hand control back to the user and let them opt in, through a button click, to receiving notifications.
If you are interested in learning more, the MDN documentation describes these APIs (push and notification) in much more detail.
VAPID keys
Voluntary Application Server Identification keys, or VAPID for short, completely confused me for a while when I began researching into push notifications. They are optional when sending notifications, but it is advisable to implement VAPID to ensure that the messaging platforms can validate that notifications are being sent from your website and not being impersonated (it uses a public and private key pair between your server and the messaging provider). This restricts the validity of a subscription to a particular URL (you must subscribe to the push service - a user creates a subscription in the browser using the push manager and then you store these generated keys to use when sending your messages). The second benefit of using VAPID is to provide information about your website to the push services. This information can then, in theory, be used to contact you if there is a problem with your message. A prime example of this is if your server starts spamming push messages, the operator would have the information to contact and notify you of the issue.
Implementation with Umbraco
The above information is an overview of the concepts involved in push notifications and I would recommend reading further if you plan to use them in your website. In particular, the VAPID specification is worth reading to really understand its purpose.
This section will explain how to implement this for the Umbraco backoffice, but you could adapt the example code to send notifications from a standard MVC website using APIs. I chose to integrate the interface for sending notifications into the backoffice because editors are already familiar with Umbraco and how to interact with it. Furthermore, Umbraco is easily extensible for developers, has great documentation and by integrating into the backoffice, it keeps all admin features in one location, removing the need for developing a custom management section in the site. There are multiple ways to add custom features to Umbraco, such as Sections and Dashboards. Since push notifications are a small, encapsulated feature, a dashboard is the perfect extension point.
The steps for sending push notifications from the Umbraco backoffice can be outlined as:
- Create a custom dashboard in Umbraco for editors to send and manage the notifications
- Set up the client-side website scripts to handle the subscription to push messages and displaying the notifications
- Add the server side code, hooked into the Umbraco dashboard to send the push notifications
- Something extra: Track the number of subscribers to your push messages
1. Creating the Dashboard
The Umbraco documentation is a thing of beauty these days, so it would be a disservice to everyone (particularly @marcemarc’s screenshots) if I explained how to create a custom dashboard in this post. This amazing guide will provide all the information you need, in addition to the documentation for the Angular directives that come packaged with Umbraco. I followed those steps, tweaked a few parts and created a dashboard that looked like this (the code for this is in the GitHub repository reference at the end):
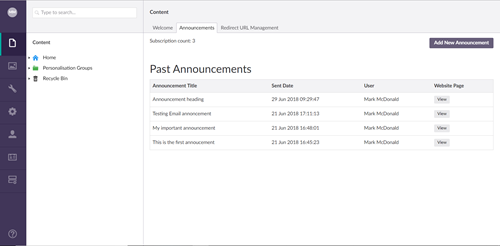
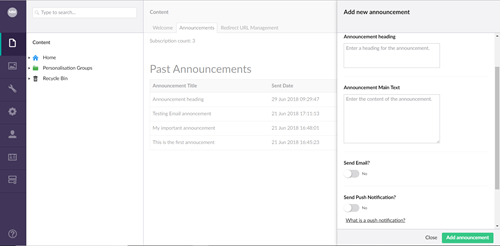
The subscriber count is an aggregation of the number of subscriptions in the push subscription database (explained shortly). The past notifications are displayed as a table with the data for this coming from a JSON file that is updated after each new notification is created. The “new notification” button opens a drawer (as shown below) from the right-side and provides an interface where Editors can input the message to be sent in the push notifications. There is also a tooltip there to explain what a push notification is and how it will work for editors new to the terminology.
2. Create the service worker and subscription UI
There are different approaches to how a website can gain permission from the user to send push messages; it can either ask by default without any interactions from the user, or, it can allow the user to explicitly opt in to the messages. I opted for the latter method due to the fact that websites that use the former approach tend to get their push notification permission request habitually declined by users sick of having them pop up. My chosen approach is less intrusive and presumptuous, and thus more user friendly.
Service worker, notifications and UI events
I explained earlier that the service worker is the key feature that enables the browser to receive the push notifications asynchronously from the server. The code to register the service worker should run on page load:
function initialiseServiceWorker() {
    if ('serviceWorker' in navigator && 'PushManager' in window) {
        navigator.serviceWorker.register('/sw.js')
            .catch(function (error) {
                console.error('Service Worker Error', error);
            });
    }
};
JavaScript code to register a service worker.
It has two main responsibilities in the push notification flow. First, it receives the push message from the server. Second, it maps the data in the message and displays the notification to the user. The code for doing this is as follows:
self.addEventListener('push', function (event) {
    //check if the user has granted permission for us to show notifications
    if (!(self.Notification && self.Notification.permission === 'granted')) {
        return;
    }

    var data = {};
    if (event.data) {
        data = event.data.json(); //method on the PushMessageData object: https://developer.mozilla.org/en-US/docs/Web/API/PushMessageData/json
    }

    var title = data.title;
    var options = {
        body: data.message,
        icon: 'assets/images/Logo.png',
        badge: 'assets/images/Logo.png',
        tag: 'announcement',
        data: {
            url: data.url
        }
    };

    //keep the service worker alive until the notification has shown
    event.waitUntil(self.registration.showNotification(title, options));
});
JavaScript code to map push message data to a Notification and display the notification to the user.
The final piece of the client-side jigsaw is to add a button and event handler, in this case, a click handler, to allow the user to subscribe (and unsubscribe!) from the push notifications. The JavaScript for this is listed below:
//the full code containing the function for requestNotificationPermission, urlB64ToUint8Array and base64Encode are in the GitHub repository
function subscribeToPush() {
    var registration = null;
    return navigator.serviceWorker.ready
        .then(function (reg) {
            registration = reg;
            return requestNotificationPermission();
        })
        .then(function () {
            var subscribeParams = { userVisibleOnly: true };
            var applicationServerKey = urlB64ToUint8Array(applicationServerPublicKey);
            subscribeParams.applicationServerKey = applicationServerKey;

            return registration.pushManager.subscribe(subscribeParams);
        })
        .then(function (subscription) {
            var p256dh = base64Encode(subscription.getKey('p256dh'));
            var auth = base64Encode(subscription.getKey('auth'));

            $.post('/umbraco/api/push/add', {
                PushEndpoint: subscription.endpoint,
                PushP256DH: p256dh,
                PushAuth: auth,
                Token: $('#pushToken').val()
            })
            .done(function () {
                $toggleButton.text('Enabled!');
            });
        })
        .catch(function (e) {
            console.log('Unable to subscribe to push', e);
        });
};
JavaScript code sample for handling a user's push subscription. It gets the subscription and passes the details back to the server via an API call.
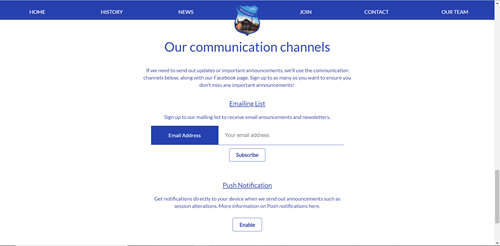
The UI to enable the notifications and trigger this subscription code consists of a button and some text describing a push notification and its purpose:
Handling the push subscriptions
When I was originally writing this code and researching push notifications, I’ll admit that it failed to occur to me that I would need to store the user subscriptions in a database. The information returned from the subscribe() call on the client is needed for sending the messages to the relevant cloud messaging platform that the user subscribed to. When a user subscribes in the browser, they are subscribing to the messaging platform, which then returns an endpoint URL, an auth value and a public key. This took a while to figure out but was worth it for the light bulb moment that happened when everything finally came together and made sense!
With my new found knowledge, let me explain the steps involved in storing the subscriptions.
Disclaimer: I don’t claim that this approach is the best, but it works for a small site and the Umbraco forums provided useful steps as a starting point.
- Create a table to store the Subscriptions. A subscription contains a private auth value, a public key and an endpoint URL for the messaging service. I opted to add a new table to the Umbraco database for this and hook into the startup pipeline to ensure the table gets created and exists.
public class RegisterEvents : ApplicationEventHandler
{
    protected override void ApplicationStarted(UmbracoApplicationBase umbracoApplication, ApplicationContext applicationContext)
    {
        var ctx = applicationContext.DatabaseContext;
        var db = new DatabaseSchemaHelper(ctx.Database, applicationContext.ProfilingLogger.Logger, ctx.SqlSyntax);

        //Create the subscriptions table if it doesn't exist
        if (!db.TableExist("PushSubscriptions"))
        {
            db.CreateTable<PushSubscription>(false);
        }
    }
}
A C# event that runs after the application has started. This event ensures that the custom database table for storing subscriptions is created.
- Create an Umbraco API controller with an action to add a subscription. In the code sample below, there is a throttle attribute that restricts how many times this method can be called by an IP address over a certain amount of time to prevent abuse.
public class PushController: UmbracoApiController {

    // GET: /umbraco/api/push/add
    [Throttle(Name = "PushSubscription", Message = "Subscription rate violated.", Seconds = 3600)]
    public void Add(AddPushSubscriptionRequest request)
    {
        //validate the anti-forgery CSRF token to ensure the request comes from our site
        var tokenParts = request.Token.Split(':');
        ValidateToken(tokenParts[0], tokenParts[1]);

        PushSubsciptions.CreateSubscription(request.PushEndpoint, request.PushP256DH, request.PushAuth);
    }
}
A C# API controller to handle adding push subscriptions.
3. Umbraco Dashboard APIs
This section will focus on how to send the push notifications. To find out how to retrieve the subscription count and history log, there is a GitHub repository linked at the end of the article that contains a complete working version.
When an Umbraco user clicks on “Add announcement”, the angular controller submits a POST request to an API controller with the information for the push message. The server then processes the data, maps it to a push message and uses the .Net Push library to send the push notifications to all subscriptions that are stored in the data subscription table.
    public class PushService: IPushService
    {
        //these can be generated online by tools such as https://tools.reactpwa.com/vapid
        private readonly string vapidPublicKey;
        private readonly string vapidPrivateKey;

        public async Task SendNotificationsAsync(string title, string message, string clickUrl)
        {
            var payload = JsonConvert.SerializeObject(new { title, message, url = clickUrl });
            var vapidDetails = new VapidDetails("mailto:contact@mysite.com", vapidPublicKey, vapidPrivateKey);
            var webPushClient = new WebPushClient();

            foreach (var subscription in PushSubsciptions.GetSubscriptions())
            {
                var pushSubscription = new PushSubscription(subscription.PushEndpoint, subscription.PushP256DH, subscription.PushAuth);

                try
                {
                    await webPushClient.SendNotificationAsync(pushSubscription, payload, vapidDetails);
                }
                catch(WebPushException e)
                {
                    switch(e.StatusCode)
                    {
                        //the subscription has been cancelled, remove it from the database
                        case HttpStatusCode.NotFound:
                        case HttpStatusCode.Gone:
                            PushSubsciptions.RemoveSubscription(subscription);
                            break;
                    }
                }
            }
        }
    }
A C# class that uses the .Net push library to send push notifications to subscriptions stored in a database table.
The steps involved are:
- Set your VAPID details and Push message data (a JSON serialised object containing a title, message and an optional URL). This is encrypted using the keys stored in the subscription table.
- Retrieve all subscription details from the database and send the push notification to each one.
- If the push message fails to send (returns a particular status code), the client (user) has removed their subscription. When the user unsubscribes from the notifications in their browser, there is no callback on the client-side to hook in to. Thus, no way of knowing when a user unsubscribes. The only way to know if a subscription is no longer valid is to check the HTTP status code when sending a message. If the code returned is either NotFound or Gone, then you can assume that the subscription has been cancelled by the user and remove their subscription from the table.
Wrapping it up
That is all of the steps involved, but I realise that there are probably more questions than answers raised in this article. So, this GitHub repository contains a fully working version of the Dashboard and flow described in this article, along with the slide deck from the first time I presented this at the Umbraco Liverpool meetup. The slide deck contains some useful links for further reading that will provide extra context and information to the concepts section.
Why is this not a package?
To finish, I want to preempt the inevitable question about why this isn’t a package yet. I’ve been asking myself the same question, and there are two reasons (read: excuses):
- Does it need to be a package? I’d love to hear feedback on this. It seems like a niche piece of functionality that would be so rarely needed, does it warrant the time and effort to maintain as a package? I’ll let you decide.
- This would be the first package that I’ve created and I haven’t found the time or energy to research how to go about making it happen.
I hope this has proven useful and you maybe learned a thing or two along the way. The web is an incredibly powerful tool today, but we need to be mindful not to abuse that power...such as sending push notifications every 5 minutes to tell you that you have 10 unread notifications to play Candy Crush.
Have a great Christmas!
Useful Links and Further Reading
If you'd like to learn more about service workers or push notifications, there are some great resources out there, with a few coming directly from the Umbraco community:
- Matthew Wise (@waltza86) gave a great talk at the Umbraco UK Festival this year about service workers: https://www.slideshare.net/MatthewWise7/service-workers-what-and-why-umbukfest-2018
- The Matt Brailsford (@mattbrailsford) presented a talk about Progressive Web Apps at CodeGarden 2017: http://mattbrailsford.github.io/presentations/2017/06/09/progressive-web-apps/index.html#/
- Majid Hajian took a dive into service workers at this year's CodeGarden: https://codegarden18.com/sessions/lets-dive-into-service-worker/
- And finally, a real in-depth case study on making a service worker from Lyza Danger Gardner (@lyzadanger): https://www.smashingmagazine.com/2016/02/making-a-service-worker/
