Automating your code reviews
Heads Up!
This article is several years old now, and much has happened since then, so please keep that in mind while reading it.
Of course, automation is not a replacement for skilled developers making the decision on what to include in the code base, but it can be a helpful checklist to preserve over time to ensure your software quality improves, even when new team members are on boarded.
In this post, I will look at how you can create tailored code review tooling to perform simple scans after specific strings and warn developers if deprecated APIs are being introduced into the codebase. This is a very simplistic example of what you can do, but it creates a foundation to add your own custom checks on top of, tailored to the team and project needs.
Why even bother with automation?
If you look at how developers create value, it is by creative thinking and problem solving, ensuring they do not spend unnecessary amounts of time on tedious tasks which could be automated is a way to maximise the value from each developer on a project.
Even for very specific project types like an Umbraco website, there are ways to automate parts of the code review to ensure that developers do not use APIs in the wrong locations, introduce anti-patterns or forget to document code.
The ease of adding custom automation tasks in your central workspace on Github have the benefit of keeping a central list of things to avoid in your codebase, effectively blocking such code to enter production, this list is persisted as new team members work on the project and ensure that knowledge is not lost.
Let's do Automation with Github Bots and Probot!
Probot is an open source project made by Github engineers. It takes the complexity out of dealing with Github webhooks and accessing repository data. It comes complete with a boilerplate project which can get you up and running with a bot on your local machine in 5 minutes.
While it would take too long to go over all the features of Probot, have a look at existing Probot projects or this introduction video to understand how it works.
Enough with the intro, onwards to the code!
Setting up a new Probot project
Let's setup a new probot on our local machine, thankfully Probot has a basic template, which makes this easy, open your terminal of choice and run:
npx create-probot-app code-reviewer
This will guide you through a quick wizard, where you can select a template in either Javascript or Typescript - for this example I went with Typescript, as it is lovely, but it also has an additional build step which I'll outline below.
With this setup I now have complete app, open src/index.ts to see how the application reacts to Github events, below is my modified version which reacts to all pull request events:
import { Application } from "probot";

export = (app: Application) => {
  app.log("Yay, the app was loaded!");

  const handlePullRequest = require("./pull-request-change");
  app.on(["pull_request"], handlePullRequest );
};
When the bot runs, it will run the function inside a file called /pull-request-change.ts - below is a shortened down version of that - it collects the Pull Request Data - then all the files, scans the files for issues and then returns a check to put on the pull request review.
import { Context } from "probot";

async function handlePullRequestChange(context: Context) {

  const pr = context.payload.pull_request;
  if(!pr || pr.state !== "open") return;
  const org = pr.base.repo.owner.login;
  const repo = pr.base.repo.name;

  const files = await context.github.pullRequests.listFiles({ number: pr.number, owner: org, repo: repo })
  const feedback =[];

  for (const file of files.data) {
    // scan each file ...
  }

  const action_required = (feedback.length > 0);
  const conclusion = action_required ? "action_required" : "success";
  const title = action_required ? feedback.length + " Issues found" : "No issues found";

  // if something is wrong ... populate the check with feedback data

  let summary = '';
  return context.github.checks.create({
      owner: org,
      repo: repo,
      name: "File Scanner",
      head_sha: pr.head.sha,
      status: 'completed',
      conclusion: conclusion,
      completed_at: new Date().toISOString(),
      output: {
        title: title,
        summary: summary
      }
    })
}

module.exports = handlePullRequestChange;
So that is our very basic code (full version is here)- you can always enhance this with whatever code you want to use to scan your commits with - but now let's get this code to run as we work on Github!
Connecting our code to Github
As we are running this locally, we first of all need a proxy url, go to smee.io/new and set one up. Secondly we need a Github app - follow these instructions on Github, fill in the form, the Webhook url put in that Smee url, and the Webhook secret put in development. Finally grant the app read/write access to checks and pull request and subscribe to the 3 pull request events further down the page - the outcome of this form is a Github App ID and Github will now ping your Webhook url on every pull request event, also Github asks you to download a private key file - download this file and place it in the root folder of your Probot project.
In your probot code, rename .env.example to .env and put in the Github App Id and the Webhook proxy url.
Finally - go to your Github app page and install it on a repository.
We have no configured Github and your bot to connect to each other, finally let's get to the stage where we can run this thing locally!
Running your Probot locally
The quickest way to run this is to use the included npm tasks:
npm install (to install dependencies)
npm run build (to compile typescript)
npm start (to start the bot)
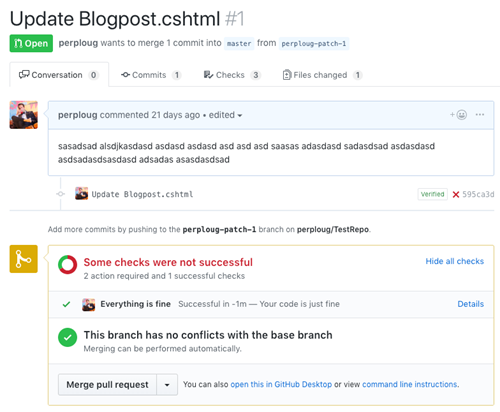
With the bot running on my local machine I can follow all events being sent to it, and if I create a new pull request I get the following feedback on Github:

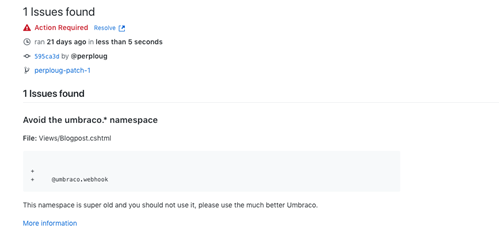
In case I have any errors in the files in my pull request, the bot can also give me detailed feedback:

Protect your master branch
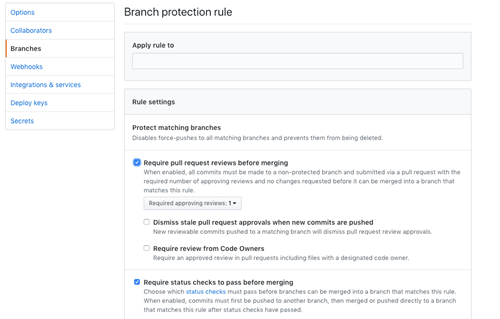
While having a tool like this in place is great, you also have to ensure that no-one bypasses it, so protect your master branch, so changes can only be submitted by pull request, turn on reviews and enforce that checks must pass:

What's next?
While the above snippets is shortened for brevity, the complete project is available on Github. Including a VsCode Setup for running the bot in debug mode, which enables you to set breakpoints as the bot reacts to webhooks.
Finally - you can of course not run the bot locally forever, so for info on how to deploy the bot, follow the deployment guides on the Probot website, it also works with the current Github Actions beta, so in the future, you won't even have to worry about hosting your own bots for these kind of tasks.
I hope this quick intro to setting up Probot and writing a basic script to test your pull requests will inspire you to write your own automation tools, nothing is too specific, maybe you just need a script to check that you did not spell "Macro" as "Marco", or you already have documentation and best practices, which you can turn into automated tests to run on each pull request, with this basic tool, the knowledge can evolve over time and help you improve the quality of your codebase.