Applications using Umbraco
Heads Up!
This article is several years old now, and much has happened since then, so please keep that in mind while reading it.
Overview
We all know that Umbraco is a pretty flexible CMS. The CMS just does not come in the way of the front end code. And most importantly with the content tree we can model our content in such a way that content editors have the flexibility they require while retaining a good structure to the content. Being a freelancer, I get to see Umbraco used in various different ways. And of late I have happened to work in a team developing applications using Umbraco, even B2B applications.
I was approached by a client of mine last year to create an application for their business. The business is essentially an advertising ground for event venues and suppliers. They wanted an application to capture information from the various venues and suppliers which could then be turned into a benchmarking report on a monthly basis. In addition to the application, the business also wanted an admin area to create logins, reset passwords etc. They also wanted to tie up logins to specific event venue/supplier. This was the basic requirements for the Phase 1. The main business website was in Umbraco which meant that the business staff is used to Umbraco. So I did not have to think too much before concluding that the admin area should be in Umbraco. I can use the Membership in Umbraco and the nice UI it provides for member management. I can make use of the content section to create the pages for the application and manage content. And all this were out-of-the-box Umbraco features. I could also extend the functionality to create custom dashboards to view the captured data thus making it quite a comprehensive admin area.
With any application you have a lot of configuration which you would either put in a config file or store in a database. You could even have some content associated with the pages in case of sizeable applications. And changing any of this can only be achieved using an effective admin interface or with a developer’s help. How can Umbraco help here as being that admin interface and how can we use some of the features effectively?
I am going to build the basics of a very simple ticketing system for a product a business sells as an example. I want 3 versions of the same application to be built:
- The basic version of the application (Brand 1)
- A version with a different branding (Brand 2)
- A version targeting businesses (resellers of product, Reseller Site)
I am hosting all the 3 versions in a single instance of Umbraco. I have set umbracoHideTopLevelNodeFromPath to true as you would set for a multi-language set up.
Let us start building the application in Umbraco. Some of the requirements for this application would be
- A login per user (I am assuming one login per client for the sake of simplicity here).
- A form to raise a ticket which could have the following fields - user name, query category and a message.
- A content page for some information
Creating the basic version of the application
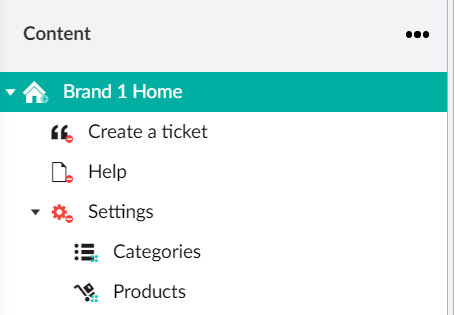
I have set up a very basic site in Umbraco with a home page, a content page, a query page and a settings section. I want all of my pages, even the content page behind a login so I have secured the site. My home page is a login page.

Once you login to the application I want to see the page for creating a ticket. It can have the following fields
- Details of the logged in user like name and contact details
- The ticket types or categories
- The products available for the logged in user
- Description of the ticket
The details of the logged in user can be gathered from the profile of the user. I want to manage the categories available myself so I am using the settings section for managing the categories available. I have a Categories container set up and I have added the various categories available as a child items to the Categories container. Now I can query the the site to get the categories to show on the page.
I want the user to log tickets only for the products that they have. Moreover, given that I have three versions of the same application I want to make sure that the login created for one site cannot be used on another. I am going to use the Membership in Umbraco to control all of this.
Using Membership in Umbraco to enable user login to the site
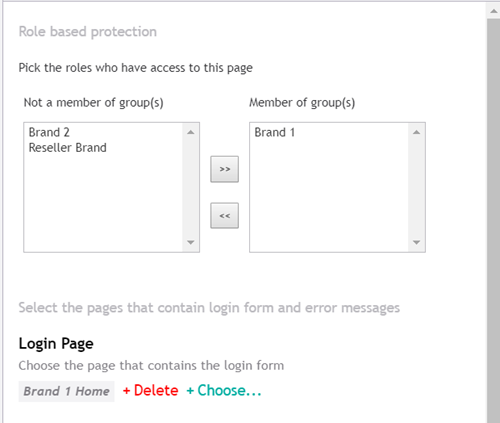
My application can have different types of end users - Consumers, which can be individuals or businesses, and Resellers. So I have set up 2 member types in Umbraco - Consumer and Reseller. I want to allow only Consumers to access my Brand 1 site and more specifically, only “Brand 1” Consumers should be able log in to the Brand 1 site. As a starting point I have created a property called “Brand Name” in the Site Settings tab of the Home Page doctype. I have also created Member Groups in Umbraco. The idea is to set up a member group by the same name as the brand name property. In this case the brand name and the associated member group is set to “Brand 1”. I also secure the site to allow access to only the above member group.


Finally, for every login I create for the site I assign the member to this member group. Now I can check in my code whether the member is in the correct role/member group before letting the user log in.
The allowed roles for the site is same as the brand name.
var allowedRoles= homePage.BrandName;
You can check for the allowed roles here before logging the user in.
if (!Roles.IsUserInRole(viewModel.Email, allowedRoles)) {
ModelState.AddModelError(string.Empty, "The user does not exist.");
return CurrentUmbracoPage();
}
Since the property Brand Name is a crucial one, I have made it an admin only field. Only Umbraco users in the “admin” user group should be allowed to change it, for anyone who is not, it should be a read-only field. I have achieved this by using some code in the ApplicationStartUp. You can find the sample code here.
Assigning specific products to logins
I want users to create tickets for products that they own. For this I create a property called Available Products. I have created a new data type using Umbraco Multi Node Tree Picker limiting the selection to product nodes only. I use this property to assign products to logins and query the logged in member’s profile to show the relevant product options on the query form.

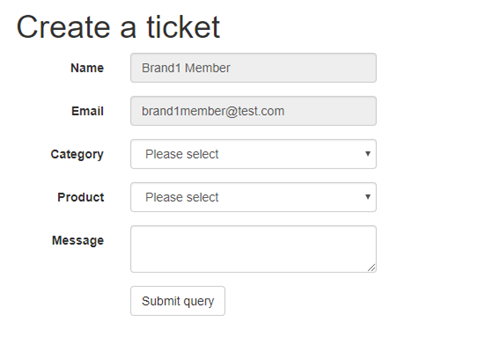
Finally, a look at the query page now.

This is the “Create a ticket “ page in the application. It queries the ticket type/categories for the application, products associated with the logged in member as well as the details of the logged in member to present the final screen to the end user, all using Umbraco’s out-of-the-box capabilities.
You can have a look at the application at http://brandapp1.kvtechsltd.co.uk
Username/password : brand1member@test.com/password123
Introducing a different branding to the application
Suppose you have a scenario where you want to rebrand the application. To begin with, I make a copy of the site above and make some content changes. Here are the content changes I made
- Changed the category and product names, prepending “Brand 2” before the names.
- Changed the “Brand Name” property on the Home Page to “Brand 2”.
- Changed the navigation to look at the content page for the new application
- Created a member group called Brand 2 and secured the site to use this role
- Create a member and assign it to group Brand 2
Now we can start thinking about how can we apply specific styles to this application alone. I have a few sets of stylesheets
- a base set of rules in the styles folder along with Bootstrap files
- A stylesheet per application for the brand specific styles.
I plan to use ASP.Net bundling and minification for my JavaScript files and CSS files. So I set up my base bundle like this:
bundles.Add(new StyleBundle("~/bundles/css").Include(
"~/assets/styles/bootstrap.css",
"~/assets/styles/site.css"));
Now I can call this bundle in my Layout view
@Styles.Render("~/bundles/css")
For my application specific styles I am creating a stylesheet per brand. I hold the stylesheet in a folder named after the brand name, getting rid of any whitespaces. In this case I put my application specific stylesheet in a folder called “brand2”. I can now create my bundle
bundles.Add(new StyleBundle("~/bundles/brand2").Include(
"~/assets/brand2/styles.css"));
I create a controller action to load the site specific bundle depending on the brand name and call the action in my layout view
public ActionResult GetBrandSpecificStyleBundle()
{
var homePage = CurrentPage.AncestorOrSelf(1).OfType<HomePage>();
var brandName = homePage.BrandName;
var assetFolder = brandName.ToLower().Replace(" ", string.Empty);
return this.PartialView(SiteConstants.PartialViewPath + "BrandSpecificStyles.cshtml", assetFolder);
}
@Html.Action("GetBrandSpecificStyleBundle", "GlobalSurface")
I have kept the branding very minimal here, just to the navigation background, but this can all be extended to suit your needs.
Have a look at the application at http://brandapp2.kvtechsltd.co.uk
Username/password : brand2member@test.com/password123
Creating a version of the application targeting businesses (B2B Application)
I now want to create a version of the application targeting businesses. I start off by copying the basic application and making the content changes as mentioned above. I set the brand name of the application as “Reseller Brand”. I create a member group called “Reseller Brand” and secure the application to this role. I also create a member and assign it to this member group. That is the basic version of the B2B application ready.
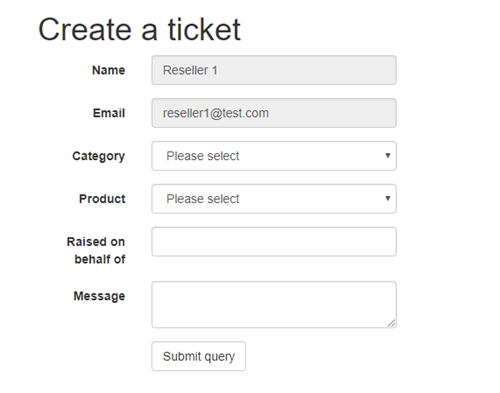
I now want to add an extra field to the “Create a ticket” screen, just for the reseller site. I want to capture the name of the client, on whose behalf the ticket is being raised. For this I have added a True/False property to the Home Page Settings tab called “Is Reseller Site”.
I can query for a True value for this property when I build my view model for the form and use it to show a textbox to capture the details. So the final screen looks like this.

Have a look at the application at http://resellerapp.kvtechsltd.co.uk
Username/password : reseller1@test.com/password123
Capturing data and viewing the information
No application is complete without capturing data and providing ways and means to view it as well. Although I am not going into great detail here, you can use custom dashboards which you can build to view the data or use a package like Fluidity to create custom sections to view the captured data.
So that is it! You have now got 3 versions of the same application running on the same instance of Umbraco. The point to note here is that you have your application running, you have the CMS as the admin/back-office, all using the out-of-the-box features from Umbraco and you can extend it by all means to suit the needs of your application. You can create whole new database to capture data or even send the data to a CRM of your choice. Not only this, but you also are free to choose the front end technology of your choice. For this demo I have chosen ASP.Net MVC but you can use a JavaScript library of your choice to render your application UI, make it a Single Page Application or even use it to power a mobile app.
The code for the demo application is available at https://github.com/poornimanayar/Umbraco-Application
The database is available in the repo as well.
Username/password for the CMS : admin@admin.com/password123
Give it a spin and let me know.
Hope you enjoyed reading the article! Merry Christmas and a very Happy New Year :-)
Resources
- ASP.Net Bundling and Minification https://docs.microsoft.com/en-us/aspnet/mvc/overview/performance/bundling-and-minification
- Enabling bundling and minification in Umbraco https://codeshare.co.uk/blog/how-to-use-bundling-to-minify-css-and-javascript-in-mvc-and-umbraco/
- Fluidity https://umco.github.io/umbraco-fluidity/
- SLides and Demo Rep from Dave Woestenborgh's talk at DUUGFest'18 https://github.com/dawoe/umbraco-journey-into-the-unknown