Virtual Umbrality
Heads Up!
This article is several years old now, and much has happened since then, so please keep that in mind while reading it.
As the technology develops, it’s becoming more accessible to lower-end devices such as mobile phones. Web based VR is also gaining traction with frameworks and tools such as A-Frame.io, PlayCanvas and Three.Js to name a few. The browser vendors are also working on the WebVR spec to make it easier to generate multi-platform, responsive VR content.
What does any of this have to do with Umbraco?
One of the great things about Umbraco is its incredible flexibility. Although commonly used for websites, it has also been used as a headless CMS for numerous non-browser based projects. From IoT and Handlebars.Net integrations to the up coming Umbraco Headless, the ability to use Umbraco in new and interesting ways will continue to evolve.
So with that in mind, how can Umbraco be used to help shape the future of WebVR and/or WebAR? Let’s have a look at a few rough concepts in which Umbraco could be the powerhouse behind a VR/AR application, there might even be a few code samples.
Bringing VR and AR to the web not only makes it far more accessible to more people, it also adopts all of the usual web development principles, such as progressive enhancement. This means those without the right equipment should be able to access the information they need. As AR and VR on the web are still in their infancy from a consumer standpoint, it may be difficult to envisage the potential it has to offer, but as more people start investigating the technology themselves, who knows how our interactions with the internet with change.
Innovating the online shopping experience
The idea of a virtual store that you can put yourself in, or project into your home is already becoming attractive to a number of businesses. IKEA for example has an app that allows you to place furniture from their shop, into your own living room. Amazon has joined the scene with a similar AR app. Shopify has also been experimenting with the medium and released this incredibly useful article about their process of building a VR Shopping Experience.
So let’s say we have our own store that sells magnificent Umbraco sculptures. On our product page, a photo of the sculpture is all fine and dandy, but what if we wanted to really get an idea of scale for it, to get a feeling of what it would be like to stand next to it.
Demo time
Quick heads up, this demo is a very rough and ready implementation to provide a basic idea of how something like this could be achieved. It was built using the Umbraco Starter kit and A-Frame.io (which is constantly being updated and improved).
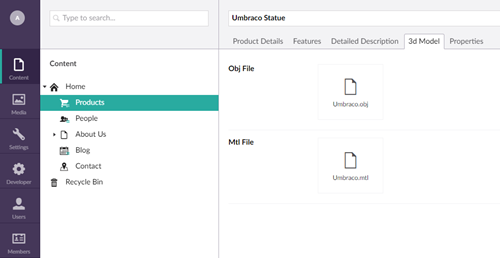
The Umbraco starter kit already contains some product pages so to start, we’ll create a new “3d Model” tab on our “Product” doctype, that will contain the properties for uploading the necessary files for our virtual statue. In this example the object requires an obj file (this will create the geometry), and an mtl file (this defines what is on the surface of the model).


We’ll need to add the mtl and obj MIME types to the web.config so that IIS can handle them.
Web.config
<staticContent>
    <remove fileExtension=".obj" />
    <mimeMap fileExtension=".obj" mimeType="text/plain" />
    <remove fileExtension=".mtl" />
    <mimeMap fileExtension=".mtl" mimeType="text/plain" />
</staticContent>
Once that’s in place, using ModelsBuilder, we’ll get hold of the files we want and if they exist, create a button that will take the user to a VR version of the page.
At the top of our Product.cshtml, well check for the model files, and also check for a querystring to determine if we should be in VR mode (The link we will create will simple append a `?vr=1` to the url. If they both return true, we want to use a special “VRMaster.cshtml” template
Product.cshtml - Check for VR
@{
    bool vrMode = Request.QueryString["vr"] == "1";
    bool hasVrAssets = Model.Content.ObjFile != null && Model.Content.MtlFile != null;

    Layout = vrMode && hasVrAssets ? "VRMaster.cshtml" : "Master.cshtml";
}
The VRMaster.cshtml template strips out all of the usual code used on a page, and adds a script file which gets the A-Frame.io library. This is going to be a full page experience, but you could make this work on the product page without going to an external page if you wanted.
VRMaster.cshtml
@using ContentModels = Umbraco.Web.PublishedContentModels;
@inherits Umbraco.Web.Mvc.UmbracoTemplatePage
@{
	Layout = null;

	// Get basic design settings from the homepage
	ContentModels.Home home = Model.Content.Site() as ContentModels.Home;
	bool vrMode = Request.QueryString["vr"] == "1";
}

<!doctype html>
<html>
<head>
    <meta charset="utf-8">
    <meta http-equiv="X-UA-Compatible" content="IE=edge,chrome=1">
    <meta name="viewport" content="width=device-width, initial-scale=1.0, maximum-scale=1.0, user-scalable=no">

    <title>@Model.Content.Name - VR Mode - @home.Sitename</title>
    <meta name="description" content="">
    <meta name="author" content="">
    <script src="https://aframe.io/releases/0.7.0/aframe.min.js"></script>
</head>

<body>
     @RenderBody()
</body>
</html>
Back in our Product.cshtml, we add a new link to the VR version of the page, when if it is needed.
Product.cshtml - VR mode button
@if (hasVrAssets)
{
    <div class="product-button">
    <a href="@(Model.Content.Url)?vr=1" class="button button--border--solid" target="_blank" rel="noopener noreferrer">View in VR</a>
    </div>
}
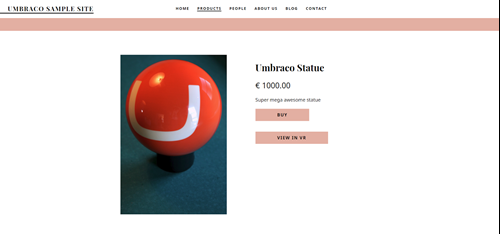
Our product page will now look something like this.

Next up we need to add the code to make our amazing sculpture appear in VR. A-Frame allows us to do this all in the cshtml markup.
Product.cshtml - A-Frame
<script>
    <!-- Registers a component to handle a click event -->
    AFRAME.registerComponent('move-box',{
        init:function(){
        var view = document.getElementById("umbraco");
            this.el.addEventListener('click',function(){
                view.emit("startAnimation");
            });
        }
    });
</script>

<!-- Creates the A-Frame scene -->
<a-scene fog="type: exponential; color: #c1c1c1; density: 0.035;">
    <!-- Assets for the Umbraco statue -->
    <a-assets>
        <a-asset-item id="umbraco-obj" src="@Model.Content.ObjFile.Url"></a-asset-item>
        <a-asset-item id="umbraco-mtl" src="@Model.Content.MtlFile.Url"></a-asset-item>
    </a-assets>

    <!-- Creates the umbraco statue -->
    <a-entity>
        <a-entity id="umbraco" position="6 4.7 -5" rotation="0 -30 0" obj-model="obj: #umbraco-obj; mtl: #umbraco-mtl" shadow="cast: true; receive: true">
            <a-animation attribute="position" begin="startAnimation" repeat="0" from="6 4.7 -5" to="0 4.7 10" dur="2000" direction="alternate" easing="ease-in-out"></a-animation>
            <a-animation attribute="rotation" begin="startAnimation" repeat="0" from="0 -30 0" to="0 0 0" dur="2000" direction="alternate" easing="ease-in-out"></a-animation>
        </a-entity>
    </a-entity>

    <!-- Creates the ground -->
    <a-plane rotation="-90 0 0" width="300" height="300" color="#eee" shadow="cast: true; receive: true"></a-plane>

    <!-- Creates the sky -->
    <a-sky color="#ffffff" radius="500" position="" rotation="" scale="" visible="" material="" geometry=""></a-sky>

    <!-- Creates some lights to make shadows and light the environment -->
    <a-light type="directional" color="#FFF" intensity="0.45" position="4 2 1" rotation="" scale="" visible="" light=""></a-light>
    <a-light type="directional" color="#FFF" intensity="0.45" position="0 7 -25" rotation="0 0 0" scale="1 1 1" visible="true" light="shadowCameraRight:15;shadowCameraLeft: -12;type:directional;color:#FFF; shadowCameraTop: 16,  intensity: 0.45; castShadow: true"></a-light>
    <a-light type="ambient" color="#A8A8A8" position="" rotation="" scale="" visible="" light=""></a-light>

    <!-- Create a camera -->
    <a-entity camera="userHeight:1.6;" wasd-controls look-controls="" position="0 1.46 15" rotation="5.6149863922820655 -0.34377467707848264 0">
        <a-entity cursor="fuse: true; fuseTimeout: 500"
                    position="0 0 -1.3"
                    geometry="primitive: ring; radiusInner: 0.02; radiusOuter: 0.03"
                    material="color: black; shader: flat">
        </a-entity>
    </a-entity>

    <a-text text="width:50;wrapCount:17.53;value:Use WASD keys to move, or click on the red box to move the statue closer.;align:center;color:#333333" position="-40 15.668 -30.946" rotation="10 25 0" wrap-count="20"></a-text>
    <a-entity move-box position="-10 1 3.761" material="color:red" rotation="0 40 0" geometry="" scale="4 2 1" shadow=""></a-entity>
</a-scene>
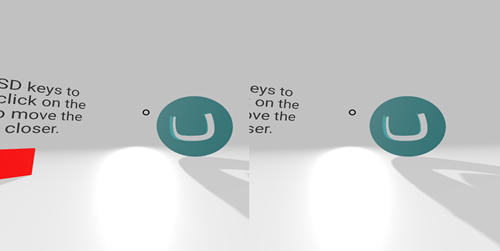
This should create a 3d scene that can be used whether or not a user has a VR headset. Hooray for progressive enhancement.

Now if a user visits the site and has a VR capable browser and device (Oculus Rift, HTC Vive, Windows Mixed Reality, Daydream etc), they can step into the world we have created by clicking on the icon in the bottom right of the screen. Below is an example of the running code, it's best viewed on a desktop device (iframes ignore orientation changes so it may not work on mobile for you, but you're more than welcome to take the code and play with it yourself). Top tip: ctrl + alt + i
See the Pen by MMasey (@MMasey) on CodePen.
In the grand scheme of things, this demo is fairly basic. The aim is to provide a rough example of how WebVR can be used alongside Umbraco. This could be taken further, perhaps into creating an entire shop.
The possibilities are endless
As I stated previously, Umbraco can work as a CMS for applications outside the browser, thanks to its API Controllers and upcoming headless version on Umbraco Cloud. Using this, we can take a similar approach of the demo above for handling content on iOS/Android apps or more powerful PC based experiences. This also opens up the capabilities of Augmented Reality (a browser based solution is in the works but not quite ready yet). To explain the differences between AR and VR, the VR version of the Umbraco statue provides a sense of scale in relation to the rest of the VR environment we have created, but with AR, we can get an idea of scale in relation to the rest of the real world. I’m sure those with the latest AR capable phones will have undoubtedly already played with this.
Granted, seeing how a glorious Umbraco statue would look in your house may not be everyone's cup of tea, but when you transfer this same concept to an architects website for example, it turns into the tool that can show a client what their house may look like before it’s built. By placing a person inside their new home before it’s been built would give most people a far better understanding of how it would look and feel, compared to viewing a set of flat blueprints.
Imagine logging into the Umbraco backoffice and putting on a headset to start editing content in an Umbraco VR scene. There are already tools available that allow you to have multiple screens all around you (think minority report, but with less Tom Cruise), but how about the actual Umbraco backoffice as its own virtual environment. The media library could surround you with images, when editing a content node you could have all the tabs visible to you at once, maybe even have voice to text integration to get those words out of your head and into the article you’ve been trying to write for a few weeks.
VR and AR are often being touted as the next computing platform, sometimes referred to as MR (Mixed reality) when they are combined. When this it integrated with other computing services such as voice recognition, conversational UIs, image recognition we may one day even step away from our keyboards.
Wrapping up
I could ramble on for ages about how VR/AR could be used alongside Umbraco, but i’m going to leave it here so your brain can start working on how you might use VR or AR. While your at it you should go grab yourself a tasty mince pie as well.
If you want to get in touch to talk about Umbraco/VR/AR/MR or just about anything, you can find my Twitter info below.
If you fancy making some new year's resolutions, maybe also think about coming along to some of the great Umbraco meetups that exist around the world. You can find information about the upcoming events at our.umbraco.org. Maybe even take it a step further and have a go at talking at one.
Also, don’t forget to join the Umbraco discord at discord.gg/umbraco.
Happy Holidays to you all.