Packaging
Heads Up!
This article is several years old now, and much has happened since then, so please keep that in mind while reading it.
However a lot has changed in recent years, and so it’s time to look at yet another approach – I will call it “The 2019 Way”. We’ve seen a rise in the complexity of creating a package, NuGet has become considered the “default” format, and AppVeyor is no longer the go-to CI tool for open-source projects – our processes need to adapt.
Let’s take things right back to the beginning...
Visual Studio csproj format
Most packages with compiled C# code will use a .NET Framework Class Library project in Visual Studio. This is where we compile our code to a distributable DLL, as well as add references to external dependencies such as NuGet packages. Traditionally each file in the project is listed in a *.csproj file and dependencies are tracked in a packages.config file.
A lesser known feature introduced in Visual Studio 2017 is the .NET SDK project format, offering a vastly simpler developer experience and significantly leaner *.csproj files.
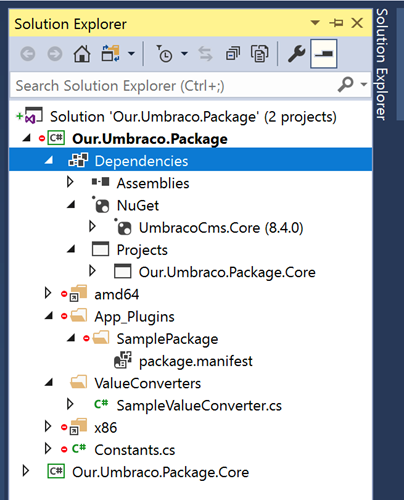
The most noticeable improvements are the handling of project dependencies. The “dependencies” tree is now grouped into “Assemblies”, “NuGet” and “Projects” – no more scouring the long list of references to find the assembly you’re looking for. NuGet package’s own internal dependencies don’t get added individually to your project anymore, rather Visual Studio keeps a reference to the “top-level” package and it’s dependencies are nested beneath.
For me the icing on the Christmas pudding is how insanely fast restoring packages is now, all thanks to the fact downloaded packages are kept a machine-wide cache rather than on a per-project basis.
Migrating to the new format is a manual process so there’s a little bit of work to do. Scott Hanselman has an excellent tutorial on how to migrate a project over, or you can follow the steps below.
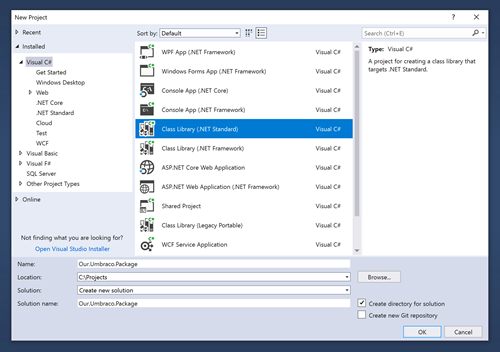
Start by adding a new project to your Visual Studio solution and choosing “Class Library (.NET Standard)” (yes this seems wrong, bear with me here…)
SDK projects are the default format for .NET Standard Class Library projects, but with a little magic can also be used with legacy .NET Framework projects too.
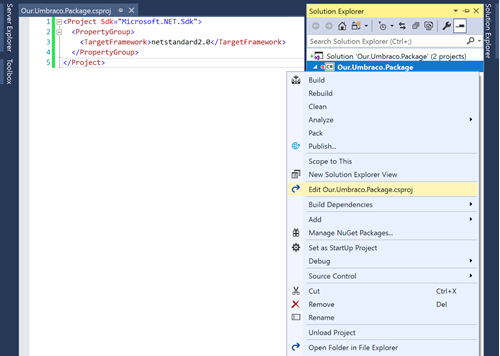
Select “Edit csproj” to reveal the XML config file for your project – change the value of the TargetFramework element from netstandard2.0 to net472.
Any version of .NET Framework works here: v4.6.1 would be net461, v4.5 would be net45, and so on. We can only wish that Microsoft would make this a bit easier for us by adding a dropdown somewhere in the UI...
Congrats, you're now using the new project format! Of course this is not limited to working with Umbraco packages but with any Class Library project in any existing applications – everything should work exactly the same as before only cleaner, faster and arguably more future-proof.
For now these enhancements are only a small win for our projects, but it will have a far larger impact on other parts of the packaging process...
NuGet
Having your package available via NuGet feels essential nowadays, in fact many people refuse to install packages any other way.
But creating a NuGet package isn’t as straightforward as you might think - you have to get your head around the NuGet.exe CLI as well as populate a .nuspec file with all your project metadata. Developers generally have a separate build script to run the relevant commands and generate the package, but knowing how to write one or where to find one can be a tough task. I certainly found this a daunting and confusing task when I first started sharing my code with the community.
Thankfully the simplified *.csproj format massively helps out here by more tightly integrating with NuGet, effectively eliminating a large amount of the complexity and making package creation possible in only a few clicks!
NuGet packages can be generated automatically on build through Visual Studio. Open the project properties and navigate to the “Packaging” section. Here it is possible to configure the common package metadata that would have previously been defined in a .nuspec file.
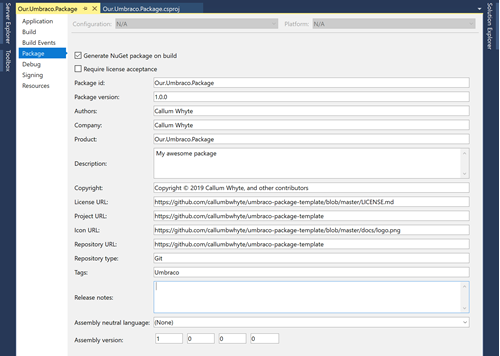
Enabling “Generate NuGet package on build” adds a line <GeneratePackageOnBuild>true</GeneratePackageOnBuild> to the *.csproj file which instructs MSBuild to generate a NuGet package on each build, or when the dotnet pack command is run.
C# files within the solution will be automatically compiled and the resulting assembly included in the NuGet package; external “package” references (e.g. NuGet packages) are listed as dependencies of your NuGet package and will be installed when someone installs your package.
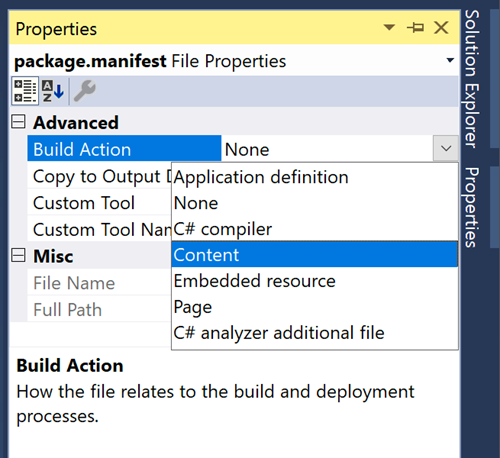
To include static files in the NuGet package the “build action” of that file needs to be set to “Content” within the file’s properties. You will notice this also adds a line to your *.csproj file referencing the file’s path, this is because by default files are assumed to be for compilation.
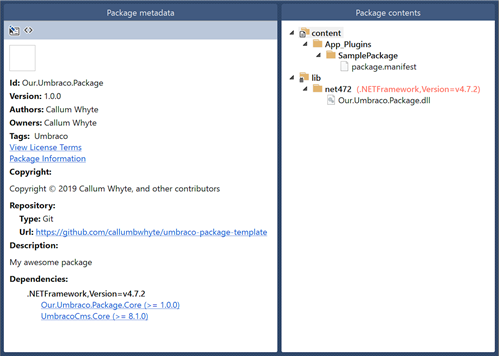
In this example I want to include my App_Plugins files so I updated the “build action” for those files. As you can see in the screenshot below, when I inspect the package that gets created on build via NuGet Package Explorer, all my desired files are included as well as the metadata and dependencies I added. This was achieved purely through the Visual Studio UI and without writing a single line of code!
Zip package
Umbraco has it's own package format comprised of files plus a package.xml manifest in a zip archive. Much like with compiling a NuGet package there has never been a straightforward way to create an Umbraco compatible zip - everyone has their own scripts for this.
The longest standing solution is Matt Brailsford’s MSBuild tasks, but these scripts are pretty complicated if you don't know MSBuild and do still require a bit of configuration and know-how. In the same vein as how Microsoft made NuGet packaging infinitely simpler, it would be great to simplify the process to the point where generating the package zip is also something we no longer worry about.
I realised that the Umbraco package format requires most of the same metadata as NuGet packages and this is already managed in Visual Studio. I set about developing a process to run alongside with MSBuild’s pack target (which is responsible for generating NuGet packages). My MSBuild task generates a zip archive including the files and dependencies (via DLLs in this case) defined in the *.csproj, as well as valid package.xml file based off the metadata defined in the “Package” settings in Visual Studio.
Crucially the solution needs to be painless to get up-and-running, so it can be installed into any project via NuGet. No code or config required; as long as “Generate NuGet package on build” is enabled, an Umbraco package zip will be created with every build!
PM > Install-Package MSBuild.Umbraco.Packaging
Naturally the project is open-source on Github and welcomes contributions.
For those interested in the inner workings of the MSBuild tasks, the referenced assemblies and “content” files are copied into the resulting package.
<!-- Import tasks -->
<UsingTask AssemblyFile="$(TargetDir)\MSBuild.Umbraco.Packaging.dll" TaskName="MSBuild.Umbraco.Packaging.GatherAssemblies" />

<Target Name="UmbracoGatherFiles">
	<!-- Gather assemblies -->
	<GatherAssemblies Dependencies="@(ReferenceCopyLocalPaths)"
					  PackageRefs="@(PackageReference);@(ProjectReference)">
	  <Output TaskParameter="Assemblies" ItemName="PackageAssemblies" />
	</GatherAssemblies>

	<!-- Copy assemblies -->
	<Copy SourceFiles="$(TargetPath)" DestinationFolder="$(TempFolder)\bin\" />
	<Copy SourceFiles="@(PackageAssemblies)" DestinationFolder="$(TempFolder)\bin\" />

	<!-- Copy files -->
	<Copy SourceFiles="@(Content)" DestinationFiles="$(TempFolder)%(RelativeDir)%(Filename)%(Extension)" />
</Target>
Then MSBuild calls Umbraco Core’s internal packaging code to generate and validate the package.xml file.
<!-- Import tasks -->
<UsingTask AssemblyFile="$(TargetDir)\MSBuild.Umbraco.Packaging.dll" TaskName="MSBuild.Umbraco.Packaging.GenerateManifest" />

<Target Name="UmbracoPackage" AfterTargets="Pack" DependsOnTargets="UmbracoClean;UmbracoGatherFiles">
	<!-- Create manifest -->
	<GenerateManifest TargetDirectory="$(TempFolder)"
					  Name="$(Product)"
					  Description="$(Description)"
					  Version="$(Version)"
					  UmbracoVersion="$(UmbracoVersion)"
					  Author="$(Authors)"
					  AuthorUrl="$(AuthorUrl)"
					  ProjectUrl="$(PackageProjectUrl)"
					  IconUrl="$(PackageIconUrl)"
					  LicenseUrl="$(PackageLicenseUrl)" />
</Target>
Finally the resulting output gets zipped up and the task cleans up after itself.
<Target Name="UmbracoPackage" AfterTargets="Pack" DependsOnTargets="UmbracoClean;UmbracoGatherFiles">
	<!-- Create zip -->
	<ZipDirectory SourceDirectory="$(TempFolder)"
				  DestinationFile="$(DestFolder)\$(Product).$(Version).zip"
				  Overwrite="true" />
</Target>

<Target Name="UmbracoClean" AfterTargets="Clean">
	<!-- Remove temp folder -->
	<RemoveDir Directories="$(TempFolder)" />
</Target>
Want to learn about automating the process of building and releasing your package? Check out Automating Package Builds With Azure Pipelines!
