Automating
Heads Up!
This article is several years old now, and much has happened since then, so please keep that in mind while reading it.
The nirvana of building and releasing packages could be considered having a fully automated process end-to-end. I'll be using Azure Pipelines in my examples as it seems to be the tool of choice nowadays – with a free private projects and 1800 build minutes per month it’s a winner for open-source projects. In reality Azure Pipelines, Github Actions, and AppVeyor all work in similar ways so this applies broadly – the tool you choose is a matter of preference.
Build steps
Regardless of the tool you are using the process for compiling and packaging is more-or-less the same. When working locally, Visual Studio runs through the following steps during each build:
- Restore any dependencies (e.g. NuGet)
- Build the solution – dotnet build
- Package up the result of the build – dotnet pack
- Generate NuGet package
- Generate Umbraco zip archive
- Copy the generated packages to the desired destination (e.g. the bin folder)
Thankfully all of these steps come pre-configured as part of most CI tools so very little work is needed to successfully build a package.
Setup the pipeline
If you haven't already, create a new project in the Azure DevOps portal for your package.
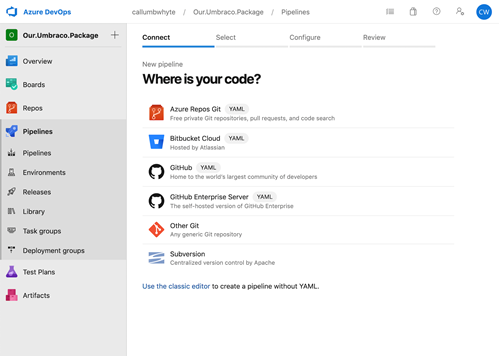
Navigate to the "Pipelines" section and select "New pipeline".
You will be asked to provide Azure DevOps with access to the version control repository (usually Git) where your package's code lives – it supports most popular cloud providers by default, such as Github and Bitbucket.
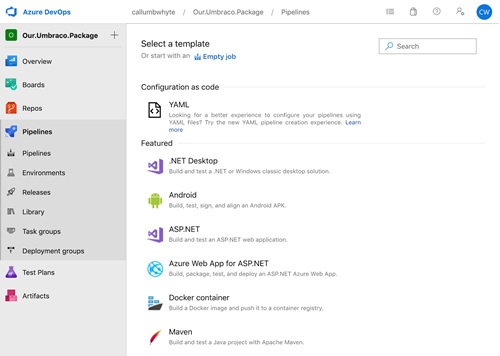
Next you will be prompted to choose a "template" for your build. Alternatively you could choose to create an "Empty job" and create each step yourself. If you already have an existing pipeline setup you wish to reuse there is also the option to provide a YAML file.
The "ASP.NET" pipeline template includes all the steps needed to compile a .NET Framework application, like an Umbraco package.
Each build runs on a different agent / server and there can be slight differences in the configuration or default versions of software installed. As a result, it is essential to specify the version of certain software should be used, such as NuGet.
Beyond this the steps follow the lines of what we would expect – restoring NuGet packages, building the solution, and "publishing" (copying) the build output to a place it can be easily reached later.

If you would rather configure your pipelines in YAML, the same above pipeline would look something like this:
pool:
  name: Our.Umbraco.Package
  demands:
  - msbuild
  - visualstudio
  - vstest

variables:
  buildConfiguration: 'Release'

steps:
- task: NuGetToolInstaller@0
  displayName: 'Use NuGet 4.4.1'
  inputs:
    versionSpec: 4.4.1

- task: NuGetCommand@2
  displayName: 'NuGet restore'
  inputs:
    restoreSolution: '$(Parameters.solution)'

- task: VSBuild@1
  displayName: 'Build solution'
  inputs:
    solution: '$(Parameters.solution)'
    msbuildArgs: '/p:PackageOutputPath=$(Build.ArtifactStagingDirectory)'
    platform: '$(BuildPlatform)'
    configuration: '$(BuildConfiguration)'

- task: PublishBuildArtifacts@1
  displayName: 'Publish Artifact'
  inputs:
    PathtoPublish: '$(build.artifactstagingdirectory)'
    ArtifactName: '$(Parameters.ArtifactName)'
  condition: succeededOrFailed()
Versioning
When releasing libraries / software for public consumption having a strict versioning policy is crucial. Versioning is also an important part of any build process.
By default Visual Studio assumes you are building v1.0.0 of your library, but we need to be able to pass a version from our build pipeline to ensure the right packages get created.
Adding a conditional rule to the Version element of a *.csproj file makes it possible to use a variable value when passed in to the build pipeline or to fallback to a value if the variable is unset, such as when building the project locally.
<Project Sdk="Microsoft.NET.Sdk">
	<PropertyGroup>
		<TargetFramework>net472</TargetFramework>
		<Version Condition="'$(BUILD_BUILDNUMBER)' == ''">1.0.0.0</Version>
		<Version Condition="'$(BUILD_BUILDNUMBER)' != ''">$(BUILD_BUILDNUMBER)</Version>
	</PropertyGroup>
</Project>
The $(BUILD_BUILDNUMBER) variable seen here is native to Azure Pipelines and can be defined in the pipeline options. The current date followed by the build count is the default build number, and while this is great for internal builds this wouldn't be sufficient to expose as a public version number.
Here I have introduced a custom variable $(Package.Version) to define the desired Semver version number for the package – this has the build count added to it to determine the current build number.

In order to apply the custom version number to the resulting packages and also the DLLs compiled within some additional parameters must be passed to the MSBuild build task. /p:PackageVersion=$(Package.Version) sets the package version number, while /p:Version=$(Build.BuildNumber) sets the "file version" of the DLLs. The "Build Solution" task in Azure DevOps allows these custom parameters to be passed in.
If you prefer to configure your pipeline via YAML, the build number property can be set like so:
name: $(Package.Version)$(Rev:.r)
Triggers
In Azure Pipelines the out-the-box behaviour is that builds must be manually triggered, however there are options to trigger when certain events occur; perhaps when a new commit is pushed to a specific branch or at regular intervals.
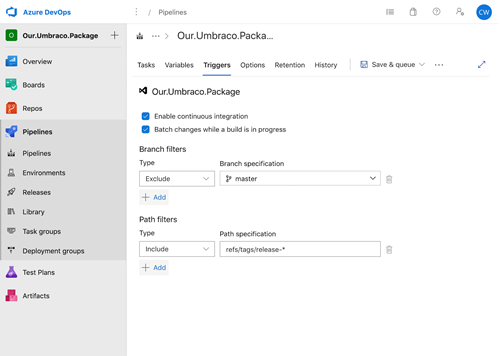
Navigate to the "Triggers" tab of your pipeline. First, open the "Continuous Integration" settings and ensure "Enable continuous integration" is selected. It should now be possible to define branches you wish for your build to be triggered by. Branches to trigger or ignore should be searchable by name. It is also possible to find branches via pattern using a Git path. I trigger all of my builds from the pushing of a Git tag using the following expression: refs/tags/release-*
