Umbraco Forms and Newsletter Studio
Heads Up!
This article is several years old now, and much has happened since then, so please keep that in mind while reading it.
Newsletter management and sending without SaaS
If you aren't using any SaaS like Mailchimp or CampaignMonitor to manage your newsletter for any reason, Newsletter Studio by Enkel Media Stockholm AB is the most integrated, easy and affordable solution you can get without reinventing the wheel yourself. Have a look at the features here.
While the mail generation and bulk sending capabilities of Newsletter Studio are quite sophisticated, the subscription management itself isn't as much. Basically you just use a small macro to render a simple subscription form requesting the user's email to the page. While that macro is customizable, in the end it still adds any syntactically valid email address right to the mailing list. Definitely not something you want to do.
But there are not only legal reasons to it. If you use Umbraco Forms in your website as well, you probably know about the workflow feature it provides. If you haven't had a look at the product recently, you could do so now.
In short, with Umbraco Forms, if someone submits a form, you can execute a range of workflow steps to process and handle things. Hate email? Just post form submissions to a Slack or Teams channel instead. Want to trigger an onboarding workflow for new signups? Go ahead! Very powerful and easy to extend. If you ask me, the killer feature of Umbraco Forms isn't the (great) forms editor but the workflows. Essentially if you have data entry on the page, hook it up to Umbraco Forms -- and tie the workflows together to get your business and marketing processes in order.
Join forces for less friction!
So let's tie Umbraco Forms and Newsletter Studio together -- so the editing experience and the marketing process are streamlined and the "CMS friction" is getting reduced. Plus, legal is happy as well!
Because, you know:
First Step: Adding newsletter consent to Umbraco Forms
If your law requires your subscribers to express their will in receiving a newsletter explicitly, the best option is to use a mandatory checkbox. While the built-in checkbox works for that, it doesn't allow for too much text and doesn't provide a way to add i.e. a link to your privacy policy.
If you like your content editors to be able to be free and creative, it is essentially that they can create and insert signup forms everywhere it suits. At least if your users are professional content creatives and digital marketers. This flexibility is crucial to them as they can build a better website by moving things around if the data shows lack of interest or whatever. A simple custom Umbraco Forms field type is all it takes to acomplish that flexibility:
using System;
using System.Collections.Generic;
using System.Linq;
using System.Web;

using Umbraco.Forms.Core;
using Umbraco.Forms.Core.Attributes;
using Umbraco.Forms.Core.Enums;
using Umbraco.Forms.Data.Storage;

namespace FormsExt
{
    public class Consent : FieldType
    {
        [Setting("Text", prevalues = "", description = "Enter consent text(s) here.", view = "textarea")]
        public string Text { get; set; }

        [Setting("Add privacy policy", prevalues = "", description = "Adds a default privacy statement.", view = "checkbox")]
        public string PrivacyStatement { get; set; }

        public Consent()
        {
            this.Id = new Guid("57696a35-f1e6-4fab-af4a-ad7f7ad2c235");
            this.Name = "Consent";
            this.Description = "Shows privacy conditions and requests consent.";
            this.Icon = "icon-legal";
            this.DataType = FieldDataType.Bit;
            this.SortOrder = 10;
        }

        // - custom value
        public override IEnumerable<object> ProcessSubmittedValue(Field field, IEnumerable<object> postedValues, HttpContextBase context)
        {
            List<object> returnValue = new List<object>();
            if (postedValues.ToList().Count > 0)
            {
                returnValue.Add("true");
            }
            else
            {
                returnValue.Add("false");
            }
            return returnValue;

        }
    }
}
/App_Code/FormsExt/Consent.cs
<div class="fieldset-consent">
    <textarea class="inline-editor inline-textarea" style="width:80%;"
              select-on-focus
              umb-forms-auto-size
              ng-model="field.settings.Text"
              placeholder=""></textarea>

    <div ng-if="field.settings.PrivacyStatement" class="inline-editor">
        <b>✅ Privacy statemention added automatically</b>
    </div>
</div>
/App_Plugins/UmbracoForms/Backoffice/Common/FieldTypes/Consent.html
@model Umbraco.Forms.Mvc.Models.FieldViewModel
@{
    var settings = Model.AdditionalSettings;
    bool hasPrivacyStatement = settings.ContainsKey("PrivacyStatement");
}
<div class="forms-consent">
    <div class="row forms-consent-primary">
        <div class="col-xs-1 forms-consent-checkbox">
            <input type="checkbox" name="@Model.Name" id="@Model.Id" style="width:auto;margin-right:10px;"
                   @if (Model.Mandatory) { <text> data-val="true" data-val-requiredcb="@Model.RequiredErrorMessage" </text>    }
                   @if (Model.ContainsValue(true) || Model.ContainsValue("true") || Model.ContainsValue("on")) { <text> checked="checked" </text>    } />
        </div>
        <div class="col-xs-11 forms-consent-text">
            <label for="@Model.Name" style="text-transform:none;white-space: pre-line;"><p class="forms-consent-text">@settings["Text"]</p></label>

            @if (hasPrivacyStatement)
            {
                <label for="@Model.Name" style="text-transform:none;" class="forms-consent-privacystatement">
                    <p>
                        Your data will not be passed on to third parties. Please see our
                        <a href="/de/datenschutz" target="_blank">privacy policy</a>
                        for further details.
                    </p>
                </label>
            }

        </div>
    </div>

</div>
/Views/Partials/Forms/Fieldtypes/FieldType.Consent.cshtml
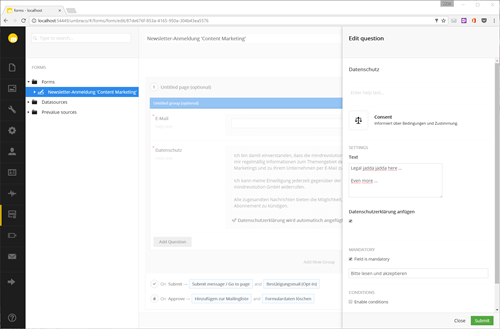
Now you can add a newsletter consent section to your form in Umbraco Forms:
Send new subscribers an opt-in email
Next up: We're sending some fancy approval mail. Why that? Because in this day and age a nice looking email converts better. As until now our new subscribers haven't approved their email, we are not allowed to reach out to them (depending on your juristiction). Better convert them or the marketing department is going to kill us!
Without re-inventing the wheel or plugging in and wiring up one of the available Razor email engines, your best bet is the built-in capabilities of Umbraco Forms. Without any further configuration you can easily prepare emails with XSLT and send the result out. While XSLT isn't the most loved templating (well, tranformation) of all time, it get's the job done.
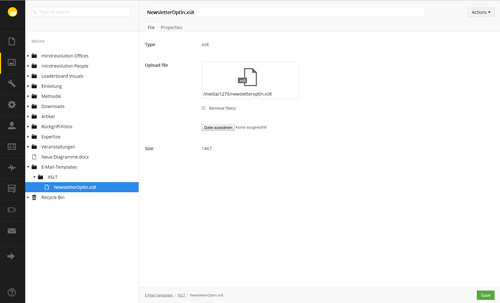
First, we need to prepare the XSLT template for our HTML email and upload it to the media section in Umbraco. No, really. To the media section. ?? I suggest you create a dedicated folder for the email templates there:
If you could use a premade template that you only need to adapt to your branding and laws, why not take the one we use at mindrevolution?
Get it from GitHub or see below. You're welcome.
<?xml version="1.0" encoding="utf-8"?>
<xsl:stylesheet version="1.0"
xmlns:xsl="http://www.w3.org/1999/XSL/Transform"
xmlns:msxsl="urn:schemas-microsoft-com:xslt"
xmlns:user="urn:my-scripts"
xmlns:umbraco.library="urn:umbraco.library"
exclude-result-prefixes="xsl msxsl user umbraco.library">

  <xsl:output method="html" media-type="text/html" doctype-public="-//W3C//DTD XHTML 1.0 Strict//EN"
  doctype-system="DTD/xhtml1-strict.dtd"
  cdata-section-elements="script style"
  indent="yes"
  encoding="utf-8"/>

  <xsl:param name="records" />

  <xsl:template match="/">

    <xsl:variable name="email">
      <xsl:value-of select="$records//fields/*[caption='E-Mail']//value"/>
    </xsl:variable>
    <xsl:variable name="optinkey">
      <xsl:value-of select="$records//uniqueId"/>
    </xsl:variable>
    <xsl:variable name="optinlink">
      http://localhost:54449/de/fnc/newsletter-optin?key=<xsl:value-of select="$optinkey"/>
    </xsl:variable>

    <body style="font-family: Segoe UI, Frutiger, Frutiger Linotype, Dejavu Sans, Helvetica Neue, Arial, sans-serif; font-size: 16px; line-height: 20px;">

      <table width="80%" style="max-width:80%;max-width:500px;font-family: Segoe UI, Frutiger, Frutiger Linotype, Dejavu Sans, Helvetica Neue, Arial, sans-serif;">
        <tr>
          <td align="center">

            <p style="font-size:120px;">
              <a href="{$optinlink}" style="text-decoration:none;color:#e2e2e2;">👍</a>
            </p>

            <h3>Please activate your email address.</h3>
            <p>
              Thanks you for signing up to our newsletter. Please activate your subscription with a simple click:
            </p>

            <table width="80%" style="max-width:80%;font-family: Segoe UI, Frutiger, Frutiger Linotype, Dejavu Sans, Helvetica Neue, Arial, sans-serif;">
              <tr>
                <td>
                  <table border="0" align="center" cellpadding="0" cellspacing="0" style="margin:0 auto;">
                    <tr>
                      <td align="center">
                        <table border="0" cellpadding="0" cellspacing="0" style="margin:0 auto;">
                          <tr>
                            <td align="center" bgcolor="#ffcc00" style="min-width:180px; -moz-border-radius: 3px; -webkit-border-radius: 3px; border-radius: 3px; font-family: Segoe UI, Frutiger, Frutiger Linotype, Dejavu Sans, Helvetica Neue, Arial, sans-serif;color:#ffffff;">
                              <a class="msoAltFont" href="{$optinlink}" style="padding: 9px 12px; mso-padding-alt: 9px 12px; min-width:180px; display: block;text-decoration: none;border:0; text-align: center; text-transform:uppercase; font-weight: 600;font-size: 16px; color: #ffffff; background: #ffcc00; border: 1px solid #ffcc00;-moz-border-radius: 3px; -webkit-border-radius: 3px; border-radius: 3px; mso-line-height-rule: exactly; line-height:18px;">
                                activate <xsl:value-of select="$email"/>
                              </a>
                            </td>
                          </tr>
                        </table>
                      </td>
                    </tr>
                  </table>
                </td>
              </tr>
            </table>

            <p style="color:#333;font-size:10px;">
              By confirming your e-mail address, you agree that mindrevolution GmbH will send you regular information on the subject area of B2B marketing and your company by e-mail. You may revoke your consent at any time to mindrevolution GmbH via the contact details below or click on the unsubscribe link in the sent messages.
            </p>


            <p style="color:#333;font-size:10px;">
              <br/><br/>
              <img src="http://mindrevolution.com/static/mindrevolution-square-signet.png" width="60" style="width:60px"/>
              <br/><br/>

              mindrevolution GmbH<br/>Theodor-Heuss-Straße 23<br/>70174 Stuttgart<br/>Germany
              <br/><br/>86 - 90 Paul Street<br/>London EC2A 4NE<br/>United Kingdom
              <br/><br/>
              <a href="http://www.mindrevolution.com">www.mindrevolution.com</a><br/>
              Phone +49 711 3401740 / +44 20 03331340<br/>
              <a href="mailto:stuttgart@mindrevolution.com">stuttgart@mindrevolution.com</a><br/>
              <a href="mailto:london@mindrevolution.com">london@mindrevolution.com</a><br/>
              <a href="https://twitter.com/mindrevolution">@mindrevolution</a>
              <br/><br/>
              <a href="http://www.mindrevolution.com/de/impressum">IMPRESSUM</a><br/>
            </p>


          </td>
        </tr>
      </table>

    </body>

  </xsl:template>


</xsl:stylesheet>
?
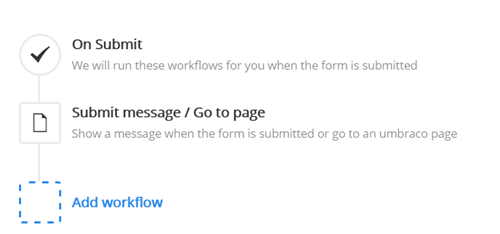
After adding this to the media library, switch to Forms again and add . And click "Add workflow" in the sidebar of your "On Submit" workflow in Umbraco Forms and choose the "Send XSLT transformed email":
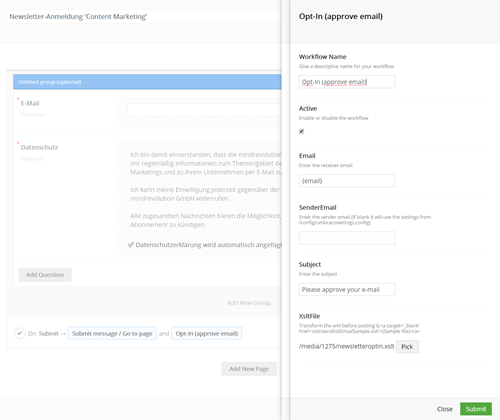
Whenever you submit this form from your website you should receive an opt-in mail:
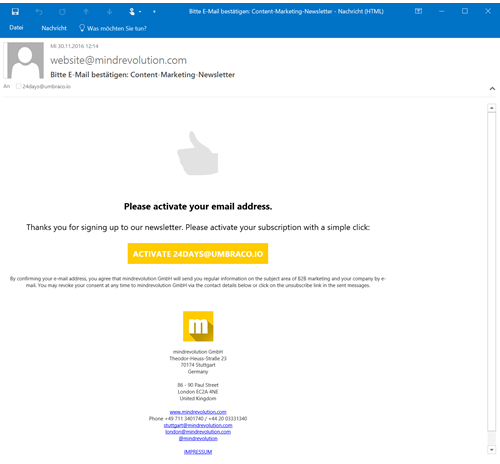
Good job! What the XSLT does is to generate a link with the form submission's record GUID as the approval token. So essentially we're just sending some email, nothing more. That's why we need to continue with the next step:
Receiving the click and approving the recipient's email address
Write some surface controller, API or just use a template to catch the click of the user. Generally, true Umbraco pages often make sense, as they are within the URL structure and thus have context (which country, language, product section, etc.) you maybe need to present the users with a professional landing page telling them everything went fine and you are looking forward to sending your upcoming newsletters to them. As always, use the tool you find suits your project. To keep this sample project contained, I opted for some code in a template. Here's the code:
@using Umbraco.Forms.Core;
@using Umbraco.Forms.Data.Storage;
@using Umbraco.Forms.Web.Services;

@inherits Umbraco.Web.Mvc.UmbracoTemplatePage
@{
    Layout = "Base.cshtml";

    string optinKey = Request["key"];
}

@if (!string.IsNullOrWhiteSpace(optinKey))
{
    try
    {
        Guid recordGuid = new Guid(optinKey);
        if (recordGuid != null)
        {
            RecordStorage recordStorage = new RecordStorage();
            FormStorage formStorage = new FormStorage();

            Record record = recordStorage.GetRecordByUniqueId(recordGuid);

            // - approve this record, so that form workflows kick in!
            Umbraco.Forms.Core.Form form = formStorage.GetForm(record.Form);
            RecordService.Instance.Approve(record, form);

            <h1>Success!</h1>
        }
        else
        {
            <h1>Unknown token/guid/id/key</h1>
            <h3>@optinKey</h3>
        }

    }
    catch (Exception ex)
    {
        <h1>Oh noes!</h1>
        <h3>@ex.Message</h3>
    }
}
Example Template (in /Views/). Use whatever approach makes you more productive.
What does this do? Simple: If there exists a form submission with the given GUID, the submission gets approved. Nothing else. We're just approving the record. For that to be possible to need to enable that with your form's settings. Unfortunately it's labeled "Moderation" now, which doesn't make it too obvious:
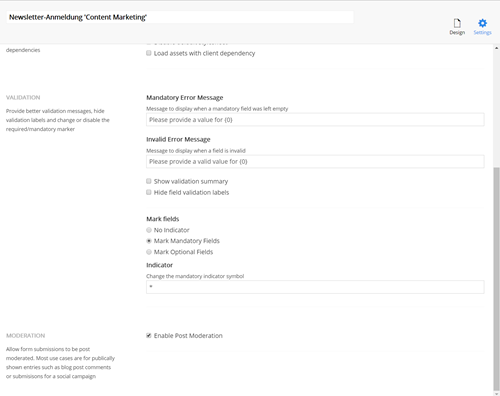
Activating this feature enables the other workflow pipeline "On Approve". All actions you set up for this seperate workflow only get executed as soon as the record is approved. In our case: As soon as the user clicks on the activation link. Now we just need to add this user's email address to the designated mailing list in Newsletter Studio. Easy!
Build an Umbraco Forms workflow for Newsletter Studio
Instead of hardcoding anything, we stay true to our pretty modularized approach and don't just add the recipient's emails when they hit the activation page. Instead we use a custom Umbraco Forms workflow that allows to add recipients to Newsletter Studio mailing lists. This way we are flexible and can re-use this workflow within our marketing automation and processes. If, for instance, site members (already customers) request a demo of our newest software version, we can add their email (from the client's records) to the drip campaign we have set up. Nice!
Writing your own workflow for Umbraco Forms is very straightforward and while the Newsletter Studio API is "compact" at best, it only takes a few minutes to wire everything up:
using System;
using System.Collections.Generic;

using Umbraco.Forms.Core;
using Umbraco.Forms.Core.Attributes;
using Umbraco.Forms.Core.Enums;

using NewsletterStudio;

namespace FormsExt.NewsletterStudio
{
    public class Subscribe : WorkflowType
    {
        [Setting("Mailing List Id", prevalues = "", description = "Numeric mailing list id (i.e. '2')", view = "textstring")]
        public string MailingListId { get; set; }

        [Setting("E-Mail Field Name", prevalues = "", description = "The name of the field containing the e-mail address (i.e. 'E-Mail')", view = "textstring")]
        public string EmailFieldName { get; set; }

        public Subscribe()
        {
            // - GUID, name et al setup
            this.Id = new Guid("57c9b164-c255-4724-a384-29fb6de73d0c");
            this.Name = "Subscribe to Newsletter Studio mailing list";
            this.Description = "Adds an E-Mail to a mailing list within Newsletter Studio";
            this.Icon = "icon-inbox";
        }

        public override WorkflowExecutionStatus Execute(Record record, RecordEventArgs e)
        {
            try
            {
                // - get the email value and subscribe
                string email = record.GetRecordField(EmailFieldName).ValuesAsString();

                if (Api.IsValidEmail(email))
                {
                    Api.Subscribe(email, int.Parse(this.MailingListId));
                }

                // - all good
                return WorkflowExecutionStatus.Completed;
            }
            catch (Exception ex)
            {
                // - that didn't work out: log it and bubble up failed execution
                Umbraco.Core.Logging.LogHelper.WarnWithException(this.GetType(), string.Format("Unable to subscribe e-mail (EmailFieldName: '{1}', MailingListId: '{2}'): {0}", ex.Message, EmailFieldName, MailingListId), ex);
                return WorkflowExecutionStatus.Failed;
            }
        }

        public override List<Exception> ValidateSettings()
        {
            List<Exception> exceptions = new List<Exception>();

            int listid = -1;
            int.TryParse(this.MailingListId, out listid);
            if (listid == -1)
            {
                exceptions.Add(new Exception("Mailing list id is expected to be numeric (int)"));
            }

            return exceptions;
        }
    }
}
/App_Code/FormsExt/NewsletterStudio.Subscribe.cs
Now you can add the new workflow "Subscribe to Newsletter Studio mailing list" within the Umbraco Forms interface to the "On Approval" queue:

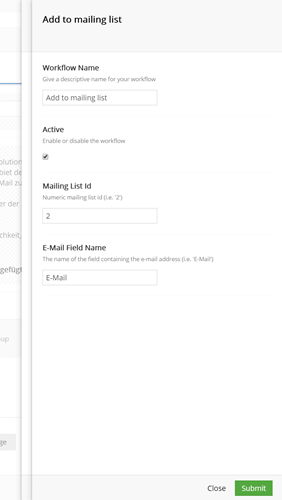
Enter the mailing list's id and the name of the forms field that contains the email address and save everything. Next time someone clicks the activation like and approved his or her email, you'll find them amongst the mailing list's recipients:

If your law requires you to keep a record of the date and time the user clicked the activation link, this is identical to the "Subscribed" column in Newsletter Studio with this solution as the recipients get added only upon their approval click.
Wrapping things up
To setup our opt-in newsletter approval, we did:
- Installed Umbraco Forms and Newsletter Studio
- Created a legal consent field type for Umbraco Forms to use in our signup forms
- Used the "On Submit" workflow to send an activation email (XSLT transformed for the looks)
- Approved the submitted form record upon receiving the click on the activation link
- Created a custom Umbraco Forms workflow to add the email to the designated mailing list "On Approve"
Where to go from here
You could and many more actions to each of the workflows and create members, add users to special newsletters based on their interests and much much more. If you are interested in expanding even further on the topic, I would recommend to also install "Pipeline CRM" by GrowCreate. It is very extensible and can be combined with Umbraco Forms as well -- again by utilizing custom workflows and datatypes. In fact there is premade code provided for creating an opportunity
Now go out there and build your own tailor made marketing automation -- and let me know: @esn303
?
