Getting comfortable with Umbraco Cloud
Heads Up!
This article is several years old now, and much has happened since then, so please keep that in mind while reading it.
Getting started with Umbraco Cloud
Getting started with Umbraco Cloud is very different than what you are used to when starting with an Umbraco setup. If you already opened your Visual Studio environment to do some steps while reading this article... just leave it alone for now... It will be fine... Really!
Getting started actually starts with signing up on https://umbraco.com/cloud. There is no request for payment details here so you don't need the creditcard of your boss to get started, just enter your information and within minutes you will have a full Umbraco installation ready on the Umbraco Cloud platform.
Getting started: done!
A fully hosted Umbraco installation on the Umbraco Cloud in minutes?
Yep! Isn't that just wonderful? But for sure this isn't as full featured as when I run a normal Umbraco copy? Nope! Exactly the same thing as what you are used to. You can use the packages you like, your own crappy code and do just everything that you are already used to with Umbraco.
But I want to access the file system! I want to see the running processes! I want to run commandline and powershell! Yes you can! Let's get into that in the KUDU part of this article. And for those who are familiar with African animals... No, there is no deer-like animal involved.
Do's and don'ts
Some quick tips for working with Umbraco Cloud are easily found and while some might be knocking on an open door, it's always good to have some short tips in an article like this.
Do!
Do #1 is about your favorite development tool, Visual Studio. You already had it started to get going, so lets take that to some good use!
This first Do is not something I will write out, but, very lazily, just a link to a blog post by Sebastiaan Janssen of Umbraco HQ: Visual Studio and Umbraco Cloud
His article will help you get a recommended setup for working with Umbraco Cloud and Visual Studio and also will make sure you only place your output Umbraco project in Umbraco Cloud and keep your own source code in your source control.
Do #2 is again a lazy Do for me to write out, The second do is to read the documentation that Umbraco wrote about Umbraco Cloud. There is plenty and it really helps you to get an understanding of what is there and what is possible.
Do #3 is to Do it your way, your code, your style. You can work on Umbraco Cloud solutions the same as you currently work on your website, you don't have to follow the default Umbraco structure of views, stylesheets and scripts. An Umbraco Cloud implementation is the same Umbraco that you currently host yourself.
Do #4 Place your media in Azure Blob storage instead of on the Umbraco Cloud environment itself. While you do have unlimited storage at the Umbraco Cloud platform, placing your media in a separate Azure Blob will prevent Umbraco Cloud to download all media locally when you restore content from an environment. There is a great provider build for this by James South, the great ImageProcessor guy. You can download it and read the documentation at https://our.umbraco.org/projects/collaboration/umbracofilesystemprovidersazure/
Do #5 Always create at least a development environment next to the live environment on Umbraco Cloud. This way when you push a deployment to Umbraco Cloud you can check everything on the development environment first; transfer the live content to the development environment so you have a 1:1 copy of how the site will work after you deploy the development version to live.
Don't!
Now with those simple Do's; lets move on to some Don'ts of Umbraco Cloud:
Don't #1 Do not NOT step on-board the Umbraco Cloud train. Give it at least a try with a project. It will not only help your workflow, but will also help Umbraco get more data about the sites running and what issues the automated upgrading process can cause, which does result in a better Umbraco product for everyone. With Christmas coming up at the time of writing this article isn't that just a warm cozy feeling to help not only yourself but also others?
Don't #2 Do not reinvent the wheel; stick to Umbraco best practices (read: https://our.umbraco.org/documentation/Reference/Common-Pitfalls/). The closes you stay to how Umbraco is intended to be used (and this is not limiting you, you can go CRAZY within those practices) the less issues shall arise. If you did not do so, Umbraco Training can help to get you in the right direction.
Don't #3 Do not blindly trust the automatic patch release Umbraco Updates that are automatically rolled out to your live environment as well. So when an Umbraco release is imminent make sure you have time to test your sites. A nice feature would be to have this optional in Umbraco Cloud.
Deployments of code
By now you have read and understood the article Sebastian wrote about Visual Studio and Umbraco Cloud so you have a proper Umbraco Cloud setup at your disposal.
If you did not, a quick summary of what that will give you:
- One source control repository with your own code.
- One GIT Umbraco Cloud source control repository with the output Umbraco project.
With this setup your source code will not be hosted in the Umbraco Cloud, but only your output project will be in the Umbraco Cloud GIT Repository.
Your code is build and compiled into the output project and then pushed to Umbraco Cloud. Thus updating the site with your latest code changes.
With this setup you do commit twice. Once to commit your code in your own source control. And another commit to the Umbraco Cloud GIT repository is a commit to deploy of your website, something you probably did in the past by coping the files to the server.
Push your code to the next environment
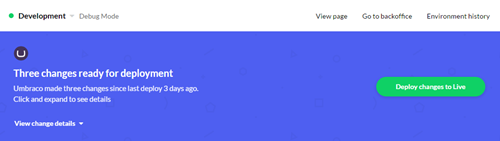
Now you have your code on the Umbraco Cloud development environment and all is tested and working as it should, you are ready to get the code to your live website.
To make this happen, login to your Umbraco Cloud environment, open the project and click the "Deploy changes to live" button. Yep, that simple.
Deployments of content
With code deployed, you now want to get the content that uses the new code also on your live site.
Umbraco Cloud creates a local database when you work on the project on your machine, so your first have to transfer your content to the next environment: the development environment in Umbraco Cloud.
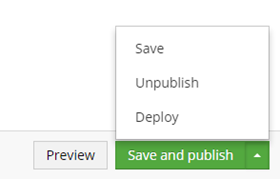
You can mark the content you want to transfer via the context menu of the node, or via a new option, 'Deploy', on the save & publish button.
This will put the node (and all the content on it) to the deployment cue, but will not really deploy anything yet. This way you can make a collection of content you want to transfer at once.
note you should first transfer your code before you can transfer your content! Also the node should be first saved before Deploy will notice any changes.
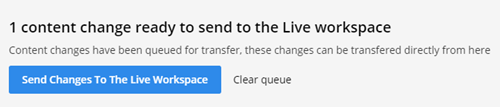
After marking a node as ready to deploy you can deploy from there or from the "Your workspace" dashboard on the "Content" section.
Transferring data between environments (development to live) works in exactly the same way.
tip create a staging environment in Umbraco Cloud that sits between the Development and the Live environment. Your editors can edit content there and publish all the changes in one push to live.
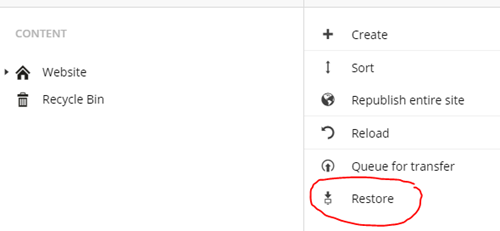
Another great feature is that you can get content back to the previous environment with a simple action in the content contextmenu.
This makes it possible to work with the live data on your development or even local environment. You know how editors always be able to mess things up. This makes it easy to debug exactly what they put in as content or see how your new changes effect that content.
Using custom datatypes? Build yourself some Courier Resolvers!
Since Umbraco Cloud uses Courier (Umbraco Deploy) for transfers of your node data you should be aware that you might need to write Courier Resolvers.
Now I can image you did not use Courier before and even if you did like two years back, the results would probably still infuriate you right now. But bear with me... Umbraco Cloud is the best thing that could happen for Courier. Umbraco HQ themselves now see the issues that Courier could cause, on a large scale. And they can take a look themselves and debug to real world situation. Making Courier much, much better tool these days (I never say perfect ;)). At the time of writing Umbraco Cloud is running Courier version 3 that is not yet available as a stand alone download for non-Umbraco Cloud implementations.
Umbraco Courier makes the connection between the data (nodes, document-types, etc) on environment 1 and can sync those met environment 2.
Because Umbraco, for now, uses NodeId's that are not unique per environment, syncing data is quite a challenge. Courier solves that, and a lot more. Courier is the tool that handles all the content (related) transfers in Umbraco Cloud.
So what do Courier Resolvers do and why do you need them for Umbraco Cloud?
Image you have created a datatype, with data in a custom format that picks a nodeId. If you deploy your content changes between environments you want that NodeId to be targeted at the correct NodeId at the other environment. With Courier Dataresolvers you tell Courier what kind of data is stored and how it should be handled. It will match the selected Node of environment 1 to the same Node of environment 2 so the link is still correct.
Out of the box, Courier, can understand all standard data-types in umbraco. This means that Courier knows that a Content picker contains a ID, pointing at a document, which then becomes a dependency, and the ID gets translated into a Guid which can safely be deployed to another location. It also knows that a template might contain references to javascript files or internal links, using the [locallink:] syntax. Or a a lot of other cases where data have a special meaning.
While Courier itself is not open-source, you can read more about creating Courier resolvers at the official Courier Github respsitory at https://github.com/umbraco/Courier.
Some great examples of Courier Resolvers for much-used community build Umbraco Packages can be found at https://github.com/leekelleher/umbraco-courier-dataresolvers
Get your baseline started!
Probably everyone working on various Umbraco projects works with some kind of staterkit with a set of standard document types, maybe some content already, a set of great packages you can't live without and some default views. Umbraco Cloud baselines is just that, and better.
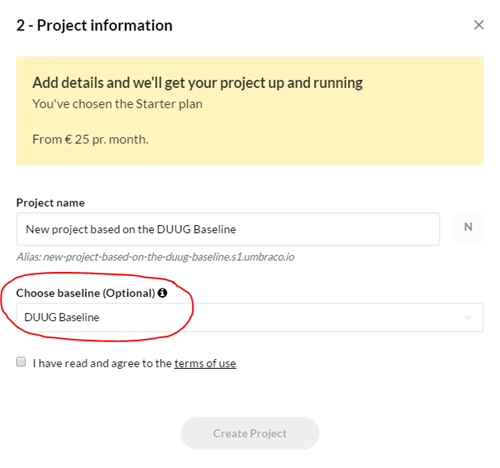
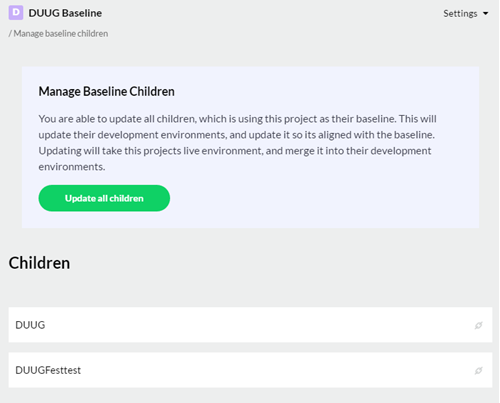
Why better? Umbraco Cloud Baselines keep a link between the baseline and the sites created with that baseline. If you update the baseline project, you can update all the sites using that baseline with a single action. Each project in Umbraco Cloud can be a baseline for another project so even baselines can have multiple environments.
More information about baselines can be found in the official documentation.
Take control with KUDU
Kudu as an animal
The greater kudu (Tragelaphus strepsiceros) is a woodland antelope found throughout eastern and southern Africa. Despite occupying such widespread territory, they are sparsely populated in most areas, due to a declining habitat, deforestation and poaching. The greater kudu is one of two species commonly known as kudu, the other being the lesser kudu, T. imberbis.
 By © Hans Hillewaert, CC BY-SA 4.0, https://commons.wikimedia.org/w/index.php?curid=10436599
KUDU as software
No, we are not talking about the Kudu above (the Kudu meat has a great taste actually, but that is for a different post on a different 24days...).
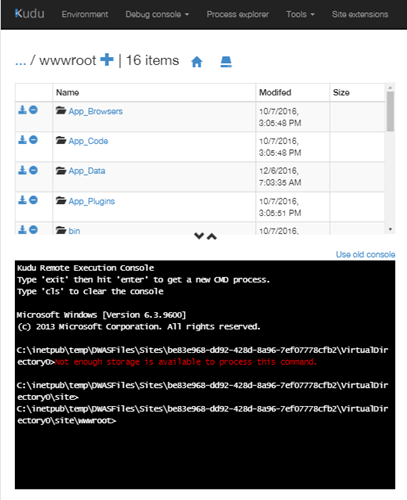
The KUDU that we will use is the Azure KUDU (https://github.com/projectkudu/kudu). A web-tool that gives you access to various management features for your site.
This includes:
- Browsing and editting your files
- Using command-prompt
- Using powershell
- Watch running processes
- Get information about your environment
- Download logfiles
You can reach KUDU for your environment using http://projectname.scm.s1.umbraco.io.
As you can see in that feature list, you can run command-line from your Umbraco project. You can upload command line tools in your umbraco environment and access them just as you would be able on your own server.
A video of Microsfot explaining more about KUDU can be viewed at the following url: https://azure.microsoft.com/nl-nl/resources/videos/what-is-kudu-with-david-ebbo/
Getting Help
With your current hosting provider you probably have a SLA contract with uptime guarantee and a support contract.
Keep in mind that the basic plan (25,- EUR/month) of Umbraco Cloud does not come with any support guarantee or guaranteed uptime. This is all based on 'best effort' chat support and forum support. If you do want to get full, gold level, support you will have to get the 400,- EUR/month plan. The advantage is that this plan also comes with unlimited environments and users, but is not a plan for 'everyone'.
While using the chat support in Umbraco Cloud all replies have been within an hour a few hours the most (We did not have the professional support plan). This is adequate is most situations, but do consider if your customer is more demanding, then switch to the professional plan, or to a different kind of hosting.
