Umbraco extensibility
Heads Up!
This article is several years old now, and much has happened since then, so please keep that in mind while reading it.
Introducing NuTranslation
In this article I'm showing some less used extensibility points using as example a simplified version of NuTranslation, a translation package I'm working on, that might make its way to the new version of Umbraco. At the moment, without v8's language variations, it only works with Vorto.
It's made of various components:
- A custom dialog used to request a translation for a node;
- A server-side component that creates the actual translation request;
- A translation history page that shows all translations request for a specific node;
- A dashboard that shows all pending translations.
To implement these components, among other tasks, I had to:
- Add some new menu items in the content menu;
- Build a new dialog, using the Umbraco AngularJS directives to make it look like a native UI element;
- Build web services to interact with the AngularJS services of the dialog;
- Build a dashboard;
- Store custom data on custom tables.
But enough introductions... let's see how to implement some of these custom components!

Adding new menu items
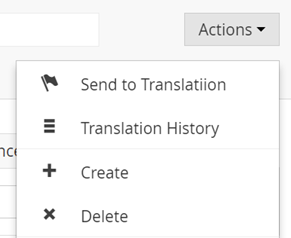
The entry point for node-related functionalities is the contextual menu that opens up by right-clicking on a node in the tree or in the actions button in the editing page.
This is done by adding a new MenuItem to the content tree. The following code shows the basics:
public class UpdateContentMenu : ApplicationEventHandler
{
    protected override void ApplicationStarted(UmbracoApplicationBase umbracoApplication, ApplicationContext applicationContext)
    {
        Umbraco.Web.Trees.ContentTreeController.MenuRendering += ContentTreeController_MenuRendering;
    }

    private void ContentTreeController_MenuRendering(TreeControllerBase sender, MenuRenderingEventArgs e)
    {
        var myMenuItem = new Umbraco.Web.Models.Trees.MenuItem("alias","Item name");
        myMenuItem.Icon="globe";
        //Add item at the top of the list
        menu.Items.Insert(0,myMenuItem);
    }
}
Basic menuItem
The code to create a menu must be added to an handler for the event MenuRendering and must be setup in the ApplicationStarted event.
Inside the handler the menu is created with the name "Item name" and with the globe icon. It will be the first in the item in the menu, and once clicked it will try to open the /umbraco/views/<currentSection>/alias.html page in slide-out dialog. So if you are in the content section, the url called is /umbraco/views/content/alias.html.
These location is ok for actions that are part of Umbraco, but as a general rule one should not add files to folders of the core, or maintenance will become very difficult. But items can be configured to do other actions:
- open an AngularJS View with the LaunchDialogView method;
- navigate to an AngularJS route with the NavigateToRoute method;
- execute directly some javascript with the ExecuteLegacyJs method;
- open a dialog with an iFrame with a webform in it with the method... not telling you, you shouldn't do it anyway.
Probably you also don't want your item everywhere. You might want to add it only to a specific tree, or if the node is of a specific type or if the user has specific permissions. These things can be done by inspecting the sender parameter or the e EventArgs parameter.
Finally you might want to add a separator before or after the item. The next snippet shows the code to add 2 menu items that call some views in my plugin folder, only when in the content tree and only if the user is allowed to access the translation section. And removes the "legacy" translation item.
But beware: if you put them at the first place in the menu, like done in the previous sample, your custom action will be called as default action instead of the standard "Create" action, which is not a good idea. Better put them at the end with e.Menu.Items.Add, or figure out a position in the middle of the menu.
using System.Linq;
using Umbraco.Core;
using Umbraco.Web.Models.Trees;
using Umbraco.Web.Trees;

namespace NuTranslation.Core.EventHandlers
{
    public class UpdateContentMenu : ApplicationEventHandler
    {
        protected override void ApplicationStarted(UmbracoApplicationBase umbracoApplication, ApplicationContext applicationContext)
        {
            Umbraco.Web.Trees.ContentTreeController.MenuRendering += ContentTreeController_MenuRendering;
        }

        private void ContentTreeController_MenuRendering(TreeControllerBase sender, MenuRenderingEventArgs e)
        {
            //If it's the content tree
            if (sender.TreeAlias == "content")
            {
                //If the current user is allowed in the translation section
                if(sender.Services.SectionService.GetAllowedSections(sender.Security.GetUserId())
                    .Count(s => s.Alias.InvariantEquals("translation")) > 0)
                {
                    //Get old translation item and remove it
                    var oldMenuItem = e.Menu.Items.SingleOrDefault(m => m.Alias == "sendToTranslate");
                    if (oldMenuItem != null)
                    {
                        e.Menu.Items.Remove(oldMenuItem);
                    }

                    //Adds 2 new items at the top of the list
                    var sendToTranslationItem = new MenuItem("sendToNuTranslate", "Send to Translation");
                    sendToTranslationItem.LaunchDialogView("/App_Plugins/NuTranslation/views/sendforTranslation.html", "Send to Translation");
                    sendToTranslationItem.Icon = "flag-alt";
                    e.Menu.Items.Insert(0,sendToTranslationItem);

                    var translationHistoryItem = new MenuItem("translationHistory", "Translation History");
                    translationHistoryItem.LaunchDialogView("/App_Plugins/NuTranslation/views/translationHistory.html", "Translation History");
                    translationHistoryItem.Icon = "list";
                    e.Menu.Items.Insert(1, translationHistoryItem);

                    //Add separator before next menu item
                    e.Menu.Items[2].SeperatorBefore = true;
                }
            }
        }
    }
}
The complete code for the event handler that adds the menuItem
Building the dialog

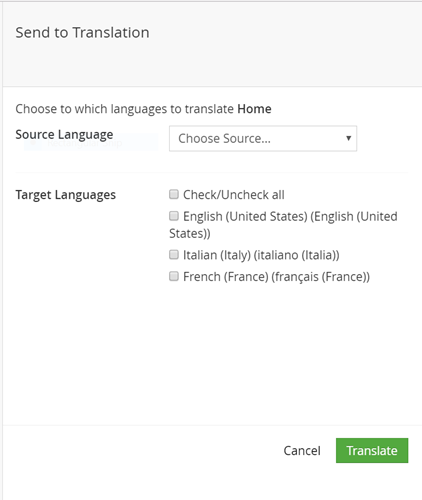
The menu item now calls the /App_Plugins/NuTranslation/views/sendforTranslation.html: let's see how it's built.
An Umbraco plugin is a collection of html views and AngularJS scripts, all sitting in the same folder together with a manifest file that explains how they are tied together. Usually plugins are used for Property Editors, but they can also be used just as way to inject your own javascript files into the Umbraco backend.
So, first step is creating a new folder under the /App_Plugins folder. Just to keep things tidy also create 3 subfolders: views, js, css.
A dialog is no different from a complex Property Editor: it has the view, an AngularJS controller and a WebAPI controller for managing the interaction with the server.
The Dialog's view

Let's first start with the anatomy of the HTML view, and how it is made look like a native UI by using a combination of umb- CSS classes and <umb-*> directives for the few cases in which they are usable (Umbraco has a lots of AngularJS directives but they do not work on dialogs).
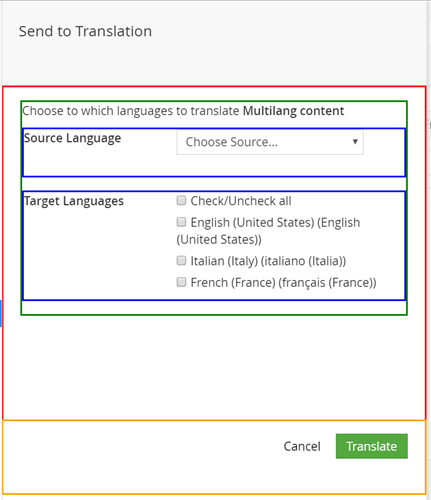
The top part, the one not surrounded by any colored box is managed directly by Umbraco, and comes for "free".
The two outside boxes (red and orange) are the two elements of the native-looking dialog:
- the body of the dialog, a div with the umb-dialog-body class
- the footer, another div with the umb-dialog-footer class
Inside the body, there is the main pane (in green), defined with the <umb-pane> directive.
<div ng-controller="nutranslation.sendToTranslationController as vm">
    <div class="umb-dialog-body form-horizontal">
        <umb-pane>
          <!-- The body of the dialog, usually containing buttons -->

          <div class="control-group umb-control-group">
            <!-- Each property -->
          </div>

        </umb-pane>
    </div>

    <div class="umb-dialog-footer btn-toolbar umb-btn-toolbar" ng-hide="vm.success">
      <!-- The footer of the dialog, usually containing buttons -->
    </div>
</div>
Structure of the dialog
Inside there are all the controls of the dialog, each one enclosed in a umb-control-group (highlighted in blue). Each control group contains the label and the actual controls, as shown in the code snippet below.
<div class="control-group umb-control-group">
    <div class="umb-el-wrap">
        <label class="control-label" for="comment">Comment</label>
        <div class="controls controls-row">
            <textarea id="comment" class="form-control"></textarea>
        </div>
    </div>
</div>
Property within a control-group element
In the footer, there the two buttons, one for simply closing the dialog and one for sending the current node to translation.
<div class="umb-dialog-footer btn-toolbar umb-btn-toolbar" ng-hide="vm.success">
    <a class="btn btn-link" ng-click="nav.hideDialog()" ng-if="!vm.busy">
        <localize key="general_cancel">Cancel</localize>
    </a>

    <button class="btn btn-primary" ng-click="vm.sentToTranslation()" ng-disabled="vm.busy">
        <localize key="actions_translate">Translate</localize>
    </button>

    <umb-button
        action="vm.sentToTranslation()"
        type="button"
        buttonStyle="btn-primary"
        labelKey="actions_translate"
        disabled="vm.busy"
        label="Translate">
    </umb-button>

</div>
The footer section of the dialog
Buttons can be created by either applying the Bootstrap classes directly, or by using the <umb-button> directive if you want bit more of functionalities. The previous snippet shows both approaches.
One final touch to dialog is the response to action, showing either a "success" or a "error" message.

These are done by adding two alert boxes styled with Bootstrap, one with the alert-error class and another with the alert-success class.
The complete listing is available in the following snippet. It has a lot AngularJS variables in it, but hopefully their names should be easy to guess. If not the next section will solve any doubt.
<div ng-controller="nutranslation.sendToTranslationController as vm">
    <div class="umb-dialog-body form-horizontal">
        <umb-pane>
            <p>Choose to which languages to translate <b>{{currentNode.name}}</b></p>

            <!-- Loading indicator -->
            <div class="umb-loader-wrapper" ng-show="vm.busy">
                <div class="umb-loader"></div>
            </div>
            <!-- Error Alert -->
            <div class="alert alert-error" ng-show="vm.error">
                <h4>{{vm.error.errorMsg}}</h4>
                <p>{{vm.error.data.Message}}</p>
            </div>
            <!-- Success message -->
            <div class="alert alert-success" ng-show="vm.success">
                <p>
                    <strong>{{currentNode.name}}</strong> was sent to translation for:
                    <ul>
                        <li ng-repeat="item in vm.translationRequests">{{item}}</li>
                    </ul>
                </p>

                <button class="btn btn-primary" ng-click="nav.hideDialog()">Ok</button>
            </div>

            <!-- Source language -->
            <div class="control-group umb-control-group">
                <div class="umb-el-wrap">
                    <label class="control-label" for="sourceLanguage">Source Language</label>
                    <div class="controls controls-row">
                        <select id="sourceLanguage" ng-model="vm.langFrom" ng-change="vm.setSource(vm.langFrom)" class="form-control">
                            <option value="">Choose Source...</option>
                            <option ng-repeat="lang in vm.languages" value="{{lang.isoCode}}">{{lang.name}} ({{lang.nativeName}})</option>
                        </select>
                    </div>
                </div>
            </div>

            <!-- Destination languages -->
            <div class="control-group umb-control-group">
                <div class="umb-el-wrap">
                    <label class="control-label">Target Languages</label>
                    <div class="controls controls-row">
                        <div class="control">
                            <label><input type="checkbox" ng-model="vm.selectedAll" ng-click="vm.toggleAll()"> Check/Uncheck all</label>
                        </div>
                        <div class="control" ng-repeat="lang in vm.languages" ng-class="{disabled: lang.disabled}">
                            <label><input type="checkbox" name="selectedLang[]" value="{{lang.isoCode}}" ng-model="lang.selected" ng-disabled="lang.disabled"> {{lang.name}} ({{lang.nativeName}})</label>
                        </div>
                    </div>
                </div>
            </div>
        </umb-pane>
    </div>

    <div class="umb-dialog-footer btn-toolbar umb-btn-toolbar" ng-hide="vm.success">
        <a class="btn btn-link" ng-click="nav.hideDialog()" ng-if="!vm.busy">
            <localize key="general_cancel">Cancel</localize>
        </a>

        <button class="btn btn-primary" ng-click="vm.sentToTranslation()" ng-disabled="vm.busy">
            <localize key="actions_translate">Translate</localize>
        </button>
    </div>
</div>
The complete listing of the view
Dialog's controller
Happy with look of the HTML view of the dialog, it's time to add some interaction. For this dialog we needed to interact with the server in order to load or send data. This while showing some feedback to the user and handling possible errors.
Every request to the server is done in the same way:
- First the status tracking variables are reset: success and error are set to false.
- Then the busy variable is set to true since the request to the server is started. This will show the loading bar and disable the action buttons.
- The request is sent:
- if everything is ok the request is processed, success is set to true and the rest to false
- if error happen, busy is set to false as the operation is completed, but error now contains the error message.
Apart from the initial setting of variables, the request and its handling are done using the Umbraco AngularJS helper method umbRequestHelper.resourcePromise.
The following method to request a translation is an example of such process.
vm.sentToTranslation = function () {

    vm.busy = true;
    vm.error = false;

    var args =
    {
        contentId: $scope.currentNode.id,
        sourceLang: vm.langFrom,
        languages: _.map(_.where(vm.languages, { selected: true }), function (lang) { return lang.isoCode; })
    };
    umbRequestHelper.resourcePromise(
        $http.post("/umbraco/backoffice/api/NuTranslation/post", args),
        'Failed to request translation for content')
        .then(function (data) {
            vm.error = false;
            vm.success = true;
            vm.busy = false;
            vm.translationRequests = data;

        }, function (err) {
            vm.success = false;
            vm.error = err;
            vm.busy = false;
        });
};
The sendToTranslation function of the controller
If you want to go one step further, you can also use the umbRequestHelper.GetApiUrl method to automatically get the url of the backoffice API without hard coding it in the call. In this case umbRequestHelper.getApiUrl("nuTranslation","Post").
I've omitted the full controller for sake of brevity, by you can see its full version on the project's repo on Github
WebAPI controllers
The dialog was sending some resource from the server, but if you run the code now you'll get an error. This because we haven't built the server-side counterpart. This is done by building a WebAPI controller and is probably the easiest part of the whole exercise.
All you need is implementing an UmbracoAuthorizedJsonController, and adding a Get or Post method. The controller just created will be available at the url: /umbraco/backoffice/api/<ControllerName>/<actionName>.
In the dialog the url that was called was /umbraco/backoffice/api/NuTranslation/post, so my controller should be named NuTranslationController and the action Post.
The listing shows the NuTranslationController controller (with the logic stripped for brevity) with both actions used by the dialog: Post and GetLanguages.
public class NuTranslationController: UmbracoAuthorizedJsonController
{
    [HttpPost]
    public HttpResponseMessage Post([FromBody] TranslationRequestDTO request)
    {
        //Process Post
        return Request.CreateResponse(HttpStatusCode.OK);
    }

    [HttpGet]
    public HttpResponseMessage GetLanguages()
    {
      //Collect available languages
      return Request.CreateResponse(HttpStatusCode.OK, languages);
    }
}
Web API Controller
The dialog showed two different alert boxes based on whether the request was successful or not. This can be done by checking the input and returning a validation error instead of an OK message.
[HttpPost]
public HttpResponseMessage Post([FromBody] TranslationRequestDTO request)
{
    if (request.Languages.Count() < 1)
        return Request.CreateValidationErrorResponse("At Least one Target language is needed");
    if (String.IsNullOrWhiteSpace(request.SourceLang))
        return Request.CreateValidationErrorResponse("Source Language is needed");

    //Do the real work

    return Request.CreateResponse(HttpStatusCode.OK, request.Languages);
}
Checking the input and returning a validation error
If you want to use the getApiUrl method, you also need to add the configuration it uses. This is done inside the handler for the ServerVariablesParser.Parsing event by adding the url of the controller to the umbracoUrls JavaScript dictionary. The whole process is explained more in details on my post: How to get the url of custom Umbraco backoffice API controllers with the GetApiUrl method.
Conclusions
In this article you've seen some of the extensibility points that you can leverage to build your own custom solution on top of Umbraco. There are still many more I haven't covered yet, like dashboards, complete editing forms, new sections and new tree, and you can even add your own tables to save data specific to your solution.
And thanks to the umb- classes and directives, you can build something that looks and behaves like the native UI of Umbraco.
Unfortunately not everything is always well documented but you can see all the available angular directives and services on the Umbraco Backoffice UI API documentation and failing that, a visit to the source code repository on Github might solve many other doubts.
If you want to try the NuTranslation sample, you can go to the repository on GitHub, clone it and look at the various elements. And why not, send a pull request if you think something might be improved. It's still a work in progress, do not expect a working solution tho.