Dashboard overload
Heads Up!
This article is several years old now, and much has happened since then, so please keep that in mind while reading it.
Chriztian already covered the topic some days ago with a few awesome dashboards of his own, but a dashboard can be many different things, and I believe there is still plenty of ways that we can help make the life easier for our clients.
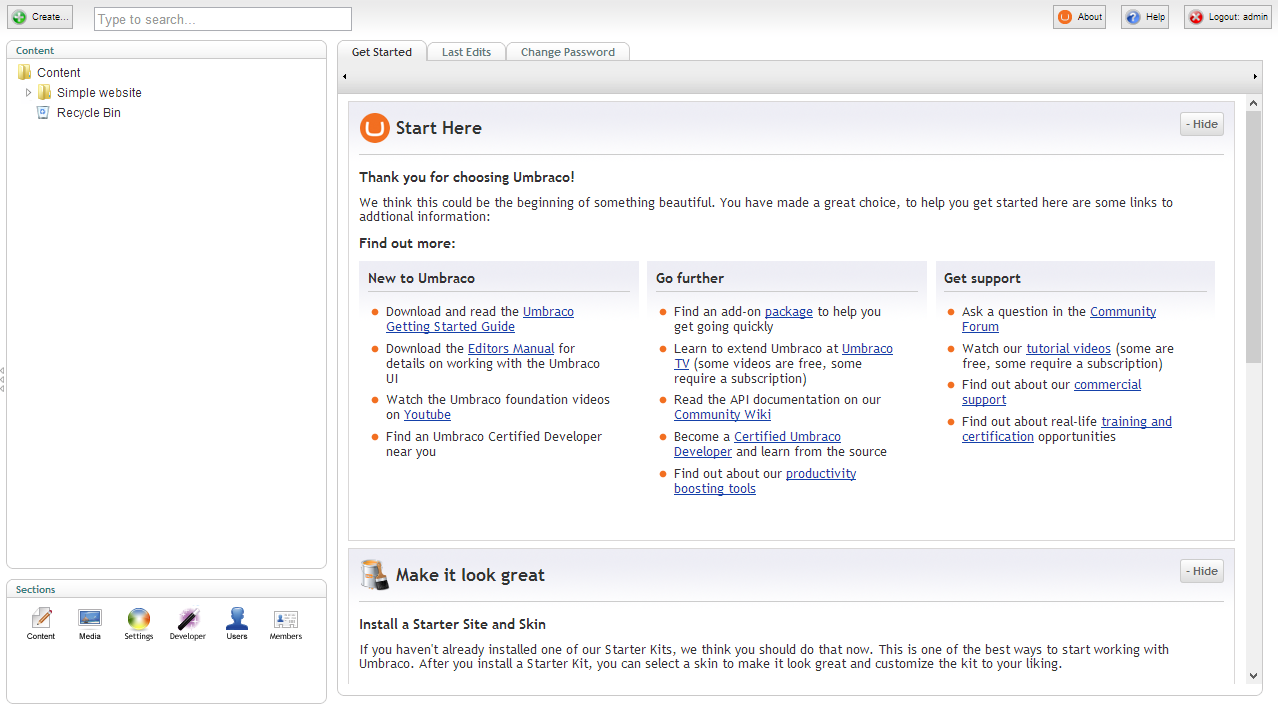
The dashboard I'm building today consists of a datagrid containing useful information on all the pages in the content tree. For this demo I've used one of the default starterkits with minimal content, but as I'm using Examine as the data store, the dashboard can easily support thousands of nodes making it ideal for both small and large sites.
I have chosen to separate the post into two parts. The first part is fairly basic and makes use of what we got available in Umbraco out of the box. In the second part I will go into more advanced topics extending on the things covered in the first part. There is a lot to cover, so without further ado, lets get started.
Part 1
Installing Umbraco
You can run Umbraco in any way you like, but for this demo I installed it straight from Nuget in Visual Studio. To simplify the setup I'm running on an embedded SQL CE database. Since this demo is based on v6, I'm using the new api whenever I can, though everything can be backported to the v4 api if need be.
Registering a user control
First I need a new User Control that will act as my dashboard container. Umbraco (conveniently) already has a folder named "usercontrols" so that is where I'm gonna put it. Depending on your developer setup, there are different ways to create a user control, so I won't go in to that here.
<%@ Control Language="C#" AutoEventWireup="true" CodeBehind="View.ascx.cs" Inherits="Demo.usercontrols.dashboards.PageOverview.View" %>
<p>This will be our dashboard container</p>
That is one fine user control!
Next I need to register it in the Dashboard.config file located in the config folder. I add the new dashboard control and get rid of the other default ones.
<section alias="StartupDashboardSection">
    <access>
        <deny>translator</deny>
    </access>
    <areas>
        <area>content</area>
    </areas>
    <tab caption="Dashboard">
        <control panelCaption="">/usercontrols/dashboards/PageOverview/View.ascx</control>
    </tab>
    <tab caption="Change Password">
        <control addPanel="true">/umbraco/dashboard/changepassword.ascx</control>
    </tab>
</section>
Let's keep the dashboard for changing password, that one is handy!
Now that the dashboard container is done, let's put in some content.
Setting up the datagrid
A datagrid is basically an enhanced table with data in it. A good datagrid provides functionality such as paging, sorting, filtering and searching. There are lots of different datagrids out there and they can vary hugely in functionality and ease of use. For this demo I have chosen to use a framework called Fuelux that builds upon Bootstrap. Fuelux offers a really simple and stylish yet very flexible data grid, just what I need.
I'll admit though, that the structure of the framework is a bit hard to figure out, and I ended up having to load the entire thing. Apparently, the datagrid component uses a lot of different stuff from other components, so it can be hard to break them apart. Luckily, script size isn't that much of a concern in the backoffice, so let's accept that for now and move on.
To load the datagrid assets I'm using the Umbraco Client Dependency Framework. CDF helps manage css and javascript dependencies and handles all the boring stuff like minification, compression, caching and so on. You can read more about CDF here.
<%@ Control Language="C#" AutoEventWireup="true" CodeBehind="View.ascx.cs" Inherits="Demo.usercontrols.dashboards.PageOverview.View" %>
<%@ Register TagPrefix="CD" Namespace="ClientDependency.Core.Controls" Assembly="ClientDependency.Core" %>
<CD:CssInclude runat="server" FilePath="/userControls/dashboards/PageOverview/fuelux.css" />
<CD:JsInclude runat="server" FilePath="/userControls/dashboards/PageOverview/underscore.min.js" />
<CD:JsInclude runat="server" FilePath="/userControls/dashboards/PageOverview/fuelux.loader.js" />
<CD:JsInclude runat="server" FilePath="/userControls/dashboards/PageOverview/fuelux.datagrid.datasource.js" />
<!-- Just a few custom styles I'm going to need, nothing fancy .. -->
<style>
    .fuelux .datagrid { margin: 10px 0 0 0; }
    .fuelux .datagrid-header-right > .select,
    .fuelux .datagrid-header-right > .input-append { float: left; }
    .fuelux .datagrid tbody tr.odd { background-color: #f9f9f9; }
</style>
Note that I'm also including underscore.js, which is used by Fuelux per default.
To set up the datagrid I'm taking a starting point in the example provided on the Fuelux demo site. I have left out most of the html boilerplate code here since it's quite lengthy, but you can find it in the Github repository accompanying this demo.
<div class="container fuelux">
    <table id="DashboardDatagrid" class="table table-bordered datagrid">
        <thead>
            ...
        </thead>
        <tfoot>
            ...
        </tfoot>
    </table>
</div>
Basically I need to set up the header and footer html and then let the datagrid component render some rows and columns for me. To do this I need to provide it with a data source and a few options. Let's take a closer look at the data source.
The data source for the datagrid needs a defined set of columns and some data. I also provide it with a custom formatter to transform the name of the page into a link, so I can navigate directly to the given page in the content tree.
<script>
    var payload = <%= Payload %>;
    var dataSource = new DataGridDataSource({
        columns: [
            {
                property: "PageName",
                label: "Page name",
                sortable: true
            },
            {
                property: "PageType",
                label: "Page type",
                sortable: true
            },
            {
                property: "Updated",
                label: "Last updated",
                sortable: true
            },
            {
                property: "WriterName",
                label: "Last updated by",
                sortable: true
            },
            {
                property: "CreatorName",
                label: "Created by",
                sortable: true
            }
        ],
        formatter: function (items) {
            $.each(items, function (index, item) {
                item.PageName = "<a href='javascript:UmbClientMgr.mainWindow().openContent(\"" + item.PageId + "\")'>" + item.PageName + "</a>";
            });
        },
        data: payload
    });
</script>
Payload? We'll get to that shortly, don't worry.
The data source is also responsible for configuring things like searching, filtering, sorting and paging the data. Most of the code is boilerplate taken from the samples at Github. Again, the code is rather lengthy so I left it out here.
There is one thing I need to customize though. One of the things I want to show on the dashboard is the date for the last time the pages were updated. But per default the datagrid will sort all columns alphabetically either ascending or descending. I need to tell the datagrid that I want the "Updated" column to sort on a date instead of text. This snippet expects the date to be in a certain format (da-DK). If you use a different date or time format just change your code accordingly.
if (options.sortProperty === "Updated") {
    data = _.sortBy(data, function (item) {
        var parts = item.Updated.split(' ');
        var dateParts = parts[0].split('-');
        var timeParts = parts[1].split(':');
        var date = new Date(dateParts[2], dateParts[1] - 1, dateParts[0], timeParts[0], timeParts[1]);
        return date.getTime();
    });
} else {
    data = _.sortBy(data, options.sortProperty);
}

if (options.sortDirection === 'desc') data.reverse();
The datagrid by default uses underscore.js to do the sorting. We don't need to worry much about this, but if you are interested in knowing more about underscore.js and it's sorting capabilities, you can read more about it here.
Now that I got a configured data source I can initialize the datagrid itself.
$("#DashboardDatagrid").datagrid({
    dataSource: dataSource,
    dataOptions: {
        pageIndex: 0,
        pageSize: 30,
        sortProperty: "Updated",
        sortDirection : "desc",
        filter: true
    }
}).on("loaded", function(e) {
    $(e.target).find("tr:odd").addClass("odd");
});
All the options provided should be fairly self-explanatory.
The "loaded" event will be triggered when the datagrid is first loaded and then every time it's paged. Whenever this event is triggered I want to add a class to every odd row to add some styling so it's easier to tell the rows apart.
So now that the setup for the datagrid is done, let's look at how we can provide it with some data from the server.
Introducing Examine
You probably already heard of Examine. It's been the topic of many talks and blog posts lately, and I can understand why as it's basically awesome.
If you somehow missed all the fuzz about Examine, I strongly suggest you go read about it now. Why not start with another entry in this years calendar, it's really friendly. And while you're at it, you might also want to familiarize yourself a bit with Lucene. Aaron Powell (@slace) has an excellent overview that I highly recommend you read. Go on, I'll be here patiently awaiting your return.
Fetching data from Examine
Ok, time to get to work and find some pages to display on the dashboard.
Most sites consists of content that is made up by a lot of different content types. Since I want the dashboard to show an overview of all the pages in the content tree, I need to know which content types that are actually considered to be content pages. For this demo I am assuming that all pages have a content type with an alias that is ending in "page" but your logic may vary, ajust accordingly.
using System;
using System.Linq;
using Umbraco.Core;
using Umbraco.Core.Services;

namespace Demo.usercontrols.dashboards.PageOverview
{
    public partial class View : System.Web.UI.UserControl
    {
        protected IContentTypeService ContentTypeService = ApplicationContext.Current.Services.ContentTypeService;
        protected string Payload;

        protected void Page_Load(object sender, EventArgs e)
        {
            var pageContentTypes = ContentTypeService
                .GetAllContentTypes()
                .Where(x => x.Alias.EndsWith("page"))
                .ToList();
        }
    }
}
I use the new services api to get all the relevant content types. This is really nice because now, if I ever add another page type to the site, I just need to adhere to my naming scheme and the new page type will automatically be fetched along with the others.
With the page content types in place, I can now begin to build my search criteria using the Examine fluent api.
var searcher = ExamineManager.Instance.SearchProviderCollection["InternalSearcher"];

var query = searcher
    .CreateSearchCriteria()
    .GroupedOr(new[] { "nodeTypeAlias" }, pageContentTypes.Select(x => x.Alias).ToArray());

var results = searcher.Search(query.Compile());
When I compile the search query Examine will go to work and return a collection of SearchResult objects that I can iterate through. Each result contains a relevance score, a node id and a dictionary with data from the index.
What I need to do now is serialize the results to a JSON string and dump it somewhere the datagrid can reach it. This is what the Payload variable is for.
I'm using Json.NET, which is included in newer Umbraco versions, to serialize my IEnumerable of anonymous objects into json. If you don't have access to Json.NET you can just use any other build in json serializer.
Note that I have to explicitly declare how to parse the date returned from Examine. I use the danish culture here but you can of course adjust that to suit your needs.
var culture = new CultureInfo("da-DK");

Payload = JsonConvert.SerializeObject(results.Select(x =>
{
    var fields = x.Fields;
    var updated = DateTime.ParseExact(fields["updateDate"], "yyyyMMddHHmmssfff", culture);

    return new
    {
        PageId = x.Id,
        PageName = fields["nodeName"],
        PageType = pageContentTypes.First(y => y.Alias == fields["nodeTypeAlias"]).Name,
        Updated = updated.ToString("dd-MM-yyyy HH:mm"),
        WriterName = fields["writerName"],
        CreatorName = fields["creatorName"]
    };
}));
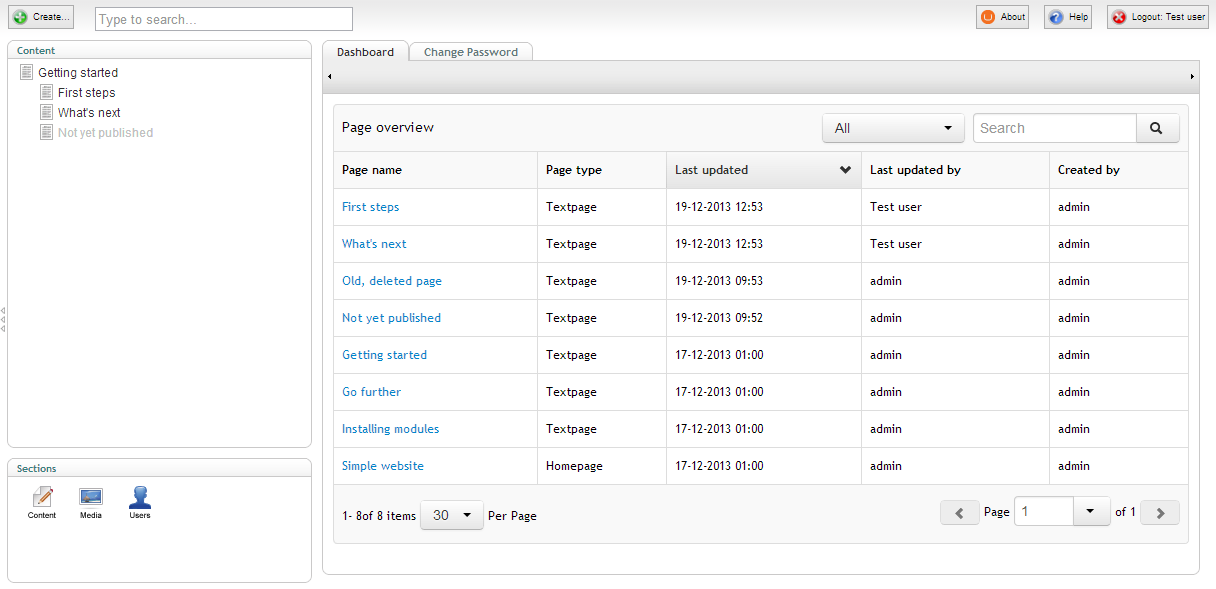
And that's it! I now have a functioning dashboard with a datagrid showing a useful, easily sortable overview of all the pages in the content tree.
Part 2
Extending the dashboard
While I now have a working dashboard I did manage to introduce a potential security issue. You see, with the current search query I use, Examine is returning every single page in the content tree regardless if the current Umbraco user has access to those pages. Whoops..
To fix this little mistake I have to restrict my search to only fetch results among pages that is a descendant to the start node of the current Umbraco user. The only problem is that out of the box I can't do that. That's because, out of the box, Examine has no data stored on the ancestors of a node, it only indexes a nodes parent id. Luckily, it's easy to extend Examine to support this.
What I need to do is tell Examine to add some custom data every time a node is indexed in Lucene. This is achieved by hooking into the DocumentWriting event that Examine provides. This event is trigged every time Examine writes something to the index. Here I can access the dictionary with the values that Examine is going to put into the index, and I also get access to the raw Lucene document, so that I can add my own custom fields. All I need to do now is to find all the ancestor ids for a given node, and index them in a way that makes it possible to use them as a search criteria later on.
I can wire up this event hook in any class that implements the IApplicationEventHandler interface or I can tell the Global.asax file to inherit from the UmbracoApplication class and do it there. For this demo I have chosen the latter.
using System;
using Umbraco.Web;

namespace Demo
{
    public class Global : UmbracoApplication
    {
        protected override void OnApplicationStarted(object sender, EventArgs e)
        {
            base.OnApplicationStarted(sender, e);

            RegisterIndexRules();
        }

        protected static void RegisterIndexRules()
        {
            ...
        }
    }
}
There are many ways to hook into application start in Umbraco.
So how do I get all ancestors of a given node? Actually, Examine is already indexing the full path of the node as a comma separated string of ids. To be able to search efficiently on these ids, I need to make sure that they are separated by whitespaces instead. This is because the default internal index uses a whitespace analyzer, so when we use a whitespace as the delimiter the ids are split up into easily searchable terms.
I can then add the new whitespace delimited string to the Lucene document. There is no need to store the actual value though, we just want it analyzed and indexed without norms or term vectors.
var draftIndexer = ((LuceneIndexer)ExamineManager.Instance.IndexProviderCollection["InternalIndexer"]);

draftIndexer.DocumentWriting += (sender, args) =>
{
    var pathParts = string.Join(" ", args.Fields["path"].Split(','));
    var pathPartsField = new Field(
        "__PathParts",
        pathParts,
        Field.Store.NO,
        Field.Index.ANALYZED_NO_NORMS,
        Field.TermVector.NO
    );

    args.Document.Add(pathPartsField);
};
This may all sound a bit confusing if you haven't worked with Lucene before. I won't go into details on the different ways to index data in Lucene here, but if you are interested in reading more about analyzers Aaron has a nice little intro to get you started.
A sidenode for Lucene nerds
Normally I would have added the ancestor ids as separate number fields and given them all the same field name without analyzing them. Unfortunately, as Examine uses a Dictionary<string, string> to map values from Lucene documents this means that if we have more fields with the same name, Examine will simply throw an exception when trying to add the same key multiple times. So for now it's necessary to index all ancestor ids as one white space analyzed string to be able to search on the individual ids.
I also realize that I could get by with a wildcard query that allows leading wildcards, which is actually what Examine does a few places itself, but I do not think that is a best practice approach, so I've chosen not to do that here.
Back on track
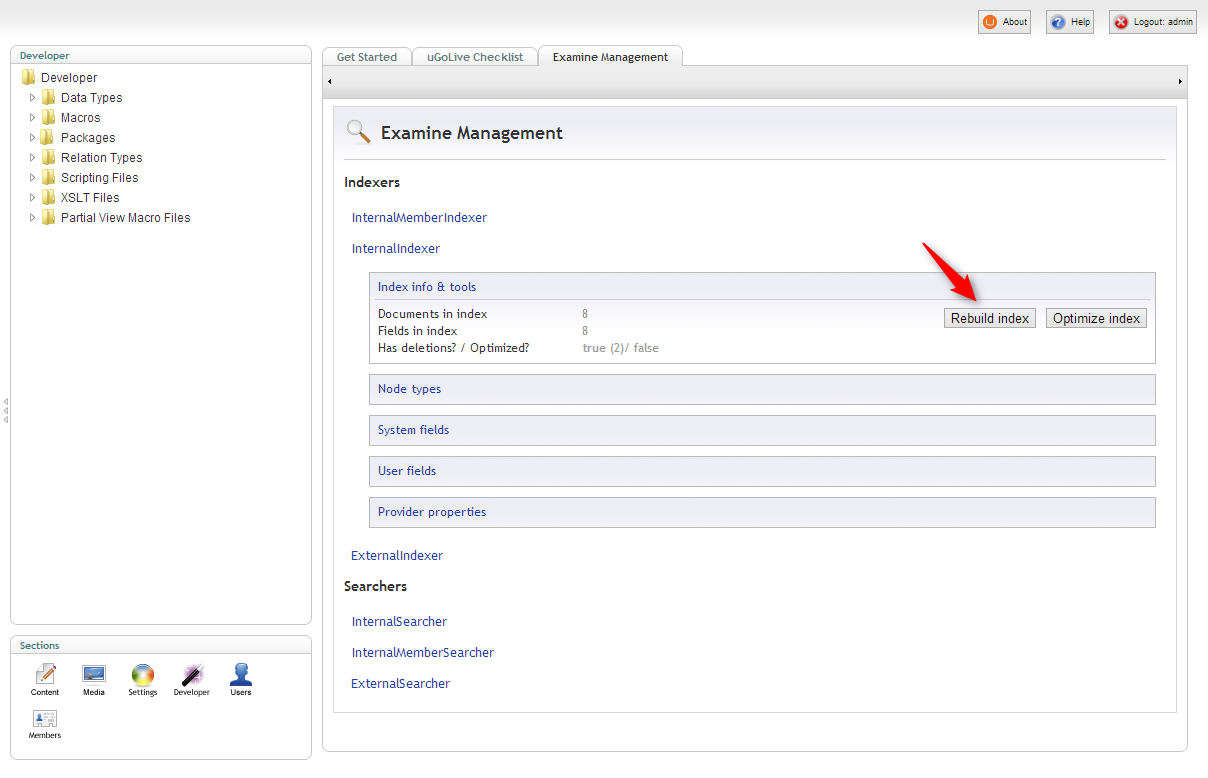
Whenever we change the way Examine should index nodes it's necessary to either re-save all the nodes to have them re-indexed or simply rebuild the index. In newer Umbraco versions there is a built-in dashboard to do this. For older versions a few packages exist to help you out (as far as I remember).
The dashboard for rebuilding the indexes is located in the developer section.
With a fresh index I can now refine my search to only include pages that the current Umbraco user has access to.
var me = User.GetCurrent();

var query = searcher
    .CreateSearchCriteria()
    .GroupedOr(new[] { "nodeTypeAlias" }, pageContentTypes.Select(x => x.Alias).ToArray())
    .And()
    .GroupedOr(new[] { "__PathParts" }, me.StartNodeId.ToString());
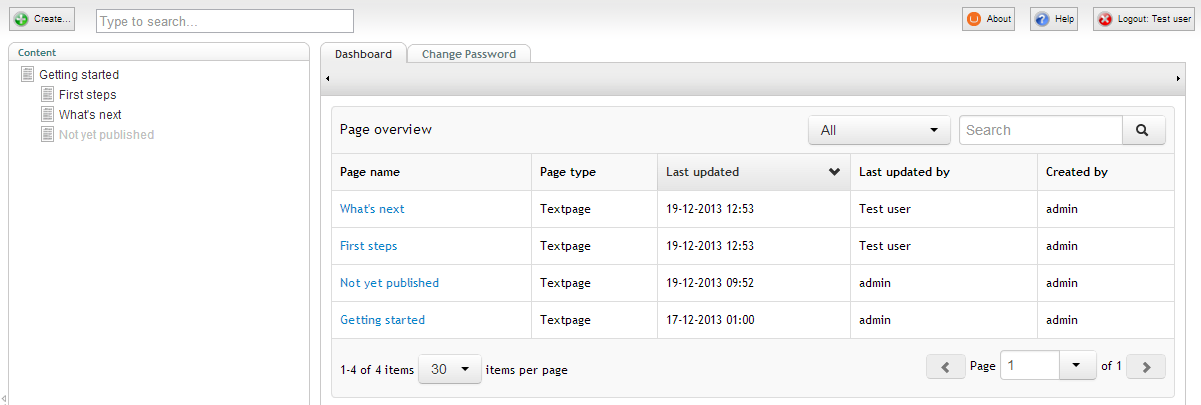
When we take a look at the dashboard now, the pages are indeed filtered as we would expect.
Next up I would like to add some data showing if the pages are published or not. Again, the only problem is, that I can't do that out of the box. I simply lack data about the state of a page since Examine does not index that information per default. This is because Examine makes the (fair) assumption that the published state of a node is determined by the index type (internal or external) that is used to search in.
Fortunately, it's easy to add the missing data to the index. The flexibility of Umbraco still continues to amaze me.
The logic I'm using is pretty trivial. If a node has a published version then it is considered published. This time I'm storing the values as I want to be able to retrieve them from the index. I've also chosen not to analyze it. That's because when no analyzer is used the value will be indexed as a single term which is useful if I need to do a search on this field at some point.
var hasPublishedVersion = contentService.HasPublishedVersion(args.NodeId);
var hasPublishedVersionField = new Field(
    "__HasPublishedVersion",
    hasPublishedVersion ? "1" : "0",
    Field.Store.YES,
    Field.Index.NOT_ANALYZED_NO_NORMS,
    Field.TermVector.NO
);

args.Document.Add(hasPublishedVersionField);
Next, I have to rebuild the index again. And then all I have to do is add a Published property to the objects in the Payload data and add a column in the datagrids data source.
/* View.ascx.cs */
return new
{
    ...
    CreatorName = fields["creatorName"],
    Published = fields["__HasPublishedVersion"] == "1"
};

/* View.ascx */
columns: [
    { .... },
    {
        property: "Published",
        label: "Published",
        sortable: true
    }
]
If we take a look at the dashboard now we have a column that shows if pages are published or not.
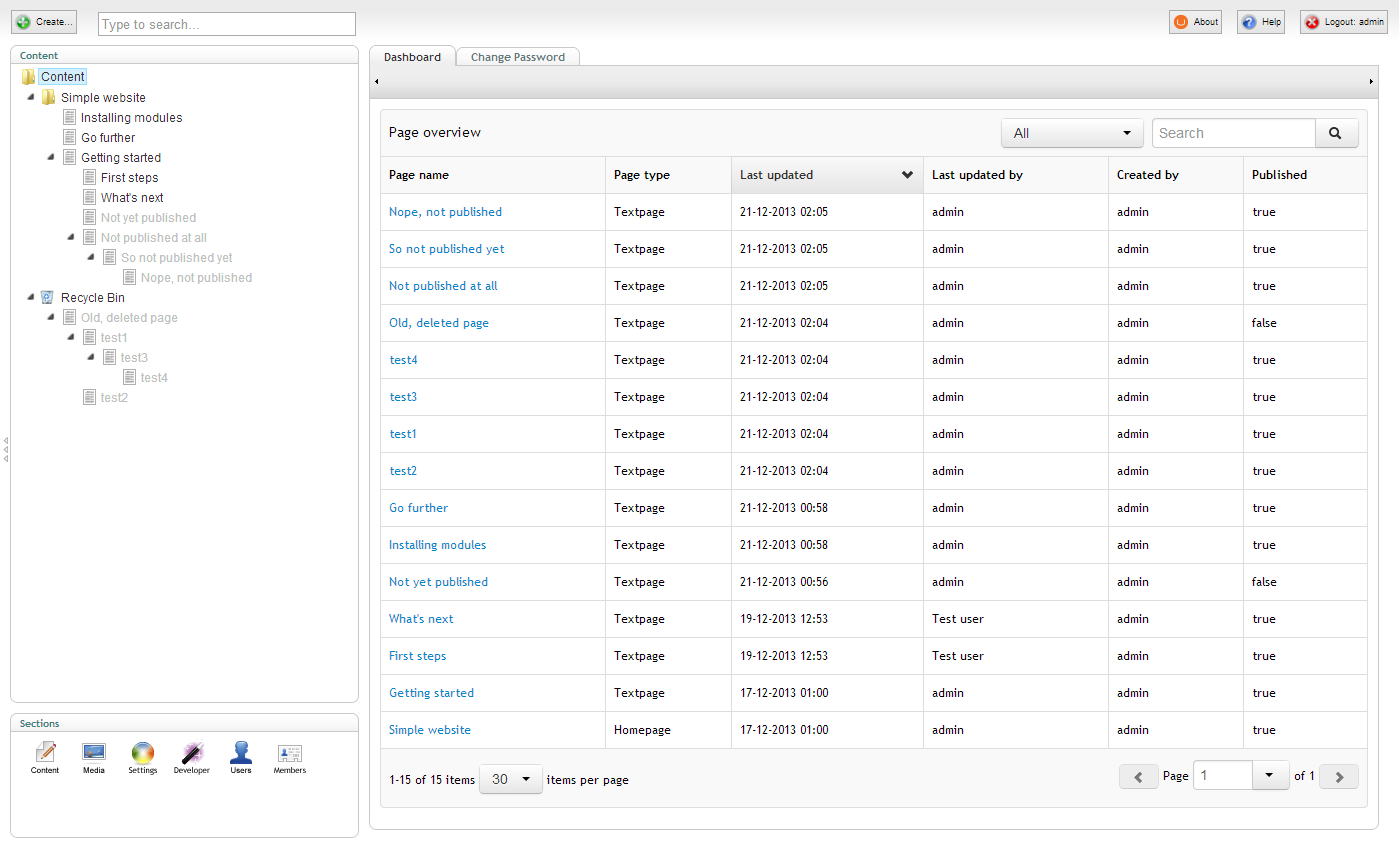
Examine, we have a problem
But wait, what is that? If you look closely, there clearly are some issues with the data shown. I put in some extra test data and triggered a few scenarios that will cause our current setup to show data about the pages published state that is out of sync with the database. What gives?
Remember that we are using an internal index. An internal index in Examine terms means that it's configured to support unpublished content. Examine has different logic for updating internal indexes than it does for external indexes, that is, indexes that doesn't support unpublished content. Let's investigate.
Whenever a single node is published, Umbraco will trigger the following events in order:
- Saved
- Published
- AfterUpdateDocumentCache
The first two should be self-explanatory and the AfterUpdateDocumentCache is triggered once per node when the xml cache is updated with that node.
However, if a node is published along with its descendants then the Saved event won't be triggered since only the published state will be changed. This means that only the Published and AfterUpdateDocumentCache events will be triggered. Examine will update nodes in the internal index whenever the Saved event is triggered. For the external index it will update nodes on the AfterUpdateDocumentCache event.
So, if we publish multiple nodes then the internal index simply won't be updated because the Saved event isn't triggered. This means that the internal index won't know about the pages being published and I end up with an index that is out of sync.
Let's look at another problem. Whenever a node is unpublished, Umbraco will trigger the following events in order:
- Unpublished
- AfterClearDocumentCache
Examine will update nodes in the external index whenever the AfterClearDocumentCache event is triggered. But that's it! By default the internal index won't be updated when a node is unpublished, so again I end up with an index that is out of sync.
The last issue has to do with the Trashed event, which is triggered every time a node is trashed. Examine has a hook on this event, however, the event is only triggered for the selected node, not it's descendants. Yet another thing that will cause the internal index to go out of sync.
A sidenode on events
There are several more events available in Umbraco than included here, but these here are the only ones relevant for this demo. So, for brevity, I left out the rest.
Back on track
To make sure my internal index is kept in sync, I have to manually tell Examine when to update it. Luckily it's pretty easy to do. For this demo I've wired it all up in the Global.asax file, just like the custom indexing stuff.
Examine needs an XElement to reindex a node. Fortunately it's easy to convert our IContent items via an extension method.
ContentService.UnPublished += (sender, args) =>
{
    foreach (var publishedEntity in args.PublishedEntities)
    {
        draftIndexer.ReIndexNode(publishedEntity.ToXml(), "content");
    }
};

ContentService.Trashed += (sender, args) =>
{
    /* The Trashed event is only triggered for the selected node.
       Get all descendants and re-index them as well. */
    var descendants = sender.GetDescendants(args.Entity);
    foreach (var descendant in descendants)
    {
        draftIndexer.ReIndexNode(descendant.ToXml(), "content");
    }
};

content.AfterUpdateDocumentCache += (sender, args) =>
{
    /* The AfterUpdateDocumentCache is part of the old api, so we are given a Document.
       Get the IContent equivalent instead. */
    var contentItem = ApplicationContext.Current.Services.ContentService.GetById(sender.Id);
    draftIndexer.ReIndexNode(contentItem.ToXml(), "content");
};
With these hooks in place I now have a consistent way of keeping the internal index in sync. Now I just need to rebuild the index as shown earlier and I'm good to go.
There is one last issue that I need to deal with though. While it might not be obvious from the screenshots, Examine will always keep trashed nodes in the internal index. But I don't want the dashboard to include pages in the recycle bin. To avoid that, I can modify the search query to exclude all pages that has an ancestor with the id of -20. This id is a universal constant for the content recycle bin and can be safely hardcoded in.
var query = searcher
    .CreateSearchCriteria()
    .GroupedOr(new[] {"nodeTypeAlias"}, pageContentTypes.Select(x => x.Alias).ToArray())
    .And()
    .GroupedOr(new[] {"__PathParts"}, me.StartNodeId.ToString())
    .Not()
    .GroupedOr(new[] {"__PathParts"}, "-20");
With the modification to the search query, I no longer have pages in the recycle bin popping up in the dashboard, nice!
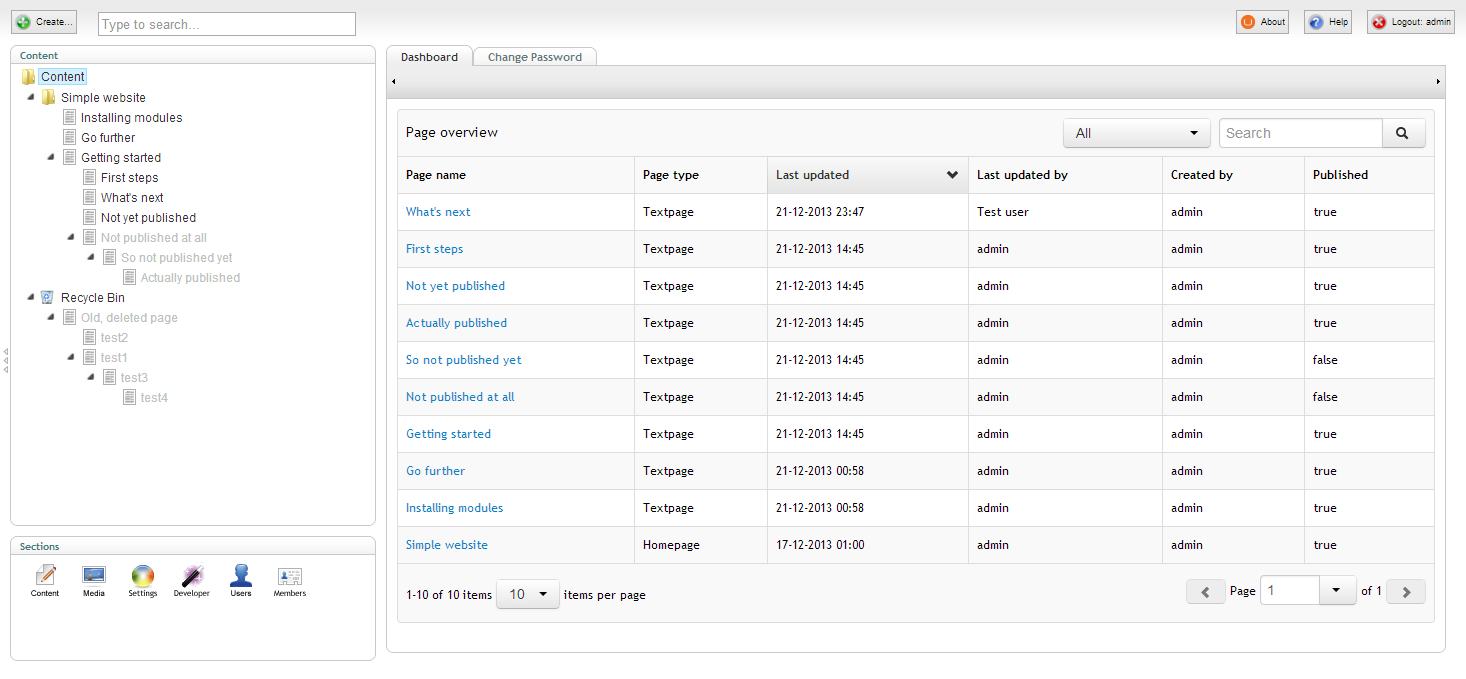
One last thing
There is one last piece of funtionality, that I want to add to the dashboard. Noticed the dropdown just left of the search field? At the moment it's a useless filter with some dummy options. I want to setup a new filter that actually does something.
On several of the dashboards I have built for clients I have introduced the concept of page owners. The rules are simple. If the current Umbraco user created or edited a given page at some point in time, then that user is considered one of the owners of that page. There is a reasonable chance that the user only cares about the pages that the user owns, so it would be useful to get a filtered view of those pages only.
Out of the box Examine will only index the last editor of a given page. Therefore, I need to add data about all the users who have edited the page at any point in time. To get the data I need, I have to get all known versions of the page in question and collect a distinct list of the editor ids.
var writerIds = contentService
    .GetVersions(args.NodeId)
    .Select(x => x.WriterId)
    .Distinct();

var writerIdsField = new Field(
    "__AllWriterIds",
    string.Join(" ", writerIds),
    Field.Store.YES,
    Field.Index.ANALYZED_NO_NORMS,
    Field.TermVector.NO
);

args.Document.Add(writerIdsField);
I need to rebuild the index again now, and then I can add a new boolean property (MyPage) to the objects in the payload on the server. This boolean determines if the page is owned by the current Umbraco user or not.
Payload = JsonConvert.SerializeObject(results.Select(x =>
{
    var fields = x.Fields;

    var creatorId = int.Parse(fields["creatorID"]);
    var writerIds = fields["__AllWriterIds"].Split(' ').Select(int.Parse);
    ...

    return new
    {
        MyPage = me.Id == creatorId || writerIds.Contains(me.Id),
        PageId = x.Id,
        ...
    };
}));
In the datagrids data source I can now modify the existing boilerplate filter to filter on the MyPage property instead.
if (options.filter) {
    data = _.filter(data, function (item) {
        var match;
        switch (options.filter.value) {
            case "all":
                match = true;
                break;
            default:
                match = item.MyPage === true;
                break;
        }
        return match;
    });
}
I also need to change the html appropriately. I'm just showing a small snippet of the html here, check out the Github repository for the complete code.
<div class="select filter" data-resize="">
    <button type="button" data-toggle="dropdown" class="btn dropdown-toggle">
        <span class="dropdown-label"></span>
        <span class="caret"></span>
    </button>
    <ul class="dropdown-menu">
        <li data-value="mypages" data-selected="true"><a href="#">My pages only</a></li>
        <li data-value="all"><a href="#">All pages</a></li>
    </ul>
</div>
You can just shift the two li elements if you want to show all pages by default.
With the new filter in place, the editors can easily switch between their own pages and all pages, while still only seeing pages that they have access to, awesome!
Hopefully you will find this dashboard useful, and hopefully you can see a potential for extending it with more data valuable to your clients.
I'll be happy to answer any questions you might have regarding all this, and in case you missed it, here is the link to the Github repository again.
Merry Christmas everybody :)