6 Easy Configuration Tweaks
Heads Up!
This article is several years old now, and much has happened since then, so please keep that in mind while reading it.
1. Maximum upload size
By default the maximum file size you can upload to Umbraco is 4Mb, which is easily exceeded by a PDF or Word document. To update the maximum size of files that can be uploaded to your Umbraco installation requires you to edit two different sections of Web.Config.
Within the System.Web section of Web.Config locate the httpRuntime element and add the maxRequestLength attribute. The value of the maxRequestLength attribute is in kilobytes (example is 150Mb)
<httpRuntime requestValidationMode="2.0" enableVersionHeader="false" maxRequestLength="153600" />Then within the system.webServer section of Web.Config check to see if you already have a security element, if you do, add only the inner elements from the snippet below, if you don't already have one add the entire snippet. The value of maxAllowedContentLength is in bytes (example is 150Mb)
<!-- Max file size limitation -->
<security>
  <requestFiltering>
	<requestLimits maxAllowedContentLength="157286400" />
  </requestFiltering>
</security>
2. Maximum JSON serialization length
This one doesn't apply to Umbraco v7
One day you may find that Multi-node tree picker has suddenly stopped showing any content within the tree, this is possibly caused by your website having grown to the point that the maximum JSON length for the ASP.NET AJAX toolkit has been exceeded. This more commonly affects Embedded Content and other third party property editors that use the ASP.NET AJAX toolkit that store significant amounts of data in JSON strings.
Locate the system.web.extensions element, then add the webServices element and the jsonSerialization element within it as shown below. The value of maxJsonLength is the maximum number of characters, the default is 2097152.
<!-- ASPNETAJAX -->
<system.web.extensions>
<scripting>
  <scriptResourceHandler enableCompression="true" enableCaching="true" />
  <webServices>
	<jsonSerialization maxJsonLength="5000000" />
  </webServices>
</scripting>
</system.web.extensions>
3. SVG and other common mime types
By default IIS does not understand what a .svg file is and will not serve any files that have been added by a designer or front end developer, they may spend many hours trying to work out what they have done wrong. Of course you can also add mime types to IIS that will apply to all websites but this isn't possible with all hosting environments so you can easily add the mime types within Web.config.
Locate the staticContent element within the system.webServer section, you should find the .air mime type already there, now you can add the SVG mime type and other commonly added file types such as ttf.
<staticContent>
  <remove fileExtension=".air" />
  <mimeMap fileExtension=".air" mimeType="application/vnd.adobe.air-application-installer-package+zip" />
  <remove fileExtension=".svg" />
  <mimeMap fileExtension=".svg" mimeType="image/svg+xml" />
  <remove fileExtension=".ttf" />
  <mimeMap fileExtension=".ttf" mimeType="font/ttf" />
</staticContent>
4. Static content client caching
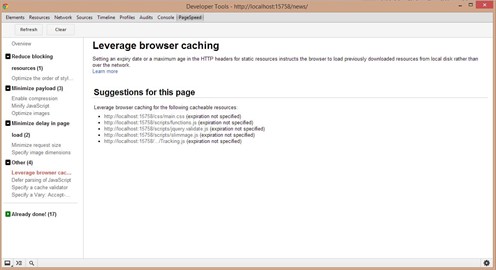
When testing your site using Google's PageSpeed to Yahoo's YSlow you may find that you are being told to "Leverage browser caching" and that your images and other static content are being flagged.

A cache header is sent to the browser by IIS telling it how long it should keep the asset in its cache before requesting it again; this is easily configured in Web.Config and set to the recommended 7 day minimum.
Locate the staticContent element within system.webServer section and add the below clientCache element (generally below the above Mime types).
<clientCache cacheControlMode="UseMaxAge" cacheControlMaxAge="7.00:00:00" />
5. Static and Dynamic Url Compression
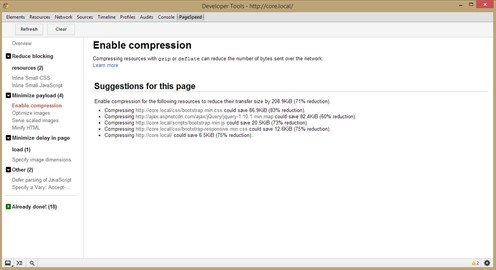
As with the client caching above you may find that your are being told to "Enable compression" by site optimisation tools.

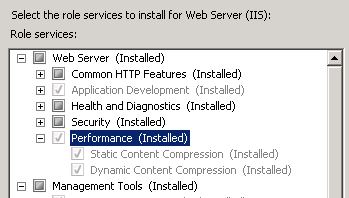
When enabled, resources sent to the browser are compressed on the server and then decompressed within the browser therefore minimising the transfer payload between server and browser. In order to use the compression built into IIS, you need to install the Static and Dynamic compression modules. The static module will compress static assets such as images and stylesheets, while the dynamic module will compress the html that is rendered by Umbraco. The dynamic module utilises CPU to perform the compression so you should make sure you have ample server power available on very busy websites.
The modules are installed using the "Turn Windows features on or off" option within control panel or by using the server role manager as shown below:
Once the modules are installed, add the urlCompression element as shown below within the system.webServer section of Web.config
<urlCompression doStaticCompression="true" doDynamicCompression="true" />
Now all requests from the server will be sent to the browser using compression.
6. Url character replacement
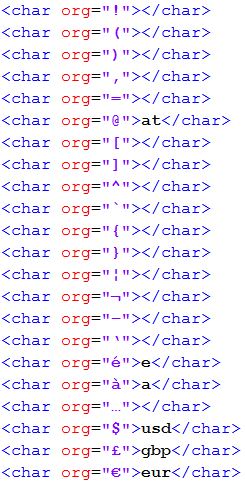
Google's spider doesn't like them and they certainly don't look nice, having a URL with unusual characters in it just isn't a good idea. Umbraco v6 (and v4) come with a decent default list however there are plenty that need adding.
Umbraco v6.2 and v7 have a new built-in character replacement system, so Umbraco will now remove unusual characters automatically, however you can override certain characters by adding the urlReplacing section to your umbracoSettings.config as existed in earlier versions. An example of when this might be useful are currency symbols below, by default Umbraco v6.2+ would remove the symbol entirely, for example, a node name of "Share price reaches £400" would become /share-price-reaches-400/ by adding the pound replacement it would become /share-price-reaches-gbp400/
Click here for a txt file of the above
For a talk through of all of these tweaks, more agency best practice and a demo of the hybrid MVC Framework you can watch Jeroen Breuer and myself at the 2013 UK Umbraco Festival here.

